Sewing Machine Stitches: Best Stitches to Use
In this guide, we’ll delve into the essential sewing machine stitches you absolutely must know, along with a plethora of additional stitches that will enhance your sewing repertoire.
Embarking on your sewing journey opens up a world of creativity, but as a beginner, you might be pondering a crucial question: “What are the basic sewing machine stitches should I master to kickstart my sewing projects?” Fear not, for I’ve got the answers.
Let’s unravel the art of stitching and discover the best sewing machine stitches to elevate your craft.
Sewing Machine Stitches Tutorial
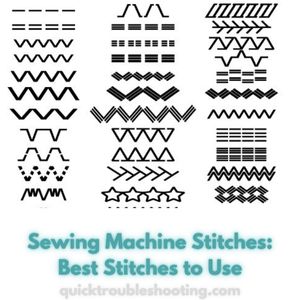
When delving into the realm of sewing machines, it’s crucial to understand that the abundance of stitches offered by different brands and models might seem overwhelming at first.
The common inclination, especially for those new to sewing, is to gravitate toward machines boasting an extensive array of sewing machine stitches. However, the reality is that you won’t necessarily need or utilize the majority of these stitches in your sewing endeavors.
The 5 most common types of sewing machine stitches
Let’s break down the essential stitches that are not only fundamental but also cover the spectrum of sewing projects:
- Straight Stitch: The simplest and most basic of stitches, ideal for fundamental seams and stitching.
- Zig-zag Stitch: Versatile in its application, the zig-zag stitch is excellent for preventing fabric fraying and works well for decorative purposes.
- Overcast Stitch (Overlock Stitch): Particularly valuable if you don’t own a serger or overlocker, the overcast stitch serves to finish raw edges, contributing to the longevity and durability of your creations.
- Blind Hem Stitch: Perfect for creating inconspicuous hems, this stitch adds a professional touch to your garments.
- Decorative Stitches: While modern machines often come equipped with a dazzling array of decorative stitches, it’s essential to note that these are more of a bonus than a necessity. They can be sparingly used for embellishments and creative accents.
- Buttonhole Stitches: An indispensable stitch for attaching buttons securely, ensuring functionality and aesthetic appeal.
Despite the tempting variety, the reality is that a significant portion of your sewing projects can be accomplished with just two stitches: the straight stitch and the zig-zag stitch. In fact, a staggering 99% of sewing tasks can be tackled using these fundamental stitches.
The remaining stitches, including the decorative ones, are indeed advantageous but can be considered optional, as there are alternative methods for achieving similar results.
It's worth highlighting that if you lack a serger or overlocker, the overcast stitch becomes particularly valuable for fortifying fabric edges. As for the multitude of decorative stitches found on modern machines, while they may spark creativity, they are often used sparingly in practical sewing applications.
Mastering the art of sewing machine stitches involves understanding the purpose and versatility of each type.
By focusing on the essentials, namely the straight and zig-zag stitches, and selectively incorporating others based on specific project requirements, you’ll not only streamline your sewing process but also enhance the quality and durability of your creations.
How To Change Sewing Machine Stitches
Here’s a detailed guide on how to change sewing machine stitches based on the type of machine:
Changing Sewing Machine Stitches on Mechanical Machines:
- Locate the Pattern Selector Dial: Mechanical sewing machines typically feature a pattern selector dial, which can be found either at the front or on the side of the machine. This dial is crucial for choosing the desired stitching pattern.
- Turn Off the Machine: Before making any adjustments, it’s a good practice to turn off the sewing machine. This ensures safety during the stitch-changing process.
- Understand the Symbols: Examine the pattern selector dial for the various stitches available. Each stitch is usually represented by a symbol or number. Familiarize yourself with the symbols to easily identify and select the desired stitch.
- Select the Desired Stitch: Rotate the pattern selector dial to align it with the symbol or number corresponding to the stitch you want to use. Ensure that the dial clicks into place, indicating that the selection is secure.
- Adjust Stitch Length and Width (Optional): Some mechanical machines allow you to further customize your stitch by adjusting the length and width. Refer to your machine’s manual for guidance on how to make these adjustments if needed.
- Turn On the Machine: Once you’ve chosen the stitch, turn on the sewing machine. It’s now ready for you to start stitching with the selected pattern.
Changing Sewing Machine Stitches on Computerized Machines:
- Locate the Digital Panel: Computerized sewing machines are equipped with a digital panel, usually located at the front of the machine. This panel displays a menu of available stitches.
- Power On the Machine: Ensure the sewing machine is powered on. The digital panel should illuminate, indicating that it’s ready for use.
- Navigate the Stitch Menu: Using the navigation buttons or touchscreen, access the stitch menu on the digital panel. The menu will display a range of stitch options.
- Select Your Desired Stitch: Scroll through the menu to find and select the stitch you want to use. Confirm your selection according to the instructions provided in your machine’s manual.
- Adjust Settings (If Applicable): Some computerized machines allow you to customize stitch settings, such as length, width, and tension. Refer to the manual for instructions on adjusting these parameters if necessary.
- Ready to Sew: Once you’ve chosen and confirmed your stitch, your computerized sewing machine is ready for use. Begin sewing, and the machine will automatically execute the selected stitch pattern.
General Tips:
- Always consult your sewing machine manual for model-specific instructions.
- Take your time to understand the symbols or menu options on your machine to avoid confusion.
- Experiment with scrap fabric before starting your actual project to ensure the selected stitch meets your requirements.
By following these steps, you can confidently change sewing machine stitches, whether you have a mechanical or computerized sewing machine.
Types of Sewing Machine Stitches Guide
Stitch №1 – Straight Sewing Machine Stitches Guide
The straight stitch holds the esteemed position of being the foremost and most utilized stitch on your sewing machine. Whether you’re a beginner or an experienced seamstress, mastering the straight stitch is fundamental for a wide range of sewing projects.
Overview:
- Prevalence: The straight stitch is a staple on all sewing machines, making it universally accessible for both entry-level and advanced users.
- Machine Variances: Cheaper machines often feature pre-set stitch lengths, while more advanced and pricier models offer the luxury of adjustable stitch lengths.
- Versatility: If you find yourself with an older machine that solely performs a straight stitch, don’t be disheartened—this stitch is more than sufficient for tackling the majority of sewing projects. Remarkably, you can even employ it to finish raw edges with finesse.
Straight Stitch Guide:
Stitch Lengths:
- 2.0-3.0: Ideal for sewing seams and constituting the primary length for most sewing tasks.
- 4.0: Specifically employed for gathering fabric and machine basting. Gathering is particularly useful for creating ruffles, while longer basting stitches serve the purpose of temporarily holding fabric pieces together before final stitching. The extended length ensures easy removal if necessary.
Needle Position:
When executing a straight stitch, pay close attention to your needle position—it should be set to the center of the presser foot. This alignment guarantees a straight and even seam.
Triple Straight Stitch:
Some sewing machines boast a triple straight stitch, characterized by two forward steps followed by one backward step. This variant of the straight stitch is known for its exceptional strength, making it ideal for reinforcing critical areas like the crotches in pants.
Additional Tips:
- Always refer to your sewing machine’s manual for model-specific instructions on selecting and adjusting the straight stitch.
- Practice on scrap fabric before starting your actual project to ensure that the stitch length and tension are suitable for the material you’re working with.
- For intricate projects or areas requiring added strength, consider utilizing the triple straight stitch for reinforced durability.
Mastering the straight stitch opens the door to a myriad of sewing possibilities. Whether you’re constructing garments, creating intricate details, or simply securing seams, the straight stitch is your go-to foundation for achieving precision and reliability in your sewing endeavors.
Stitch №2 – Zig-Zag Sewing Machine Stitches Guide
The zig-zag stitch stands as a versatile and indispensable member of the sewing machine stitch repertoire. Its applications range from preventing raw edges from fraying to facilitating the seamless sewing of knits. Let’s delve into the intricacies of the zig-zag stitch and its various applications:
Key Uses:
Raw Edge Prevention:
- Purpose: Zig-zag stitches are commonly employed to halt the fraying of raw edges, adding durability to your creations.
Knit Fabric Sewing:
- Purpose: Ideal for sewing knits without a serger, the zig-zag stitch provides built-in elasticity, ensuring stitches withstand pulling without breaking.
- Settings for Knit Seams: Use a narrow zig-zag with a width of 1.0 and a length of 2.5 for a nearly straight appearance, offering strength to knit seams.
Hemming Knits:
- Purpose: Zig-zag stitches can be used for hemming knits, providing flexibility to the fabric.
- Settings for Knit Hems: Employ a wider zig-zag with a width of 4.0 and a length of 3.0 for hemming knits effectively.
Seam Finishing:
- Purpose: Zig-zag stitches over raw edges serve as a seam finish, preventing fraying and enhancing item longevity.
- Settings for Seam Finish: Use a wide zig-zag with a width of 4.0 and a length of 3.0 right at the edge of the fabric.
Applique:
- Purpose: Zig-zag stitches are excellent for applique, allowing for fun motifs and decorative elements.
- Settings for Applique: Opt for a very close zig-zag with a length of 0.5 and a width of 4.0.
Gathering:
- Purpose: Zig-zag stitches can be utilized for gathering fabrics, especially tricky materials like tulle and canvas.
- Method: Zig-zag over a slippery cord, such as dental floss or crochet yarn, and then pull the cord to produce gathers.
Elastic Sewing:
- Purpose: Zig-zag stitches are applicable for sewing elastic in leotards and for fold-over elastic in underwear.
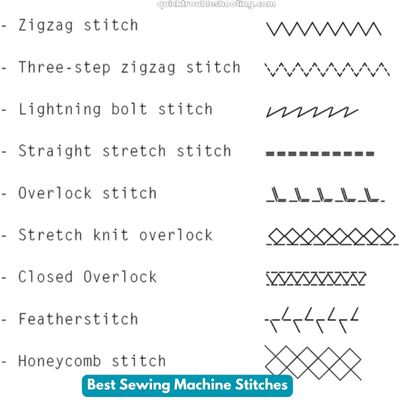
3-Step Zig-Zag (Optional):
- Purpose: Some machines feature a 3-step zig-zag stitch, particularly useful for sewing picot (lingerie) elastic and raw edges.
- Note: While not extensively used, the 3-step zig-zag may produce flatter edges on certain fabrics.
Tips:
- Experimentation: Adjusting the width and length of the zig-zag stitch may require some experimentation. Always test on scrap fabric before starting your actual project.
- Application Flexibility: The zig-zag stitch offers adaptability for a variety of fabrics and sewing tasks, making it a valuable asset in your stitching toolkit.
- 3-Step Zig-Zag Consideration: While the standard zig-zag is versatile, the 3-step zig-zag can offer specific benefits on certain fabrics, providing an alternative for achieving flat edges.
Mastering the zig-zag stitch empowers you to explore a myriad of creative possibilities in your sewing projects. Whether you’re reinforcing seams, adding decorative elements, or working with elastic, the zig-zag stitch proves itself as a reliable and adaptable ally in your sewing endeavors.
Stitch №3 – Overlock (Over-Edge) Stitch Guide
The Overlock or Over-Edge stitch is a valuable feature on most modern sewing machines, offering a convenient alternative to a serger for preventing fabric edges from fraying. Although it doesn’t trim the edges like a serger, this stitch provides a neat and finished look to seams. Let’s delve into the details of the Overlock stitch:
Key Features:
- Purpose:
Edge Fraying Prevention: Similar to a serger, the Overlock stitch is primarily employed to prevent fabric edges from fraying, contributing to the durability and longevity of your sewn items.
- Machine Compatibility:
Common on Modern Machines: Most modern sewing machines are equipped with the Overlock or Over-Edge stitch, enhancing the versatility of these machines.
- Raw Edge Handling:
Difference from Serger: Unlike a serger, the Overlock stitch doesn’t trim off the raw edges as you sew. It secures the edges in place, offering a finished appearance without removing excess fabric.
Execution:
- Specialty Foot:
Machine Foot: To execute the Overlock stitch, most machines come with a specialty sewing machine foot designed specifically for this purpose.
- Neat Edges Technique:
Preparation is Key: For achieving tidy and polished edges, trim the fabric immediately before executing the Overlock stitch. If the fabric has a ragged edge, the result may not meet your desired aesthetic.
- Comparison with Zig-Zag:
Consideration: While the Overlock stitch is effective, some may find a simple zig-zag stitch quicker. It's recommended to test both methods and determine which suits your preference for seam finishing.
Additional Insight:
- Regular Sewing vs. Serging:
- Serging Necessity: If you plan to sew regularly or intend to generate income from sewing, investing in a serger (also known as an overlocker in some countries) is advisable. A serger provides additional features and efficiency compared to the Overlock stitch on a regular sewing machine.
Tips:
- Consistent Seam Finishing: The Overlock stitch is particularly beneficial for achieving consistent and professional-looking seam finishes, especially when working with fabrics prone to fraying.
- Practice on Scrap Fabric: Before incorporating the Overlock stitch into your actual project, practice on scrap fabric to ensure you are comfortable with the technique and to refine your skills.
- Consider Your Sewing Goals: Assess your sewing goals and frequency. If you find yourself frequently dealing with fabrics that fray easily, a serger may be a worthwhile investment for long-term efficiency.
The Overlock or Over-Edge stitch on your sewing machine is a versatile tool for enhancing the durability and aesthetics of your creations. While it may not replace the capabilities of a serger, it provides a practical solution for seam finishing and edge protection, particularly when a serger is not readily available.
Stitch №4 – Blind Hem Stitch Guide
The Blind Hem stitch is a discreet and invaluable feature on sewing machines, specifically designed for creating nearly invisible hems on various garments such as dresses, skirts, and pants. This stitch, resembling an uneven zig-zag, is accessible on most basic machines and is particularly effective for wider straight-edged hems.
Key Features:
- Invisibility of Stitches:
Primary Purpose: The Blind Hem stitch is meticulously crafted to render stitches nearly invisible on the right side of the garment once the hemming process is complete.
- Zig-Zag Appearance:
Visual Characteristics: This unique stitch exhibits an appearance akin to an uneven zig-zag, contributing to its ability to conceal stitches effectively.
- Versatility on Basic Machines:
Accessible on Basic Machines: Even basic sewing machines often come equipped with the Blind Hem stitch, making it widely accessible for sewists of varying skill levels.
Execution:
- Preparation:
Hem Type: The Blind Hem stitch is best suited for wider, straight-edged hems. It excels in creating professional-looking finishes on garments with substantial hem widths.
- Machine Settings:
Machine Adjustment: Consult your sewing machine manual for specific instructions on selecting the Blind Hem stitch. Generally, machines will have a designated setting for this purpose.
- Fold and Pin:
Hem Preparation: Before stitching, fold the fabric to create the hem. Secure it in place with pins, ensuring a stable foundation for the Blind Hem stitch.
- Stitching:
Execution Technique: As you sew, the machine will create a series of small, almost invisible stitches on the right side of the fabric, securing the hem in place.
- Testing:
Evaluation: After completing the Blind Hem stitch, examine the right side of the garment to ensure the stitches are inconspicuous and the hem is securely fastened.
Tips:
- Practice on Scrap Fabric: Before applying the Blind Hem stitch to your actual garment, practice on scrap fabric to familiarize yourself with the stitch and perfect your technique.
- Choose Appropriate Projects: The Blind Hem stitch is most effective on projects with wider, straight-edged hems. Consider the type of garment and hem width when deciding to use this stitch.
- Adjust Stitch Width and Length: Depending on your fabric and the desired finish, experiment with adjusting the stitch width and length to achieve optimal results.
The Blind Hem stitch is a valuable tool in a sewist’s arsenal, offering a seamless and professional solution for creating invisible hems. Its simplicity and effectiveness make it a go-to option for a wide range of garments, providing a polished finish without compromising the aesthetic integrity of the right side of the fabric.
Whether you’re a beginner or an experienced seamstress, incorporating the Blind Hem stitch into your repertoire enhances your ability to achieve impeccable and concealed hemming results.
Stitch №5 – Decorative Sewing Machine Stitches Guide
Decorative sewing machine stitches offer a creative touch to your projects, allowing you to infuse a distinctive and personalized aesthetic into your creations. While the availability of decorative stitches varies among machines, exploring and experimenting with these stitches can add a unique flair to your sewing endeavors.
Key Features:
- Machine-Specific Stitches:
Diversity Among Machines: Different sewing machines come equipped with varying sets of decorative stitches. It’s advisable to familiarize yourself with the options available on your specific machine.
- Limited Usage Frequency:
Usage Consideration: Decorative stitches are not frequently utilized by many sewists. Their application is often reserved for smaller items like home decor and baby clothing, where the intricate details can be appreciated up close.
Execution:
- Thread Selection:
Contrasting Thread: To maximize the decorative effect, use a contrasting thread that complements or contrasts with the fabric. This adds visual interest and highlights the intricacies of the stitches.
- Mix and Match Patterns:
Creative Freedom: Experiment with mixing and matching patterns on the same project. This allows you to create unique and eye-catching designs by combining different decorative stitches.
- Project Suitability:
Best on Smaller Items: Decorative stitches are best suited for smaller items where the intricacies of the stitches can be appreciated up close. Consider incorporating them into projects like baby clothing or home decor.
Testing and Exploration:
- Grab a Scrap Fabric:
Trial and Error: Take a piece of scrap fabric and test various decorative stitches on your machine. This hands-on approach allows you to observe how each stitch looks and explore their potential applications.
- Discover Your Machine’s Stitches:
Machine-Specific Stitches: Familiarize yourself with the decorative stitches available on your machine. Explore and identify the stitches that resonate with your creative vision.
Popular Decorative Stitches:
- Scallops:
- Application: Multiple rows of scallops in different colors create a visually appealing effect.
- Floral Patterns:
- Application: Floral stitches can add a delicate and nature-inspired touch to your projects.
- Geometric Designs:
- Application: Geometric patterns offer a modern and structured aesthetic, suitable for contemporary projects.
- Borders and Frames:
- Application: Borders and frames can be utilized to accentuate and outline specific sections of your project.
Tips:
- Experiment with Colors: Play with a variety of thread colors to enhance the decorative effect and create a vibrant and dynamic appearance.
- Consider Project Theme: Align your choice of decorative stitches with the overall theme and style of your project for a cohesive and harmonious outcome.
- Combine with Basic Stitches: Integrating decorative stitches with basic stitches can yield unique and visually captivating results.
- Practice Patience: Precision is key when working with decorative stitches. Take your time, and practice on scrap fabric until you feel confident in your ability to execute the stitches accurately.
Decorative sewing machine stitches provide an avenue for artistic expression in your sewing projects. While not frequently used, they offer a unique opportunity to infuse creativity and personality into your creations.
Experimenting with these stitches, combining colors, and testing various patterns on scrap fabric can unlock a world of possibilities, allowing you to elevate the visual appeal of your projects with a touch of flair.
Stitch №6 – Buttonhole Sewing Machine Stitches Guide
Buttonhole sewing machine stitches are an essential feature found on even the most basic machines, providing a convenient and efficient method for creating buttonholes in a variety of shapes and sizes.
Whether your machine has a simple one-step automatic buttonhole or a more advanced model with multiple buttonhole shapes, mastering this stitch is crucial for garment construction and other sewing projects.
Key Features:
- Universal Availability:
Basic Machines Inclusive: Even the most basic sewing machines nowadays are equipped with a buttonhole stitch, ensuring that sewists of all levels have access to this fundamental feature.
- Variety of Shapes:
Advanced Models: Fancier sewing machine models often offer multiple buttonhole shapes, allowing for customization based on the type and style of buttons used in the project.
- Automatic and Manual Options:
Automation Levels: Buttonhole stitches can be fully automatic, completing all sides of the buttonhole with a single press of a button. Alternatively, some machines have manual steps, requiring users to change the stitch setting for different sides of the buttonhole.
Execution:
- Selecting the Buttonhole Stitch:
Machine-Specific Instructions: Refer to your sewing machine manual to understand how to select the buttonhole stitch. On most machines, it is a designated stitch setting.
- Automatic Buttonholes:
One-Step Process: For machines with automatic buttonhole stitches, the process typically involves securing the fabric, positioning the button in the buttonhole foot, and activating the automatic buttonhole feature. The machine will sew all sides of the buttonhole seamlessly.
- Manual Buttonholes:
Multi-Step Process: In machines with manual buttonhole options, the user may need to change the stitch setting for each side of the buttonhole. This involves stopping and repositioning the fabric as instructed by the machine.
- Alternative for Basic Machines:
Zig-Zag Method: In cases where a specialty buttonhole stitch is not available on very basic machines, you can sew buttonholes using a zig-zag stitch. This method involves carefully sewing along the length of the buttonhole, securing and reinforcing the edges.
Tips:
- Practice on Scrap Fabric: Before sewing buttonholes on your actual project, practice on scrap fabric to familiarize yourself with the specific buttonhole stitch settings on your machine and to ensure accurate placement.
- Buttonhole Placement: Consider the placement of your buttonholes based on the size and style of the buttons you intend to use. Ensure they align properly for functional and aesthetically pleasing results.
- Stabilize Fabric: To prevent distortion or stretching during the buttonhole sewing process, use stabilizers or interfacing on the fabric.
Buttonhole sewing machine stitches are a fundamental aspect of garment construction and sewing projects involving closures. Whether your machine offers automatic one-step buttonholes or requires manual adjustments, mastering this stitch is essential for achieving polished and functional buttonholes.
As you gain familiarity with the buttonhole feature on your machine, you’ll be able to confidently incorporate various buttonhole shapes and sizes into your projects, enhancing both form and function in your creations.
Sewing Machine Needles Guide for Various Stitches
Here’s a table outlining the types and brands of sewing machine needles that would be best suited for the mentioned seams:
| Stitch Type | Recommended Needle Type/Brand |
|---|---|
| Straight Stitch | Universal Needle (Schmetz, Singer, Organ) |
| Zig-zag Stitch | Ballpoint Needle for knits (Schmetz, Singer, Organ) |
| Overcast Stitch (Overlock) | Overlock Needle (Schmetz, Singer, Organ) |
| Blind Hem Stitch | Hemstitch or Universal Needle (Schmetz, Singer, Organ) |
| Decorative Stitches | Embroidery Needle (Schmetz, Singer, Organ) |
| Buttonhole Stitches | Buttonhole Needle (Schmetz, Singer, Organ) |
It's important to note that the mentioned needle brands (Schmetz, Singer, Organ) are popular and widely used, but there are other reputable needle brands available as well.

The needle size may vary depending on the fabric you are working with, so it's advisable to refer to your sewing machine manual or consult with a knowledgeable source for specific recommendations based on your project and fabric type.
Conclusion: Sewing Machine Stitches
In conclusion, mastering a variety of sewing machine stitches opens up a world of creative possibilities for sewists. From essential stitches like the straight and zig-zag to specialized ones like the blind hem, overlock, and buttonhole stitches, each serves a unique purpose in enhancing the quality and aesthetics of sewing projects.
While decorative stitches offer a chance for artistic expression, the practicality of stitches like the buttonhole stitch ensures functional and polished results. Whether you’re a beginner or an experienced seamstress, understanding and experimenting with these stitches empower you to elevate your sewing skills and produce professional-quality garments and projects.