Binder Foot: A Guide On The Quickest Way To Sew Binding
Discover the ultimate secret to streamline your binding process with the remarkable binder foot, a.k.a the binding foot. Seamstresses, if you’re a fan of sewing gadgets, the binder foot is about to become your new best friend. With its adjustable screws and a convenient slide rule for easy binding insertion, this tool excels at seamlessly joining binding and fabric in a single swift motion.
Whether you’re frequently working with bias tape or delving into quilting projects, the binder foot is a must-have addition to your sewing toolbox. Now, let’s unravel the ins and outs of using this invaluable accessory in our comprehensive guide on “How to Use a Binder Foot.”
What Is A Binder Foot: Binder Foot Tutorial
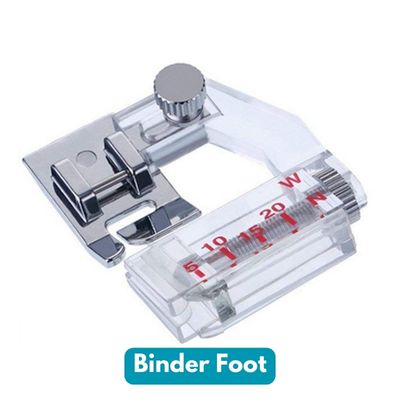
When you inspect a binder foot, you’ll notice its distinctive features—a snap-on bar that effortlessly attaches to your sewing machine and a plastic extension adorned with width markings. This versatile accessory goes by various names, including binding foot, bias tape binder, quilting binding foot, or bias tape foot, reflecting its broad utility in the realm of sewing.
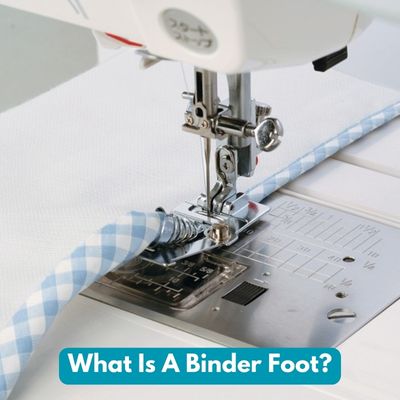
The primary function of the binder foot is to accommodate bias tape of different widths, presenting a convenient solution for sewing double-fold bias to the edges of your projects. The brilliance of this tool lies in its ability to capture the edges underneath seamlessly as you stitch, simplifying the process into a single, efficient motion.
For those seeking to delve deeper into the intricacies of bias tape and its variations, additional insights can be found in our resource on the "Types of Bias Tape."
It’s worth noting that the majority of binder feet on the market feature width markings in metric millimeters. The standard size for double-fold bias commonly encountered is ½ inch, equivalent to 12mm.
However, if you’re accustomed to working with imperial measurements, the following conversions will prove helpful:
| Metric (mm) | Imperial (inch) |
|---|---|
| 10 | ⅜ |
| 12 | ½ |
| 15 | ⅝ |
| 20 | ⅞ |
| 25 | 1 |
This table serves as a practical aid, ensuring a seamless transition between metric and imperial measurements as you explore the boundless possibilities of the binder foot in your sewing endeavors.
How To Adjust Wheels On The Binder Foot
When it comes to the binder foot, mastering the adjustment of its components is key to achieving impeccable sewing results. This guide will walk you through the process of tweaking the screws and wheels on your binder foot for optimal performance.
1. Needle Positioning Screw:
Located at the back of the binder foot, the needle positioning screw is a crucial element for precision sewing. By adjusting this screw, you can position the needle to the left or right, allowing you to sew precisely on the edge of the bias tape. This feature is particularly handy when you aim for clean and accurate stitching along the tape’s edge.
2. Front Wheels Adjustment:
On the plastic section of the binder foot, you’ll find wheels positioned at the front. These wheels play a pivotal role in accommodating the width of the bias tape. Adjusting them ensures that the binder foot seamlessly aligns with the chosen tape width, contributing to the overall smoothness of the sewing process.
Table of Binder Foot Adjustment Options:
| Adjustment | Location on Binder Foot | Purpose |
|---|---|---|
| Needle Positioning | Back of the foot | Positions needle left or right for edge sewing |
| Front Wheels | Front of plastic section | Adjusts to the width of the bias tape for precise alignment |
How To Use A Binder Foot Instructions
Embark on a journey to elevate your sewing expertise with the binder foot, as we delve into meticulous instructions for its effective utilization. The detailed steps below will guide you through the process, ensuring you achieve flawless results with confidence and precision.
1. Selecting Materials:
Commence your project with top-tier materials. Opt for high-quality bias tape crafted from 100% cotton fabric, ideally with a light to medium weight. Select a universal needle that corresponds to the thickness of your chosen bias tape.
For additional insights into needle sizes, consult our comprehensive resource on "Sewing Machine Needle Sizes."
2. Step-by-Step Instructions:
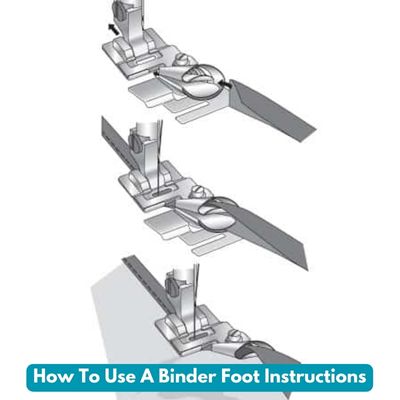
Step 1 – Inserting Bias Tape:
Before attaching the bias binder foot to your sewing machine, carefully insert the binding into the slot located in the plastic section. Identify the slot by holding the foot up at the front. Take note that double-sided bias tape often has one side shorter than the other, so ensure the shorter side is positioned on top.
Practice easing the binding onto the foot until you feel confident, using a pin to guide if necessary. The bias tape should extend at least ½ inch (12mm) at the back of the foot. Adjust the width using the screw on the adjustment, ensuring it sits snugly next to the edge of the bias tape.
Step 2 – Attaching Binder Foot to Machine:
Snap the bias tape foot with the binding inserted into the machine, ensuring that threads are clear and not entangled. Gently turn the handwheel to check the needle’s position, aligning it slightly from the edge. If needed, adjust the back screw on the foot, and take a few initial stitches on the binding to secure its position.
Step 3 – Inserting Fabric:
Insert the fabric between the bias edges and into the plastic slot. Smooth the fabric down the length of the bias, ensuring even distribution.
While straight stitches are the conventional choice for bias tape, this binder foot also accommodates a zig-zag stitch that effectively catches the edges. Proceed slowly, allowing the machine stitches to secure both sides as you guide in the binding, steadied by the binding foot.
Tips and Considerations:
Always conduct a preliminary run on scrap fabric before committing to your main project. This practice run allows you to familiarize yourself with the nuances of the binder foot and ensures a smooth and polished result.
Guide the bias binding gently over your hands and into your lap to maintain control and precision throughout the sewing process.
Table of Reference: How To Use A Binder Foot Step-by-Step Instructions
| Key Step | Detailed Instructions |
|---|---|
| 1 | Select high-quality bias tape and a corresponding needle for optimal results. |
| 2.1 | Insert the bias tape into the plastic section, ensuring the shorter side is positioned on top. |
| 2.2 | Adjust the width using the screw on the adjustment for a snug fit with the bias tape. |
| 2.3 | Snap the bias tape foot into the machine, checking the needle’s position for proper alignment. |
| 2.4 | If necessary, fine-tune the back screw on the foot and take initial stitches to secure the binding. |
| 3 | Insert the fabric, guiding it between the bias edges and into the plastic slot for even distribution. |
| 3.1 | Choose between straight or zig-zag stitches, proceeding slowly to ensure both sides are effectively caught. |
| Tips | Prioritize a practice run on scrap fabric for familiarity and precision. Guide the bias binding gently for a polished and controlled finish. |
Binder Foot Troubleshooting and Tips: Navigating Common Challenges with Ease
While the binder foot is a valuable tool for efficient and precise binding, occasional hiccups may arise during its use. Understanding common issues and implementing troubleshooting techniques can ensure a smooth sewing experience.
Here’s a guide to navigate through potential challenges and valuable tips to optimize your binder foot usage:
1. Uneven Stitches:
- Issue: Uneven stitches along the binding may occur, compromising the overall finish.
- Tip: Check the tension settings on your sewing machine. Ensure the tension is balanced for both the upper and lower threads. Additionally, inspect the needle for any damage or dullness and replace it if necessary.
2. Binding Slippage:
- Issue: The binding may slip or shift during sewing, leading to an uneven application.
- Tip: Secure the binding in place before sewing by using clips or pins. Additionally, consider adjusting the pressure foot pressure on your machine to provide optimal grip on the fabric.
3. Difficulty in Thread Engagement:
- Issue: The needle may struggle to engage with the fabric or binding properly.
- Tip: Double-check that the needle is correctly inserted and is suitable for the type and weight of fabric. Ensure the foot is securely attached to the machine and positioned correctly.
4. Uneven Feed of Fabric:
- Issue: The fabric may not feed evenly through the machine, causing distortion in the binding.
- Tip: Examine the feed dogs for any lint or debris that may be hindering smooth fabric movement. Clean the feed dogs regularly to maintain optimal performance. Additionally, ensure the fabric is aligned and guided evenly.
5. Binding Foot Misalignment:
- Issue: The binding foot may not align properly with the fabric or may not sit evenly.
- Tip: Check for any obstructions or debris around the foot. Ensure the foot is securely attached to the machine, and consider adjusting the width setting to achieve proper alignment.
6. Skipped Stitches:
- Issue: Stitches may be skipped during the binding process, resulting in an incomplete and insecure finish.
- Tip: Inspect the needle for damage, replace it if necessary, and confirm that it is compatible with the fabric type. Adjust the needle position or tension if required.
7. Choosing the Right Binder Foot:
- Tip: Ensure you are using the appropriate binder foot for your specific sewing machine model. Generic binder feet may work well with various machines, but selecting one designed for your brand and model can optimize compatibility.
By addressing these common issues and incorporating these practical tips, you can troubleshoot challenges effectively and make the most of your binder foot. Remember to practice on scrap fabric before starting a project, allowing you to fine-tune your technique and achieve professional results.
Alternatives To A Binder Foot: Traditional Binding Techniques
When it comes to binding, there’s an alternative to the modern convenience of a binder foot—the traditional, old-fashioned method. While the binder foot is a remarkable tool for efficiency, especially in straight-line projects, the traditional approach may prove advantageous, particularly when dealing with numerous curves and corners.
This alternative method might require more time upfront but can offer greater flexibility in handling intricate designs.
Traditional Binding Techniques:
- Single Fold Bias Tape: One alternative method involves the use of single-fold bias tape. Learn the art of applying bias tape in a single fold with detailed insights from our tutorial on “How to Sew Single Fold Bias Tape.” This technique is particularly useful for projects where a lighter binding is preferred.
- Double Fold Bias Tape: Delve into the intricacies of using double-fold bias tape with our tutorial on “How to Sew Double Fold Bias Tape.” This technique provides a sturdier finish and is commonly employed in projects that demand durability and a polished appearance.
- Mitred Square Corners with Bias Tape: Elevate your skills by exploring how to sew mitred square corners using bias tape. This technique is invaluable when dealing with projects that involve sharp angles and corners. Our tutorial guides you through the process, ensuring a professional and seamless finish.
Table of Alternative Binding Techniques:
| Technique | Description |
|---|---|
| Single Fold Bias Tape | Learn how to apply bias tape in a single fold, ideal for projects requiring a lighter binding. |
| Double Fold Bias Tape | Explore the use of double-fold bias tape for a sturdier finish, perfect for projects demanding durability. |
| Mitred Square Corners with Bias Tape | Master the art of sewing mitred square corners using bias tape, essential for projects with sharp angles and turns. |
By considering these traditional binding techniques, you can broaden your sewing repertoire and adapt your approach based on the specific demands of each project. Whether utilizing a binder foot or opting for traditional methods, the key is to choose the technique that best suits your project’s unique requirements.
Exploring Binder Foot Brands: A Guide to Choosing Quality Attachments
Much like other sewing presser feet, binder feet come in various options tailored to different sewing needs. You can acquire a binder foot designed specifically for quilting or sewing, ensuring compatibility with your machine’s brand.
Alternatively, generic binder feet are available for individual purchase or as part of a comprehensive kit. Personalizing your choice allows you to enhance your sewing experience, adapting the binder foot to your machine’s specifications.
Brand Compatibility and Personal Experience:
Whether you opt for a branded binder foot matching your machine’s make or a generic one, the adjustment process remains consistent.
In my experience, a generic binder foot purchased from eBay seamlessly complemented my Janome sewing machine. This serves as a testament to the versatility of binder feet, showcasing their ability to integrate smoothly across different machine brands.
As you embark on your sewing journey with the binder foot, remember that the adjustment screws and wheels are your allies in achieving precision and finesse. Experiment with these adjustments to tailor the binder foot to your specific projects, and witness the transformation of your sewing endeavors.
Here’s a guide to some notable binder foot brands and what sets them apart:
Table: Comparison of Binder Foot Brands
| Binder Foot Brand | Signature Features |
|---|---|
| Janome | Known for precision and compatibility, designed specifically for Janome sewing machines. User-friendly with easy adjustments. |
| Brother | Offers a diverse selection tailored for Brother sewing machines. Boasts durability and seamless integration with machines. |
| Singer | Well-established in the industry, provides a variety suitable for Singer machines. Recognized for reliability and compatibility. |
| Bernina | Synonymous with high-quality sewing machines, binder feet known for precision and attention to detail, meeting Bernina standards. |
| Generic | Versatile attachments designed to fit a wide range of sewing machines. While lacking brand-specific optimizations, they offer flexibility and cost-effectiveness. |
Choosing the Right Binder Foot
When selecting a binder foot for your sewing machine, consider the following factors:
- Machine Compatibility: Ensure that the binder foot is compatible with your specific sewing machine model. Brand-specific binder feet are often designed to seamlessly integrate with their respective machines.
- Material and Build Quality: Look for binder feet made from durable materials such as metal or high-quality plastic. Sturdy construction contributes to longevity and consistent performance.
- Adjustability: Opt for a binder foot with adjustable features, such as width settings and easy screw adjustments. This allows for versatility and precision in various sewing projects.
- User Reviews: Explore reviews and testimonials from other sewers who have used the specific brand and model of binder foot you are considering. Real-world experiences can provide valuable insights into performance and usability.
By considering these factors and exploring binder foot options from reputable brands, you can enhance your sewing capabilities and achieve professional results in your binding projects.
Whether you choose a brand-specific attachment or a versatile generic option, the right binder foot can be a valuable addition to your sewing toolkit.
Conclusion: How to Use a Binder Foot
In conclusion, mastering the use of a binder foot opens up a world of efficiency and precision in your sewing projects. Whether you’re working with bias tape for quilting or embellishing edges, the binder foot streamlines the process, ensuring neat and professional results.
From adjusting the foot to aligning your needle, the step-by-step guide provides valuable insights. Remember to practice on scrap fabric to familiarize yourself with the techniques before diving into your main project. With these skills, you’ll confidently navigate the intricacies of binding, bringing a polished finish to your creations with the help of the versatile binder foot.