How To Sew Basting Stitch, When & Why To Baste Seams
Wondering about the ins and outs of basting stitch? Well, let’s unravel the mystery and delve into the world of sewing mastery. So, what exactly is basting stitch? In the realm of sewing, mastering the art of basting is like wielding a secret weapon – it not only yields professional-looking results but also proves to be a savior for beginners tackling intricate seams.
Essentially, when you embark on basting a seam, you’re strategically holding the fabric pieces together temporarily, paving the way for a flawless final seam. Whether you opt for the precision of machine basting or the hands-on approach of hand basting, investing that extra bit of time pays off handsomely, minimizing the need for tedious unpicking and ensuring your sewing endeavors unfold seamlessly.
Let’s explore the intricacies of how to sew basting stitch, unraveling when and why basting seams can elevate your sewing game.
What Is Basting Stitch?
A basting stitch in sewing serves as a temporary method to secure multiple fabric pieces in place before the final, permanent stitches are applied. This preliminary stitch can either be removed entirely or discreetly left hidden within seams. Commonly known as tacking in sewing or tacking stitches, basting plays a crucial role in preventing fabric layers from slipping during the sewing process.
When To Use Basting In Sewing?
The decision of when to employ a basting stitch depends on the specific requirements of the sewing project. For instance, when dealing with a gathered skirt before attaching it to a waistband, or when securing a piece of bias tape along the edge of a quilt, basting proves invaluable. Additionally, attaching a sleeve to an armhole may necessitate the use of basting to ensure proper alignment and prevent shifting during final stitching.
In situations where precision is paramount, such as when working with zippers, a basting stitch becomes indispensable. This is particularly relevant when sewing close to zipper teeth, as any unintended movement could compromise the final result. Moreover, fabrics notorious for being challenging to handle, like silk, greatly benefit from basting. The temporary stitches provide stability, preventing slippage and ensuring that the fabric stays in place under the pressure of the sewing machine foot.
Notably, basting is a recommended step before serging, especially when working with delicate or intricate fabrics. Serging involves cutting some of the seam allowances, making it more challenging to correct mistakes. By implementing a basting stitch before serging, you create a safeguard, allowing you to assess the accuracy of your work and make any necessary adjustments with relative ease.
This precaution is particularly emphasized in projects like sewing leotards, where machine or hand basting the seams before serging is a standard practice to ensure optimal results.
Basting Stitch Tаble
| Aspect | Details |
|---|---|
| Definition | A basting stitch is a temporary sewing technique used to secure fabric pieces together before applying permanent stitches. It can be removed entirely or discreetly left hidden within seams. Also known as tacking stitches, basting prevents fabric layers from slipping during the sewing process. |
| Application | – Gathered Skirt: Used before attaching to a waistband to ensure proper alignment. – Bias Tape on Quilt: Essential for securing a piece of bias tape along the edge of a quilt. – Sleeve to Armhole: Necessitated to guarantee alignment and prevent shifting during final stitching. – Zippers: Indispensable when sewing close to zipper teeth to maintain precision. – Challenging Fabrics (e.g., Silk): Provides stability, preventing slippage under the sewing machine foot. – Before Serging: Recommended as a safeguard, especially for delicate or intricate fabrics. |
| Benefits | – Precision: Ensures accuracy in sewing projects, especially those requiring intricate details. – Prevention of Slippage: Crucial for keeping fabric layers in place during the sewing process. – Ease of Adjustment: Allows for easier correction of mistakes before applying permanent stitches, particularly relevant before serging. |
| Considerations | – Removability: The basting stitch can be entirely removed or discreetly left hidden within seams based on the desired finish. – Project Specific: The decision to use a basting stitch depends on the unique requirements of each sewing project. – Fabric Sensitivity: Particularly useful for delicate fabrics like silk that are prone to slipping and require extra stability. – Serging Preparation: Highly recommended as a precautionary step before serging to facilitate accurate adjustments. |
| Precautions | – Zippers: Ensuring precision is crucial when sewing close to zipper teeth; basting prevents unintended movement. – Serging: Essential before serging, as cutting seam allowances during serging makes correcting mistakes more challenging. – Fabric Sensitivity: Particularly emphasized when working with challenging fabrics to prevent slippage during sewing. – Project-specific: Consider the unique requirements of each sewing project to determine the necessity of a basting stitch. |
| Common Terms | – Tacking: Another term used interchangeably with basting, referring to the temporary stitches used in sewing. – Serging: A sewing technique that trims and finishes fabric edges, cutting some seam allowances; recommended after basting for delicate fabrics. |
| Recommendations | – Machine or Hand Basting: Depending on the project, either machine or hand basting may be employed to achieve optimal results. – Assessment Before Serging: Emphasized, especially in projects like sewing leotards, to ensure accuracy before the irreversible step of serging. – Adjustment Ease: Basting allows for easier correction of mistakes, offering a safeguard in the sewing process. |
Basting Stitch for Seams Tutorial
The Basting Stitch for Seams Tutorial serves as a comprehensive guide to utilizing basting sewing stitches effectively in various seam-related scenarios. This essential technique finds widespread application, with machine basting being the predominant method employed in many clothing sewing patterns.
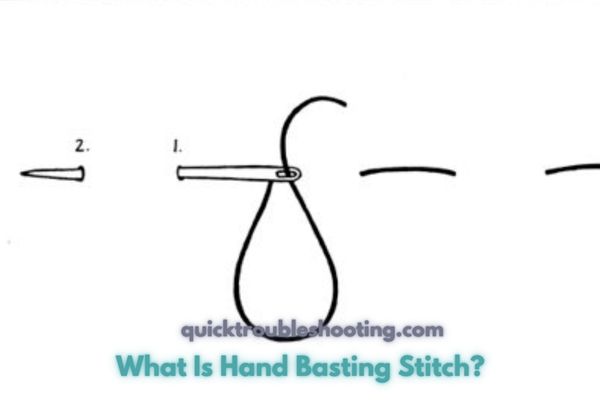
What Is Hand Basting Stitch?
Hand basting stitch is a meticulous and versatile sewing technique that provides precise control over a sewing project. This method is particularly invaluable when accuracy is paramount, such as when setting in sleeves to armholes or joining curved pieces. Even seasoned sewers recognize the significance of hand basting for achieving optimal results.
Step-by-Step Guide to Hand Basting Stitch: How to baste stitch by hand
Step 1 – Thread Needle:
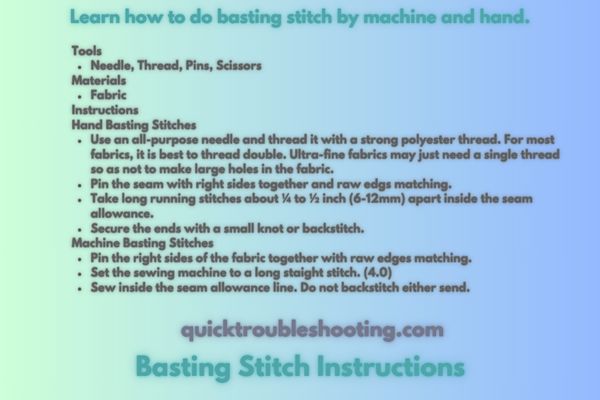
Begin by selecting an all-purpose needle that suits the fabric you are working with. Thread the needle with a strong polyester thread, and for added strength and stability, consider using a double thread. However, when working with ultra-fine fabrics, opting for a single thread may be more appropriate to avoid creating large holes in the material.
Step 2 – Stitch with Running Baste Stitch:
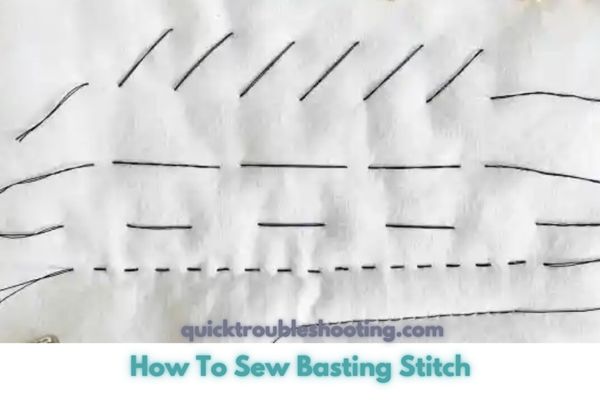
The primary hand basting stitch employed is the running baste stitch, a simple yet effective technique. Start by anchoring the thread on the fabric with a small knot or a backstitch. The running baste stitch is executed with an up-and-down motion, creating stitches spaced approximately ¼ to ½ inch apart (6mm-12mm).
- Control through Stitch Size: The size of the running baste stitches directly influences the level of control you have over the fabric. Smaller stitches provide greater precision and control. For a quick and rough hand basting, several up-and-down stitches can be executed simultaneously. However, for precise basting, it is recommended to sew one stitch at a time, following a marked line on the fabric.
Step 3 – Finish the Hand Baste Stitches:
Once the running baste stitches are completed, secure the ends of the thread to the fabric. This can be achieved by tying a small knot or employing a backstitch at the end of the basting line. Properly securing the stitches ensures stability and prevents any unraveling during subsequent stages of the sewing process.
In summary, hand basting stitch is a meticulous and effective method that allows for precise control in sewing projects. By carefully following the steps outlined, from threading the needle to executing the running baste stitch and finishing with secure knots or backstitches, sewers can harness the power of hand basting to achieve the best possible results in their creations.
Machine Basting Stitch: How To Baste
Machine basting is a valuable technique frequently employed in sewing patterns to temporarily secure fabric pieces in place before sewing the final seam. It is particularly effective for straight pieces of fabric, providing stability during the construction process. Below is a step-by-step guide on how to execute machine basting with precision.

Basting Stitch Sewing Machine Settings:
- Stitch Type: Basting is executed using a straight stitch. Set your sewing machine to the straight stitch mode.
- Thread Color: While the basting is often hidden in the garment’s construction, using a contrasting thread color is advisable if there is a possibility of needing to remove it later. This makes unpicking the stitches easier.
- Foot: Utilize an all-purpose sewing machine foot with the needle positioned in the center for the basting stitch.
- Stitch Length for Basting: Set your machine to the longest stitch length available, typically around 4.0. Some machines may have settings that go up to 6.0-9.0. Longer stitch lengths can be easily removed by pulling steadily on the loose tail of the bobbin thread.
- Loosen Tension: Check your sewing machine tension and consider loosening it slightly, especially if you plan to remove the stitches later. This facilitates easier removal without causing damage to the fabric.
How to Machine Baste Step by Step:
- Step 1 – Pin:
Align the right sides of the fabric pieces together, ensuring that the raw edges match. Secure the fabric with pins along the intended seam line. This helps maintain alignment during the basting process. - Step 2 – Baste with Long Stitches:
Using the settings configured for machine basting, sew inside the seam allowance line with long, straight stitches. The goal is to temporarily hold the fabric pieces together. - Step 3 – Finishing:
Avoid backstitching at the beginning and end of the basting line if you plan to remove the stitches later. Leaving the ends open makes it easier to locate and pull out the basting stitches when they are no longer needed.
By following these steps and adjusting your sewing machine settings accordingly, you can effectively utilize machine basting to secure fabric pieces before proceeding with the final seam, ensuring precision and ease of removal when necessary.
Alternatives to Baste Stitch
While the basting stitch is a traditional and effective method for temporarily securing fabric, several alternative techniques can be employed based on the specific requirements of a sewing project. Here are various alternatives to baste stitching, each with its unique advantages and considerations.
Pin Basting:
- Method: Use straight pins to hold fabric pieces together. Pins can be inserted vertically or horizontally along the seam line.
- Advantages: Fast and easy method. Provides stability for various fabric types.
- Considerations: Remove pins before sewing to prevent needle breakage or potential damage to the sewing machine.
Double-Sided and Iron-On Tapes:
- Method: Utilize double-sided tapes like Wonder Tape for basting. This is especially effective for knit fabric hems or when working with leather or vinyl.
- Advantages: Holds fabric in place without the need for stitching. Eliminates the risk of pinholes in delicate fabrics.
- Considerations: Ensure compatibility with the fabric being used. Iron-on tapes may not be suitable for all materials.
Basting Sewing with Wonder Clips:
- Method: Use Wonder Clips, commonly used by quilters and bag makers, to hold bulky seams in place.
- Advantages: Ideal for securing thick or bulky fabrics.
- Considerations: May slip slightly on thinner fabrics, so more suitable for heavier projects.
Improvised Baste Sewing:
- Method: Use everyday items like hair clips, paper clips, or pegs to hold fabric in place.
- Advantages: Accessible and versatile alternatives.
- Considerations: Suitable for specific fabrics that may be marked easily. May not provide as much stability as traditional basting.
Basting Spray and Glue:
- Method: Apply basting spray, a light glue often used by quilters, to temporarily hold fabric layers together.
- Advantages: Allows for easy repositioning of fabric until it’s in the correct position. Common in applique work.
- Considerations: Ensure proper ventilation when using sprays. Most sprays wash out after the sewing project is completed.
Here’s a table summarizing the key information on alternatives to the baste stitch:
| Alternative Method | Method Description | Advantages | Considerations |
|---|---|---|---|
| Pin Basting | Use straight pins vertically or horizontally along the seam line to hold fabric pieces together. | Fast and easy method. | – Remove pins before sewing to prevent needle breakage or potential damage to the sewing machine. |
| Double-Sided and Iron-On Tapes | Utilize double-sided tapes like Wonder Tape for basting, suitable for knit fabric hems, leather, or vinyl. | Holds fabric without stitching. Eliminates risk of pinholes in delicate fabrics. | Ensure compatibility with the fabric being used; may not be suitable for all materials. |
| Basting Sewing with Wonder Clips | Use Wonder Clips to hold bulky seams, commonly used by quilters and bag makers. | Ideal for securing thick or bulky fabrics. | May slip slightly on thinner fabrics; more suitable for heavier projects. |
| Improvised Baste Sewing | Use everyday items like hair clips, paper clips, or pegs to hold fabric in place. | Accessible and versatile alternatives. | Suitable for specific fabrics that mark easily; may not provide as much stability as traditional basting. |
| Basting Spray and Glue | Apply basting spray, a light glue used by quilters, to temporarily hold fabric layers together. Common in applique work. | Allows easy repositioning of fabric until correct position is achieved. | Ensure proper ventilation when using sprays; most wash out after completing the sewing project. |
Improvised Basting Step by Step:
- Step 1: Identify items like hair clips, paper clips, or pegs from your household.
- Step 2: Use these items to secure fabric layers in place.
- Step 3: Assess stability and make adjustments as needed.
These alternatives provide flexibility in choosing the most suitable method based on the fabric type, project complexity, and personal preference. Whether pin basting, using tapes, clips, or improvised methods, sewers can explore a range of options to achieve the desired results in their sewing projects.
How To Remove Basting Stitch
Removing basting stitches is a straightforward process, and with the right tools and care, you can achieve clean results. Here is a step-by-step guide on how to efficiently and neatly remove basting stitches:
Tools Needed
- Seam Ripper: A small, pointed tool designed specifically for unpicking stitches.
- Lint Roller: Used to remove any small bits of thread left behind after unpicking.
How To Remove Basting Stitch: Step-by-Step Guide
- Step 1 – Gather Materials: Ensure you have a seam ripper and a lint roller on hand. Having these tools ready will make the process more efficient.
- Step 2 – Locate Basting Stitches: Identify the basting stitches you wish to remove. They are typically longer and looser than regular stitches.
- Step 3 – Insert Seam Ripper: Gently insert the tip of the seam ripper into the middle of a basting stitch. The sharp edge of the ripper should be positioned beneath the stitch.
- Step 4 – Cut the Stitch: Carefully cut the basting stitch by pushing the seam ripper’s blade through the thread. Make small and controlled cuts along the stitching line. Take care not to cut the fabric.
- Step 5 – Pull Out Thread: After making a couple of cuts in the stitching line, you should be able to gently pull out the thread. The basting stitch is loose, allowing for easy removal. Continue this process along the entire length of the basting stitches.
- Step 6 – Inspect for Remaining Threads: Examine the fabric for any small bits of thread that may have been left behind during the removal process.
- Step 7 – Use Lint Roller: To clean up any remaining bits of thread, use a lint roller. Roll it over the fabric to pick up loose threads and ensure a clean surface.
- Step 8 – Repeat as Needed: If there are additional basting stitches to be removed, repeat the process. Take your time to avoid damaging the fabric, especially if it is delicate or prone to fraying.
Tips:
- Patience is Key: Work methodically and be patient to avoid accidentally cutting the fabric or leaving behind small bits of thread.
- Inspect as You Go: Regularly check the fabric for any remaining threads or potential issues.
By following these steps and using the appropriate tools, you can easily and effectively remove basting stitches, leaving your project clean and ready for the next steps in the sewing process.
Basting Stitch FAQs
Can Basting Stitches Be Left in the Finished Garment?
Basting stitches are meant to be temporary and are typically removed after the final seam is sewn. Leaving them in the finished garment is not recommended, as they may affect the overall appearance and wear of the item. It’s essential to carefully remove basting stitches to achieve a polished and professional result.
How Do You Secure Basting Stitches at the Beginning and End?
It’s common not to backstitch when creating basting stitches if you plan to remove them later. To secure the beginning and end, tie a small knot or use a backstitch at the start and finish of the basting line. This ensures that the basting stitches hold the fabric temporarily while allowing for easy removal.
When Is Hand Basting Preferred Over Machine Basting?
Hand basting is often preferred in intricate or delicate projects where precise control is essential. It is especially useful when setting sleeves into armholes or when working with challenging fabrics. Hand basting allows for a gentler touch and meticulous placement of temporary stitches, contributing to the overall accuracy of the sewing project.
Can Basting Stitches Be Used for Gathering Fabric?
Yes, basting stitches are commonly employed for gathering fabric. By sewing a long basting stitch within the seam allowance and gently pulling the bobbin thread, you can create controlled gathers. Once the desired fullness is achieved, the basting stitches can be adjusted or removed, and the final seam can be sewn.
Are There Special Considerations for Basting with Knit Fabrics?
Basting stitches for knit fabrics may require specific attention. Using a stretch-friendly basting stitch, such as a long zigzag stitch, is advisable to maintain flexibility. Additionally, water-soluble or easily removable basting methods may be preferred for knit fabrics to avoid damaging the material during removal.
Can Basting Stitches Help with Pattern Matching?
Yes, basting stitches are instrumental in pattern matching. When aligning pattern pieces or ensuring that prints or stripes match precisely, basting provides a temporary hold for careful adjustment before final stitching. This is particularly crucial in projects where pattern continuity is essential for a polished and seamless appearance.
What Is Baste In Sewing?
When you encounter an instruction in a sewing pattern to “baste a seam,” it means to temporarily stitch the seam using a stitch that can be easily removed later. This can be achieved with a long running stitch by hand or a long-length machine stitch.
Is Basting Stitch Necessary?
The necessity of a basting stitch depends on your project. Basting, whether done by hand or machine, is especially useful when you need to temporarily hold seams in place before the final sewing. While easy seams may be substituted with pins, basting is invaluable for achieving great results, particularly for beginners.
What Is The Difference Between A Basting Stitch And A Regular Stitch?
The main difference lies in the purpose and permanence of the stitches. A basting stitch is temporary, meant to hold seams temporarily, and is typically longer in length, ranging from 4.0-7.0. In contrast, a regular stitch is used for permanent seams and hems, with a standard length around 2.5.
What Is The Difference Between Basting And Tacking?
Basting and tacking are different terms used interchangeably to describe the same technique. Both involve the use of long hand or machine stitches to temporarily secure seams. Whether referred to as basting or tacking, the intention is to create a temporary hold that can be easily removed during the sewing process.
Conclusion: Basting Stitch (What Is Basting)
In conclusion, the basting stitch is a fundamental sewing technique that involves using temporary stitches to hold fabric pieces in place before sewing the final seam. Whether executed by hand or machine, basting plays a crucial role in achieving precise results, especially in intricate projects or with challenging fabrics.
The versatility of basting extends to alternatives such as pinning, tapes, and clips, providing sewers with various options based on project requirements. Frequently asked questions clarify key aspects of basting, emphasizing its temporary nature, necessity in certain projects, and distinctions from regular stitches. Understanding the nuances of the basting stitch contributes to the overall success and professionalism of sewing endeavors.