How to Sew Single Fold Bias Tape: A Сomplete Guide for All Skill Levels
Single fold bias tape is a sewing essential renowned for its versatility, offering a refined touch to various projects. It serves as a practical tool for edging, binding, and finishing raw fabric edges. This сomplete guide is crafted to be accessible to both novice and seasoned seamstresses, ensuring a thorough understanding of the sewing process.
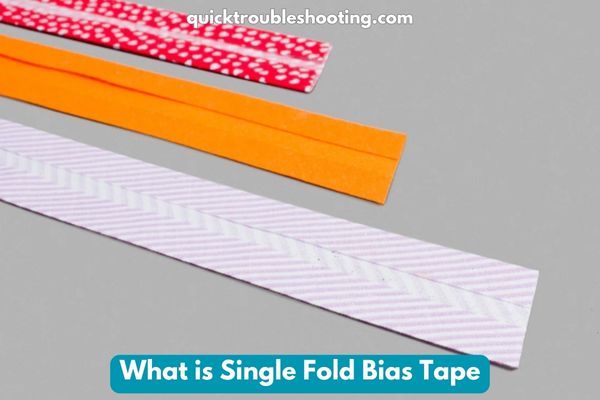
What is Single Fold Bias Tape
Single Fold Bias Tape is a narrow strip of fabric that has been cut on the bias, meaning it is cut at a 45-degree angle to the fabric’s selvage edge. This bias cut allows the tape to have some stretch and flexibility, making it ideal for curved edges and rounded corners. The term “single fold” refers to the way the tape is folded or pressed.
Here are the key characteristics and aspects of Single Fold Bias Tape:
| Characteristics | Single Fold Bias Tape |
|---|---|
| Construction: | – Created by folding the raw edges of the bias-cut strip toward the center, meeting in the middle. |
| – Resulting tape has one fold line along its length. | |
| Width: | – Available in various widths to accommodate different sewing projects. |
| – Common widths range from 1/2 inch to 1 inch, with variations available. | |
| Applications: | – Often used for finishing edges, providing a clean and polished look. |
| – Commonly applied to curved or rounded edges, such as necklines and armholes, due to its flexibility. | |
| Visibility: | – When sewn onto fabric, bias tape is typically visible on one side of the fabric. |
| – The opposite side remains flat against the fabric, creating a neat and discreet finish. | |
| Usage in Garments: | – Seamstresses frequently use it in garments to bind and finish raw edges, preventing fraying. |
| – Employed to add a decorative or contrasting edge to the fabric. | |
| Versatility: | – Despite being called “single fold,” it can be versatile in its applications. |
| – Can be used as a standalone binding or folded over again for additional reinforcement. | |
| Color and Material Options: | – Available in a variety of colors and materials, allowing for customization to match or contrast with the main fabric. |
| Ease of Application: | – Relatively easy to apply, making it suitable for both beginners and experienced seamstresses. |
| – Proper pinning and stitching techniques are crucial to achieving a clean and professional finish. |
In summary, Single Fold Bias Tape is a versatile sewing notion that adds a polished finish to fabric edges. Its characteristics make it particularly suitable for curved edges, and it is widely used in garment construction and various sewing projects for both functional and decorative purposes.
Types Of Bias Tape
It’s crucial to familiarize yourself with the various types of bias tape and determine which is best suited for your specific project. The following exploration provides an overview of single fold, double fold, and other common types, guiding you towards informed decision-making for a successful sewing experience.
Table: Comparison of Bias Tape Types
| Bias Tape Type | Description | Best Usage | Additional Information |
|---|---|---|---|
| Single Fold Bias Tape | Raw edges pressed to meet in the middle for a clean finish. | Ideal for necklines and armholes, where bias is visible on one side of the fabric when sewn. | Provides a discreet bias application, commonly used in garments for a polished appearance. |
| Double Fold Bias Tape | Raw edges pressed and then pressed again, fully encasing the edges for durability. | Suitable for necklines, armholes, and various projects, where bias tape edges are visible on both sides. | Offers a more finished and robust edge, versatile for a wide range of sewing applications. |
| Other Common Types | Explored in the linked article, including variations like wide, fusible, and pre-folded bias tape. | Depending on project requirements, choose from additional types for specific sewing needs. | Understanding the versatility of other types allows for tailored choices based on your project. |
How To Sew Bias Tape Supplies Needed
Before embarking on the journey of sewing with single fold bias tape, gather the following materials:
| Materials | Description |
|---|---|
| Fabric | Opt for a fabric that complements your project. |
| Single Fold Bias Tape | Available in an array of colors and widths. |
| Pins | Essential for securing the bias tape in place. |
| Sewing Machine | A reliable machine for accurate stitching. |
| Iron and Ironing Board | Crucial for pressing and setting the bias tape. |
| Fabric Scissors | Sharp scissors designed for fabric and bias tape. |
Step-by-Step Guide for Beginners: Preparation
1. Preparation
Choosing the Right Fabric and Bias Tape:
The choice of fabric plays a crucial role in the success of your sewing project. For beginners, opting for cotton fabric is highly recommended due to its ease of handling and forgiving nature.
- Usefulness: Cotton fabric is well-suited for beginners as it is relatively easy to work with. Its pliability makes it forgiving for those still mastering sewing techniques.
- Understandability: When selecting fabric, consider the ease of handling, and aim for materials that do not overly stretch or slip during sewing. Cotton is known for being beginner-friendly, making it an excellent choice.
- Keywords: Cotton fabric, suitability, ease of handling.
Cutting and Preparing the Fabric Edges:
Ensuring straight and even edges on your fabric is essential for achieving a clean and professional finish in your sewing projects.
- Usefulness: Straight and even edges contribute to the overall neatness of your project. They provide a solid foundation for the application of bias tape, enhancing the final result.
- Understandability: When dealing with curves, it’s essential to clip notches into the fabric. These notches allow the fabric to ease around curves smoothly, preventing puckering and distortion.
- Keywords: Even edges, notches, curves.
2. Attaching Single Fold Bias Tape
Proper Pinning Techniques:
Proper pinning is a fundamental step that ensures your bias tape stays in place during the sewing process, preventing slippage and uneven application.
- Usefulness: Proper pinning is crucial in preventing the bias tape from shifting during sewing. It provides stability and control, especially when dealing with intricate designs or curves.
- Understandability: Align the raw edges of the fabric and bias tape carefully. Secure them in place with straight pins, ensuring they are perpendicular to the edge. This prevents the fabric layers from shifting as you sew.
- Keywords: Pinning, preventing slippage.
Sewing the Bias Tape onto Straight Edges:
Securing the bias tape with a straight stitch is a straightforward yet crucial step in achieving a polished look.
- Usefulness: A straight stitch provides a secure hold for the bias tape, preventing it from unraveling or shifting over time. It is a stable and reliable choice for straight edges.
- Understandability: Set your sewing machine to a straight stitch, adjusting the stitch length according to your project’s needs. This simplicity ensures even stitching along the length of the bias tape.
- Keywords: Straight stitch, securing.
3. Finishing Touches
Tips for Neatly Finishing the Ends:
Creating a clean and polished finish involves thoughtful handling of the bias tape ends.
- Usefulness: Overlapping the ends of the bias tape creates a seamless and polished finish, preventing fraying and ensuring durability.
- Understandability: After attaching the bias tape along the edge, allow the ends to overlap slightly. Trim any excess tape and secure the ends with a backstitch, ensuring a neat and durable finish.
- Keywords: Overlapping, backstitch.
Pressing and Ironing for a Polished Look:
The final touch involves pressing and ironing to set stitches and enhance the overall appearance of your project.
- Usefulness: Pressing sets stitches, making them more secure, and improves the flatness and appearance of the bias tape. This step contributes significantly to the professional look of your project.
- Understandability: Pay special attention to corners and curves while pressing. This ensures a smooth and polished finish, eliminating any wrinkles or creases in the fabric.
- Keywords: Pressing, smooth appearance.
By following these detailed steps and incorporating the provided tips, novice seamstresses can confidently master the art of sewing with single fold bias tape, creating professional-looking finishes with ease and precision.
Here is a table summarizing the key information from the provided step-by-step guide:
| Step | Task | Usefulness | Understandability |
|---|---|---|---|
| Preparation | |||
| Choosing the Right Fabric and Bias Tape | Cotton fabric is forgiving and easy for beginners. | Select fabric based on ease of handling, avoiding materials that stretch excessively. Cotton is recommended. | |
| Cutting and Preparing the Fabric Edges | Straight and even edges are vital for a neat finish. | Clip notches in curves to allow the fabric to ease smoothly, preventing puckering and distortion. | |
| Attaching Single Fold Bias Tape | |||
| Proper Pinning Techniques | Proper pinning prevents slippage during sewing. | Align raw edges carefully and secure them with perpendicular straight pins to maintain stability and control, especially in intricate designs or curves. | |
| Sewing the Bias Tape onto Straight Edges | A straight stitch secures the bias tape reliably. | Set the sewing machine to a straight stitch for simplicity and even stitching along the bias tape. | |
| Finishing Touches | |||
| Tips for Neatly Finishing the Ends | Overlapping ends prevents fraying and ensures durability. | After attaching the bias tape, allow ends to overlap slightly. Trim excess tape and secure ends with a backstitch for a neat and durable finish. | |
| Pressing and Ironing for a Polished Look | Pressing sets stitches and improves the appearance of the bias tape. | Pay special attention to corners and curves while pressing to eliminate wrinkles and creases, contributing to a smooth and polished finish. |
By following this table, novice seamstresses can navigate the process of sewing with single fold bias tape efficiently, ensuring a professional-looking finish in their projects.
Exploring Advanced Bias Tape Sewing Techniques
Dive deeper into the world of bias tape sewing with these additional tutorials that expand your repertoire of methods. Each tutorial offers a unique approach, providing versatility and creativity to enhance your sewing projects.
1. Sewing Bias Tape – Double Fold
- Description: Double the fun and style by mastering the art of sewing with double fold bias tape. This tutorial guides you through the process of using double fold tape, adding a professional touch to your sewing projects.
- Benefits: Achieve a more refined finish with the double fold technique, suitable for various applications.
- Key Steps: Learn the intricacies of attaching double fold bias tape for a polished and stylish outcome.
2. Sewing Bias Tape Corners
- Description: Bias tape corners serve as a versatile trim for a multitude of sewing projects. This tutorial simplifies the process, empowering you to create beautiful corners effortlessly.
- Benefits: Master the basics to create stunning corners, elevating the aesthetic appeal of your items.
- Key Steps: Gain insights into sewing bias tape corners for a seamless and effective result.
3. Sewing Bias Tape V-Neck Shirts
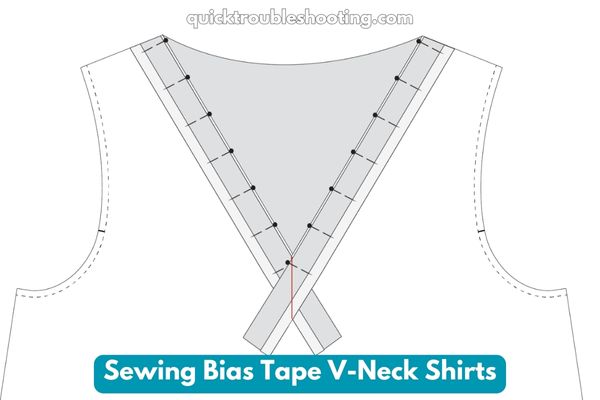
- Description: Explore the technique of using bias tape to finish V-neck shirts, eliminating the need for facings. This common yet effective method enhances the overall look of your shirts.
- Benefits: Save time by avoiding facings while achieving a polished finish on V-neck shirts.
- Key Steps: Follow step-by-step instructions to seamlessly incorporate bias tape into your V-neck shirt projects.
4. How To Make Piping With Bias Tape
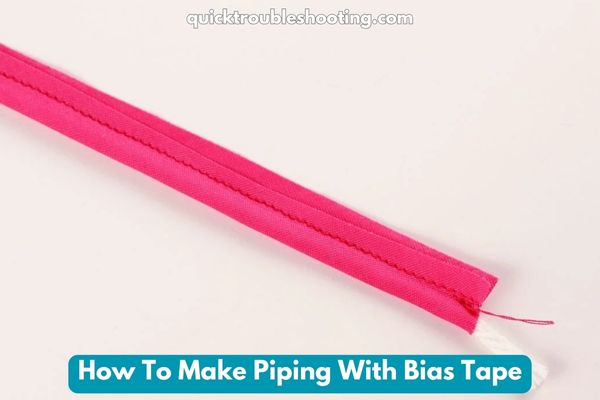
- Description: Uncover the versatility of bias tape by learning how to make piping. This tutorial goes beyond the basics, demonstrating how to sew piping along straight edges, curves, and corners.
- Benefits: Create custom piping using bias tape, adding a decorative and functional element to your sewing projects.
- Key Steps: Master the art of sewing piping, including tips on starting and finishing the ends for a professional result.
Table: Comparison of Advanced Bias Tape Sewing Methods
| Tutorial | Description | Benefits | Key Steps |
|---|---|---|---|
| Sewing Bias Tape – Double Fold | Mastering the art of using double fold bias tape for a refined finish. | Achieve a more professional look with the double fold technique. | Learn the intricacies of attaching double fold bias tape for a polished outcome. |
| Sewing Bias Tape Corners | Simplifying the process of creating versatile bias tape corners. | Master the basics to effortlessly enhance the aesthetic of your items. | Gain insights into sewing bias tape corners for a seamless and effective result. |
| Sewing Bias Tape V-Neck Shirts | Using bias tape to finish V-neck shirts, avoiding the need for facings. | Save time while achieving a polished finish on V-neck shirt projects. | Follow step-by-step instructions to seamlessly incorporate bias tape into projects. |
| Making Piping With Bias Tape | Exploring how to make piping using bias tape for decorative elements. | Create custom piping for added functionality and visual appeal. | Master the art of sewing piping, including tips on starting and finishing the ends. |
Tips for Experienced Seamstresses
Experienced seamstresses have the opportunity to take their projects to the next level by incorporating advanced techniques and creative customization using single fold bias tape.
Advanced Techniques for Incorporating Single Fold Bias Tape:
- Usefulness: Advanced seamstresses can elevate their projects by integrating single fold bias tape in innovative ways, introducing decorative trims and accents that add a touch of sophistication.
- Understandability: Experimentation is key for experienced seamstresses. By exploring different widths of single fold bias tape, they can achieve unique effects that set their creations apart. Whether creating intricate patterns or enhancing specific design elements, the possibilities are vast.
- Keywords: Decorative trims, unique effects, advanced techniques.
Creative Ways to Customize and Enhance Your Projects:
- Usefulness: Experienced seamstresses can unleash their creativity by combining various colors or patterns of single fold bias tape, injecting vibrancy and visual interest into their projects.
- Understandability: To add an extra layer of flair, sewing bias tape with decorative stitches becomes a valuable technique. This not only secures the tape in place but also introduces additional texture and visual appeal to the finished product.
- Keywords: Combine colors, decorative stitches, creative customization.
Example of Advanced Techniques in Action:
Consider a project where a seasoned seamstress is creating a stylish tote bag. Instead of a traditional straight application of single fold bias tape along the edges, she opts for an advanced technique. Using a narrower bias tape, she intricately weaves it through the fabric, creating a lattice pattern that not only reinforces the edges but also introduces a visually captivating design element.
Example of Creative Customization:
Imagine a seasoned seamstress working on a quilt. Instead of using a single color of bias tape, she decides to combine various colors to form vibrant geometric shapes within the quilt blocks. Additionally, she employs decorative stitches along the bias tape, adding texture and dimension to the overall quilt. This creative customization transforms a simple quilt into a unique and visually striking piece of art.
By embracing these advanced techniques and creative customization options, experienced seamstresses can truly make a statement with their sewing projects, showcasing their skills and unique artistic vision. The versatility of single fold bias tape allows for endless possibilities, making each project a personalized work of art.
Common Mistakes to Avoid
Experienced or novice, every seamstress encounters challenges during their sewing journey. Here are some common mistakes related to working with single fold bias tape, along with effective solutions to ensure a smooth and professional sewing experience.
Mistake 1: Stretching Bias Tape While Sewing
- Common Mistake: Allowing bias tape to stretch during the sewing process.
- Usefulness: Proper pinning minimizes stretching, ensuring that the bias tape maintains its intended shape and size throughout the sewing journey.
- Understandability: To prevent stretching, it’s crucial to pin the bias tape adequately before sewing. Secure it in place with pins, ensuring it aligns with the fabric edges. Additionally, sewing with minimal tension on the fabric prevents unnecessary stretching.
Mistake 2: Uneven Stitching
- Common Mistake: Achieving uneven stitches along the bias tape.
- Usefulness: Even stitching is vital for a polished and professional finish, contributing to the overall aesthetic of the project.
- Understandability: To achieve even stitching, it’s essential to sew slowly. Rushing through the sewing process can lead to uneven stitches, impacting the final appearance of the bias tape. Taking your time allows for better control and precision.
Mistake 3: Ignoring Pressing
- Common Mistake: Neglecting the pressing step in the sewing process.
- Usefulness: Pressing is a crucial step that sets stitches, enhances the flatness of the bias tape, and contributes to a professional and polished finish.
- Understandability: It’s tempting to skip the pressing step, but doing so compromises the final look of the project. Pressing should not be overlooked; it helps to eliminate wrinkles, creases, and ensures a smooth appearance. Take the time to press the bias tape carefully, paying special attention to corners and curves for a refined finish.
By avoiding these common mistakes and following the suggested solutions, seamstresses can enhance the quality and appearance of their projects when working with single fold bias tape. These tips contribute to a more enjoyable and successful sewing experience, whether you’re a beginner or an experienced craftsperson.
Evaluating Single Fold Bias Tape Brands: A Comprehensive Comparison
When venturing into the world of sewing, the choice of materials can significantly impact the outcome of your projects. Single fold bias tape is a staple notion for finishing edges and adding a polished touch to garments, accessories, and home decor items.
To assist you in making an informed decision, let’s delve into a comprehensive comparison of specific existing brands, highlighting their key features, materials, and usability.
| Brand | Material | Width Options | Color Variety | Noteworthy Features |
|---|---|---|---|---|
| Wrights Single Fold Bias | Cotton and Polyester blends | Various | Extensive color range | – Established brand with a long history |
| Tape by Simplicity | Cotton and Cotton/Polyester blends | Limited | Classic and neutral tones | – Simplistic packaging |
| Dritz Single Fold Bias | Cotton and Cotton/Polyester blends | Various | Wide color selection | – Easy-to-read packaging with clear instructions |
| Tape by Clover | Cotton and Cotton/Linen blends | Limited | Natural and earthy tones | – Emphasis on eco-friendly materials |
| Maker’s Mercantile Single | Cotton and Cotton/Lycra blends | Limited | Bold and vibrant colors | – Stretchable options for flexibility in sewing projects |
Key Considerations:
1. Material:
- Wrights: Offers a range of cotton and polyester blends for durability.
- Simplicity: Primarily uses cotton and cotton/polyester blends for a balance of comfort and resilience.
- Dritz: Provides options in both cotton and cotton/polyester blends for versatility.
- Clover: Emphasizes eco-friendly materials with cotton and cotton/linen blends.
- Maker’s Mercantile: Offers options with cotton and cotton/lycra blends for added flexibility.
2. Width Options:
- Wrights: Provides various width options to accommodate different projects.
- Simplicity: Offers limited width choices, suitable for standard applications.
- Dritz: Gives the flexibility of choosing from various width options.
- Clover: Has limited width options, focusing on simplicity and natural finishes.
- Maker’s Mercantile: Offers limited but versatile width options, including stretchable variations.
3. Color Variety:
- Wrights: Boasts an extensive color range, catering to a wide spectrum of preferences.
- Simplicity: Offers classic and neutral tones, suitable for timeless projects.
- Dritz: Stands out with a wide selection of colors to match diverse fabric choices.
- Clover: Provides a palette of natural and earthy tones, aligning with an eco-friendly approach.
- Maker’s Mercantile: Features bold and vibrant colors, adding a lively touch to sewing projects.
4. Noteworthy Features:
- Wrights: A well-established brand with a history of reliability in the sewing community.
- Simplicity: Known for simplistic packaging and straightforward offerings.
- Dritz: Stands out with easy-to-read packaging and clear instructions.
- Clover: Places emphasis on eco-friendly materials for environmentally conscious consumers.
- Maker’s Mercantile: Offers stretchable options, providing flexibility in sewing applications.
In summary, the choice of single fold bias tape brand depends on your specific project requirements, preferences, and environmental considerations. Each brand brings unique features to the table, catering to different needs within the sewing community.
Whether you prioritize a wide color selection, eco-friendly materials, or a history of reliability, this comparison should guide you toward selecting the ideal single fold bias tape for your sewing endeavors.
Conclusion
In conclusion, mastering the art of sewing with single fold bias tape is a valuable skill that can elevate your sewing projects. Whether you are a novice or an experienced seamstress, following the detailed steps and incorporating the provided tips will enable you to achieve professional-looking finishes and add a touch of finesse to your creations. Remember to embrace experimentation, have fun with your projects, and let your creativity shine through!