How To Use A Ruffler Foot: Fastest Gathering Foot
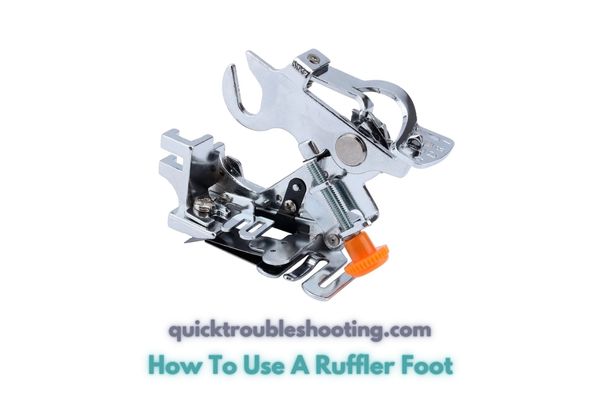
Unlock the secrets of efficient gathering with a ruffler foot as we delve into the question at the heart of this guide: “How to use a ruffler foot?” If the peculiar contraption in the photo has left you puzzled, fear not! It’s the ingenious ruffler presser foot, a tool that combines gathering and pleating in a single row of stitching.
In this step-by-step tutorial, discover the ins and outs of utilizing a ruffler foot, complete with optimal settings to significantly reduce your gathering time. Say goodbye to laborious gathering methods and embrace the swiftness of this medieval-inspired yet highly effective sewing machine foot.

What Is A Ruffler Foot: Ruffler Foot Tutorial
A ruffler foot, also known as a sewing machine pleating foot or ruffler attachment, is a valuable accessory designed for sewing machines. Its primary function is to automate the processes of gathering and pleating, making it an indispensable tool for saving time, particularly in larger sewing projects. This multifaceted foot offers versatility, catering to a range of fabric types and project sizes.
When To Use A Ruffler Foot
Deciding when to incorporate a Ruffler foot into your sewing endeavors plays a crucial role in enhancing efficiency and achieving desired results. The appropriateness of using a Ruffler foot is contingent upon the scale of your gathering needs, and the following detailed scenarios provide insights into when this accessory proves most advantageous:
| Key Considerations | Brief Overview |
|---|---|
| Project Size and Complexity | Smaller Sections: Alternative methods may suffice for minimal gathering in smaller sections. Simpler gathering techniques ensure a straightforward process without specialized tools. Substantial Gathering or Pleating: The Ruffler foot becomes indispensable for larger projects, automating gathering and pleating processes, saving significant time and effort. |
| Time-Saving Considerations | Efficiency Boost: Introducing a Ruffler foot proves beneficial when time is critical. For novice seamstresses, it streamlines gathering, ensuring quicker project completion without compromising quality. |
| Project Complexity | Novice Seamstresses: Ideal for those new to sewing, the Ruffler foot simplifies complex tasks involved in projects with substantial gathering or intricate pleating, enhancing overall efficiency. |
| Versatility Requirements | Diverse Gathering Needs: The Ruffler foot’s versatility shines in various gathering requirements. Adjustable settings cater to creating small tucks, larger pleats, or a combination, providing flexibility for different project styles. |
| Overall Project Goals | Professional Finish: The Ruffler foot contributes to achieving a polished and professional finish, particularly in projects involving garments, curtains, or decorative elements. Consistent and evenly spaced pleats enhance the overall appearance. |
| Time and Effort Management | Streamlining Processes: Novice seamstresses benefit from the Ruffler foot’s inclusion, streamlining the gathering process. It allows individuals to focus on other project aspects while efficiently handling intricate details of gathering and pleating. |
In summary, the decision to use a Ruffler foot hinges on the specific requirements of your sewing project. While alternative methods may suffice for smaller sections, the Ruffler foot truly shines in scenarios involving extensive gathering or pleating, providing an efficient and user-friendly solution, especially for those newer to the art of sewing.
By considering the size, complexity, and goals of your project, you can strategically deploy the Ruffler foot to enhance both the quality and speed of your sewing endeavors.
How To Use A Ruffler Foot: Step-by-Step Guide
Mastering the art of using a Ruffler foot can revolutionize your sewing projects, providing efficiency and precision in creating beautiful gathers and pleats. Follow this step-by-step guide to seamlessly integrate the Ruffler foot into your sewing machine and elevate your crafting experience.
Step 1 – Attaching the Ruffler Foot
Embark on your Ruffler foot journey by securely attaching it to your sewing machine. This crucial step sets the foundation for efficient gathering and pleating. Here’s a detailed breakdown:
- Follow Manufacturer Instructions: Refer to your sewing machine’s manual for specific instructions on attaching the Ruffler foot. Manufacturers often provide detailed guidance tailored to their machine models.
- Locate the Shank: Identify the shank of your machine – the protruding, vertical piece that holds various presser feet. The Ruffler foot typically attaches to the shank.
- Position the Bar: Align the bar at the back of the Ruffler foot with the shank. Carefully snap it into place, ensuring a secure connection.
- Secure the Semi-Circular Loop: Extend the black semi-circular loop over the needle clamp. This essential component contributes to the Ruffler foot’s functionality.
- Bulk Placement: Recognize that the bulk of the Ruffler foot is positioned in front of the standard foot placement area. This design ensures optimal gathering and pleating capabilities.
- Take Your Time: While the assembly may seem intimidating at first, avoid rushing the process. Patiently snap the Ruffler foot onto the shank, ensuring each component fits snugly. Forcefully pushing elements into place can lead to misalignment.
Pro Tip: Familiarize yourself with your specific sewing machine model's nuances to ensure a seamless attachment process.
Step 2 – Choosing the Right Stitch Type
Once the Ruffler foot is securely in place, the next step involves selecting the appropriate stitch type to maximize its ruffling potential:
- Opt for a Straight Stitch: Set your sewing machine to a straight stitch with a length of 4.0. The Ruffler foot excels with straight stitches, creating uniform gathers and pleats. Other stitch types, such as zig-zag, are incompatible with the Ruffler foot.
- Avoid Adding Width: Ensure that there is no width added to your stitching. The Ruffler foot operates optimally with a straight stitch, and altering the width may compromise the desired ruffling effect.
Pro Tip: Experiment with scrap fabric using different stitch lengths to observe the impact on gather size and spacing.
Step 3 – Safety Check
Before diving into your project, prioritize a comprehensive safety check to avoid potential issues during sewing:
- Needle Position Verification: Confirm that the needle smoothly passes through the designated hole in the Ruffler foot without making contact with any metal. Adjust the needle position slightly to the left or right if necessary. A bent needle may require replacement.
- Presser Foot Position: Ensure that your presser foot is securely in the down position. Given the Ruffler foot’s size, it may not be immediately evident whether the foot is up or down. Attempting to stitch with the foot in the up position can result in a thread jam.
Pro Tip: Develop a pre-sewing checklist to streamline your safety checks and ensure a smooth sewing experience.
Step 4 – Test Run
With the Ruffler foot attached, the stitch type selected, and safety checks completed, initiate a test run to acquaint yourself with the foot’s operation:
- Prepare Scrap Fabric: Cut a piece of scrap fabric to test the Ruffler foot. This allows you to observe the gathering and pleating results before applying them to your actual project.
- Execute a Test Row: Stitch a test row on the scrap fabric, closely monitoring the Ruffler foot’s performance. Observe the size and spacing of the gathers to determine if any adjustments are needed.
- Fine-Tune Settings: Based on the test run, fine-tune the Ruffler foot settings, such as stitch length or gathering depth, to achieve the desired outcome for your specific project.
Pro Tip: Keep a record of successful settings for future reference, creating a handy reference guide for different fabrics and projects.
Incorporating a Ruffler foot into your sewing repertoire opens up a world of possibilities, allowing you to effortlessly create intricate gathers and pleats. By following this detailed guide, even novice seamstresses can navigate the process with confidence, ensuring a seamless and enjoyable sewing experience.
Configuring Ruffler Foot Settings
Once you’ve familiarized yourself with the basics of using a ruffler sewing foot, the next step is unlocking its full potential by configuring the settings for optimal results. This in-depth guide will walk you through adjusting both the distance of pleats and the depth of gathering, providing you with a versatile and customizable sewing experience.
Distance of Pleats Using a Ruffler Foot
The distance of pleats is a crucial aspect of achieving the desired look in your sewing projects. The ruffler foot offers multiple settings, allowing you to control the spacing between gathers and pleats.
Let’s break down the numerical guide found on the ruffler foot:
| Setting | Description |
|---|---|
| Star (★) | The star setting indicates that the ruffler foot will produce stitches without creating any gathers. This setting is useful when a flat, ungathered fabric is required for specific project elements, offering a clean and smooth appearance. |
| 1 | Setting the ruffler foot to 1 results in gathers, bringing the fabric together at regular intervals. Ideal for creating subtle gathers in various sewing projects, this setting adds a touch of elegance and soft texture to the fabric. It is a versatile choice for projects where a gentle gathering effect is desired. |
| 6 | Opting for setting 6 introduces small tucks, creating a distinctive pattern with a tuck occurring every 6th stitch. This setting adds a nuanced texture to your fabric, suitable for a range of decorative elements. The small tucks provide a unique and intricate design, making this setting perfect for projects where a detailed and textured appearance is desired, such as on cuffs, collars, or decorative trims. |
| 12 | Setting 12 yields larger pleats, providing a more pronounced and spaced-out gathering effect. This setting is advantageous when a bolder, statement look is desired in your sewing projects. Ideal for creating dramatic pleats with substantial spacing, it adds volume and visual interest to the fabric. This setting is particularly suitable for projects where a bold and eye-catching gathering effect is desired, such as on skirts, dresses, or curtain panels. |
Pro Tip: Experiment with different settings on scrap fabric to observe the impact of each on gather size and spacing before applying them to your main project.
Depth of Gathering with a Ruffler Foot
The depth of gathering refers to how much fabric is gathered in each stitch. The ruffler foot offers a sophisticated control mechanism for adjusting this depth:
| Adjustment Feature | Description |
|---|---|
| Black Knob and Elongated Adjusting Screw | Located at the back of the ruffler foot, the black knob is connected to an elongated adjusting screw. This mechanism influences the depth of gathering by modifying the stitch length. |
| Small Numerical Value | Adjusting the black knob to a smaller numerical value results in more extensive ruffles. This setting is beneficial when aiming for a fuller and denser gathering effect in your fabric. |
| Larger Numerical Value | Conversely, setting the black knob to a larger numerical value produces fewer ruffles, creating a more spaced-out and subtle gathering effect. This is advantageous when a lighter touch of gathering is preferred. |
Pro Tip: Fine-tune the depth settings on scrap fabric to achieve the precise gathering effect desired for your specific project.
Dual Adjustment Feature: Customizable and Precise Settings
The dual adjustment feature, combining the front lever for distance and the back black knob for depth, empowers you to achieve a highly customized and precise sewing experience. This versatility allows you to adapt the ruffler foot to different fabrics, projects, and personal preferences.
| Setting | Distance (Front Lever) | Depth (Black Knob) | Effect |
|---|---|---|---|
| Star | No Gathers | Adjustable | Flat, ungathered fabric |
| 1 | Gathers | Adjustable | Subtle and regular gathers |
| 6 | Small Tucks (Every 6th) | Adjustable | Small, patterned tucks with regular spacing |
| 12 | Larger Pleats (Every 12th) | Adjustable | Pronounced and spaced-out pleats for a bold effect |
Pro Tip: Maintain a settings log for various fabrics and projects to streamline future usage of the ruffler foot.
By mastering the art of configuring your ruffler foot settings, you unleash a world of possibilities in your sewing projects. This guide ensures that even novice seamstresses can navigate these adjustments with ease, providing a seamless and enjoyable sewing experience.
Ruffler Foot Vs. Traditional Gathering
In the realm of gathering, traditional methods involve using 2 or 3 rows of stitching with an extended straight stitch length. The subsequent step involves pulling the bobbin threads, yielding delicate gathers. Although not overly complicated, this approach can prove time-intensive, particularly when dealing with numerous ruffles in your project.
Enter the Ruffler foot, a time-saving alternative with the added benefit of simultaneous pleating. One notable distinction lies in the outcome: the Ruffler foot generates larger gathers, resembling miniature pleats, providing a distinctive look to your sewing projects.
| Aspect | Ruffler Foot | Traditional Gathering |
|---|---|---|
| Ease of Use | Pros: Automates gathering and pleating simultaneously, reducing manual effort. | Pros: Simple process involving straight stitching and bobbin thread pulling. |
| Cons: Requires some practice to master adjustments for optimal results. | Cons: Can be time-intensive, especially for projects with numerous ruffles. | |
| Gathering Outcome | Pros: Generates larger gathers resembling miniature pleats, providing a unique look. | Pros: Yields delicate gathers suitable for a softer and subtler appearance. |
| Cons: May not be suitable for projects where smaller, delicate gathers are desired. | Cons: Limited in achieving bold or pronounced gathering effects. | |
| Time Efficiency | Pros: Significantly reduces gathering time, making it ideal for larger projects. | Pros: Suitable for small projects but may be time-consuming for larger ones. |
| Cons: Initial setup may take time, but the overall process is faster. | Cons: Multiple rows of stitching and thread pulling can be time-consuming. | |
| Versatility | Pros: Versatile in gathering and pleating fabrics of varying thicknesses and weights. | Pros: Limited to creating delicate gathers in thinner fabrics. |
| Cons: Larger gathers may not suit all projects, limiting versatility. | Cons: May not be suitable for heavy fabrics or achieving bold pleats. |
The choice between a Ruffler foot and traditional gathering depends on the project requirements, desired outcome, and the seamstress’s preference for ease of use and versatility.
Ruffler Foot Vs. Gathering Foot: A Comparative Analysis
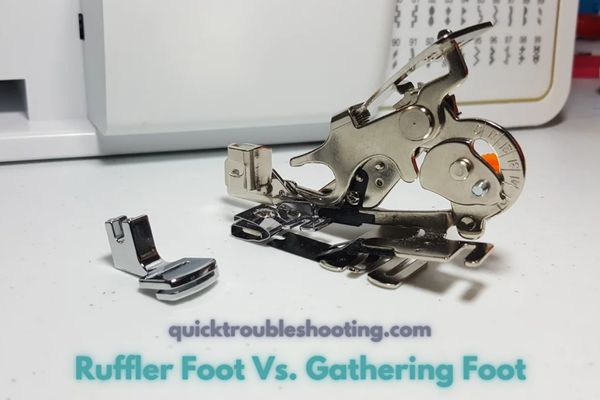
1.Size Discrepancy: A Visual Distinction
Upon examining the accompanying photo, the initial observation is the substantial difference in size between the two: a gathering foot is notably simpler and smaller compared to its larger counterpart, the ruffler. Tailored for generating subtle gathers in thinner fabrics, the gathering foot lacks the capacity for pleating.
2. Gathering Foot: Simplicity for Delicate Gathers
A gathering foot is crafted with simplicity in mind, aiming to create gentle gathers specifically in thinner fabrics. However, it does not possess the capability to execute pleating, making it a specialized tool for particular fabric types.
3. Ruffler Foot: Versatility in Gathering and Pleating
In contrast, a ruffler foot showcases versatility by seamlessly gathering and pleating fabrics of varying thicknesses and weights. This adaptability positions the ruffler foot as an essential tool for home sewers, especially those aspiring to monetize their sewing skills. Whether working with thin or thick fabrics, the ruffler foot emerges as a multifunctional companion, expanding the scope of your sewing capabilities.
A Comparative Overview of Gathering Foot and Ruffler Foot in Sewing
| Aspect | Gathering Foot | Ruffler Foot |
|---|---|---|
| Size and Visual Appeal | Pros: Compact and visually simpler, making it easy to handle. | Pros: Larger size provides visibility but may be bulkier to handle. |
| Cons: Limited in size, may not be suitable for extensive gathers. | Cons: Bulkier size may be intimidating for some users. | |
| Functionality | Pros: Specialized for creating gentle gathers in thinner fabrics. | Pros: Versatile, capable of gathering and pleating in various fabric thicknesses. |
| Cons: Lacks the ability to execute pleating or work with thicker fabrics. | Cons: May produce larger gathers, not suitable for delicate or subtle effects. | |
| Versatility | Pros: Ideal for specific projects requiring delicate gathers. | Pros: Versatile, suitable for a wide range of projects with varying requirements. |
| Cons: Limited to specific fabric types and gathering styles. | Cons: May not be the best choice for projects requiring small, delicate gathers. | |
| Suitability for Home Sewers | Pros: Simplicity makes it beginner-friendly for novice sewers. | Pros: Versatility appeals to home sewers looking to diversify their sewing skills. |
| Cons: Limited in capabilities, may not suit advanced sewing needs. | Cons: May have a learning curve for beginners due to its larger size and features. | |
| Monetization Potential | Pros: Adequate for basic projects, may not be suitable for monetization. | Pros: Versatility opens up opportunities for diverse and marketable sewing projects. |
| Cons: May limit income potential for home sewers seeking to monetize skills. | Cons: Requires proficiency to fully leverage its capabilities for monetization. |
The choice between a Gathering Foot and a Ruffler Foot depends on factors such as the project’s nature, desired gathers, the user’s comfort level, and long-term sewing goals.
Using A Ruffler Foot On Flat Fabric
Unlocking a new realm of possibilities, a ruffler foot extends its utility by enabling the seamless attachment of a ruffle to a flat piece of fabric. This feature proves exceptionally beneficial for various sewing scenarios, such as connecting a ruffle to a hem or affixing a skirt to a waistband.
Whether you’re a novice seamstress or an experienced one, integrating a ruffler foot into your toolkit can elevate your sewing capabilities. Let’s delve into the detailed aspects of using a ruffler foot on flat fabric.
Benefits and Applications
- Efficient Hem Ruffles:
- When aiming to add ruffles to hems, a ruffler foot streamlines the process, ensuring efficiency and precision.
- The foot’s design allows for simultaneous stitching, saving time and effort compared to traditional methods.
- Seamless Waistband Attachments:
- Attaching a skirt to a waistband becomes a breeze with a ruffler foot, offering a neat and professional finish.
- The foot’s automated gathering and pleating capabilities contribute to uniform and aesthetically pleasing results.
- Versatile Ruffling:
- The ruffler foot’s adaptability allows you to experiment with different fabric types, providing versatility in your sewing projects.
- From lightweight fabrics to heavier materials, the foot accommodates various textiles, expanding your creative possibilities.
Step-by-Step Guide
| Step-by-Step Guide | Detailed Instructions |
|---|---|
| Prepare Your Fabric | Ensure both the flat fabric and the ruffle material are adequately prepared, including any required hems or finishes. |
| Attach the Ruffler Foot | Follow the standard procedure outlined in the manufacturer’s instructions to securely attach the ruffler foot to your sewing machine. |
| Set the Stitch Type | Choose a straight stitch setting on your sewing machine, and adjust the stitch length to a suitable value, typically around 4.0, for optimal gathering results. |
| Perform a Safety Check | Conduct a safety check before initiating your project, ensuring that the needle is in the correct position and that the presser foot is securely down. |
| Stitching Process | Begin stitching, guiding both the flat fabric and the ruffle material through the machine. |
| The ruffler foot will automatically gather and pleat the fabric as you stitch, creating a seamless and efficient attachment. | |
| Finishing Touches | Once the stitching is complete, attend to any necessary finishing touches. |
| Consider tying off the ends instead of backstitching for a smoother and more polished result in your sewing project. |
Tips and Considerations
- Mindful Hemming: When dealing with hem ruffles, remember to hem the bottom of the fabric first before attaching the ruffle. This ensures a polished and well-finished look.
- Practice on Scrap Fabric: Before working on your actual project, practice using the ruffler foot on scrap fabric to familiarize yourself with its operation and settings.
- Experiment with Settings: Explore the ruffler foot’s settings to achieve different gather depths and distances, allowing for customization based on your project requirements.
Common Pitfalls to Avoid
| Common Pitfalls | Preventive Measures |
|---|---|
| Neglecting Hemming | Ensure proper hemming of the bottom fabric before attaching the ruffle. |
| Hemming prevents an unfinished appearance, contributing to a polished and professional look. | |
| Skipping Safety Checks | Conduct thorough safety checks before initiating sewing with the ruffler foot. |
| Verify needle position and ensure the presser foot is securely down to prevent needle breakage or thread jams. | |
| Prioritize safety checks to maintain a smooth and trouble-free sewing process. |
Incorporating a ruffler foot into your sewing endeavors opens up a world of possibilities, particularly when working with flat fabric. From enhancing hems to simplifying waistband attachments, the ruffler foot proves to be a valuable tool for seamstresses of all skill levels. Remember to take advantage of its versatility, practice on scrap fabric, and explore different settings to achieve the desired results in your sewing projects.
How To Use A Ruffler Foot: Sewing Tips And Troubleshooting
When completing your sewing project with a ruffler foot, paying attention to the finishing touches ensures a polished and professional outcome. Below are essential tips for this phase:
1. Backstitching Alternatives
- Backstitching Unnecessary: Unlike traditional sewing practices, using backstitching at the ends is unnecessary with a ruffler foot. This is due to the foot’s design and functionality.
- Tying Off Ends: Instead of backstitching, consider tying off the ends. Different brands may have varied preferences, and it’s advisable to understand your specific ruffler foot’s characteristics.
- Seamless Finish: Tying off the ends provides a seamless finish to your sewing project, avoiding any abrupt or bulky appearance.
2. Testing and Adjusting for Optimal Results
- Experimentation is Key: Achieving the desired gathers and pleats with a ruffler foot involves a degree of experimentation. Understand that finding the perfect settings might require some trial and error.
- Conduct Test Runs: Before diving into your actual project, conduct test runs on scrap fabric. This allows you to familiarize yourself with the ruffler foot’s behavior and refine your settings for the best outcome.
- Optimal Settings: Determine the optimal settings that align with your specific project and fabric type. This might include adjusting the pleat depth, distance, and other relevant parameters.
3. Precision in Cutting for Efficient Results
- Length Adjustment: Extend the length of your ruffle beyond the actual requirement during the cutting phase. This ensures that you have ample material to work with during the gathering process.
- Trimming Excess: After completing the stitching, trim any excess material carefully. This step contributes to a clean and well-finished appearance in your sewing project.
- Avoid Ruffling Too Tightly: Exercise caution not to ruffle too tightly, as this can pose challenges in adjusting overly tight stitches. Maintain a balance for the desired effect without compromising manageability.
- Measurement Technique: For precise gathering, cut a strip of scrap fabric (approximately 10 inches or 25cm) and gather it. Measure the final length – a 5-inch measurement signifies a 2:1 gather, while 3 inches indicate a 3:1 gather. Keeping detailed notes during this process aids future reference.
By incorporating these tips into your sewing routine, you enhance the efficiency and professionalism of your projects while ensuring a smooth experience, even for novice seamstresses.
Where To Buy A Ruffler Foot: Where to Find Your Ideal Ruffler Foot
Whether you’re a seasoned seamstress or a novice enthusiast, acquiring a Ruffler foot for your sewing machine is a step towards enhancing your sewing capabilities. Here’s an in-depth guide on where and how to purchase this indispensable tool.
1. Specialty Sewing Shops: A Haven for Sewing Accessories
Specialty sewing shops prove to be a haven for sewing enthusiasts, offering a diverse array of accessories to cater to various sewing needs. When on the lookout for a Ruffler foot, consider visiting these shops for a hands-on experience and expert guidance.
Benefits:
- Expert Assistance: Knowledgeable staff can provide insights into different Ruffler foot models, helping you choose one that suits your machine and projects.
- Quality Assurance: Specialty shops often prioritize quality, ensuring that you invest in a durable and reliable accessory for your sewing machine.
Considerations:
- Pricing: While specialty shops may offer premium quality, the prices might be slightly higher. Consider this as an investment in a durable tool.
2. Online Platforms: A World of Options at Your Fingertips
In the digital age, online platforms have become go-to destinations for a vast range of products, and Ruffler feet are no exception. Explore popular online marketplaces such as eBay or Amazon for an extensive selection.
Benefits:
- Variety: Online platforms provide access to a wide variety of Ruffler foot models, including original and after-market options.
- Convenience: Shop from the comfort of your home, comparing prices and reading customer reviews before making a decision.
Considerations:
- Research: Ensure that the product you choose is compatible with your sewing machine model. Read customer reviews for insights into the performance and durability of the Ruffler foot.
3. After-Market Models: Affordable Alternatives for Every Sewist
For budget-conscious sewists, after-market models are an excellent option. These are compatible accessories produced by third-party manufacturers and are often available at a more affordable cost than original brand-specific Ruffler feet.
Benefits:
- Affordability: After-market models are generally more budget-friendly, allowing you to acquire a Ruffler foot without breaking the bank.
- Wide Availability: These models are often readily available online, providing easy access for seamstresses of all levels.
Considerations:
- Compatibility: Double-check the compatibility of after-market models with your sewing machine’s shank type to ensure a seamless fit.
4. Checking Shank Type: A Crucial Compatibility Factor
Before making any purchase, it’s crucial to be aware of your sewing machine’s shank type – whether it’s high or low. This information is essential for ensuring that the Ruffler foot you choose fits seamlessly onto your machine.
Table of Popular Ruffler Foot Brands:
| Brand | Specialty Shop Availability | Online Platforms | After-Market Models |
|---|---|---|---|
| Brother | ✓ | ✓ | ✓ |
| Singer | ✓ | ✓ | ✓ |
| Janome | ✓ | ✓ | ✓ |
| Pfaff | ✓ | ✓ | ✓ |
| Bernina | ✓ | ✓ | ✓ |
This table highlights the availability of popular Ruffler foot brands across different purchasing avenues. Seamstresses can choose based on their preferences, budget, and specific machine compatibility.
Ruffler Foot FAQs
What Does a Ruffler Foot Do?
A Ruffler foot is a sewing machine accessory designed to automate the processes of gathering and pleating fabric. It creates evenly spaced gathers or pleats, saving time and effort compared to traditional methods.
How to Attach a Ruffler Foot to a Sewing Machine?
Follow the manufacturer’s instructions for your specific sewing machine model. Generally, align the foot with the shank, secure the bar at the back, and place the semi-circular loop over the needle clamp.
Can I Use a Ruffler Foot for Zig-Zag Stitches?
No, Ruffler feet are designed exclusively for straight stitches. Attempting to use them with zig-zag stitches may result in malfunction and compromised gathering quality.
Why Is Backstitching Unnecessary with a Ruffler Foot?
Backstitching is typically unnecessary as the Ruffler foot creates a continuous gather. Tying off the ends is a preferred alternative to secure the stitches without compromising the gathered effect.
How to Troubleshoot Thread Jams with a Ruffler Foot?
Ensure the needle is correctly positioned, the presser foot is securely down, and the fabric is guided smoothly. If thread jams persist, check for a bent needle and replace it if necessary.
How to Make Ruffles Without a Ruffler Foot?
While a Ruffler foot streamlines the process, you can manually make ruffles by using a long stitch length and pulling the bobbin threads. Sew two parallel rows, then gently gather the fabric by pulling the bobbin threads.
Conclusion: How To Use A Ruffler Foot
In conclusion, wielding a Ruffler foot elevates your sewing projects by streamlining the intricate processes of gathering and pleating. From the initial attachment to adjusting settings and troubleshooting, this versatile accessory proves invaluable for both novice and experienced seamstresses.
Whether you aim to enhance efficiency, achieve professional finishes, or diversify your sewing skills, the Ruffler foot emerges as a must-have tool. Experiment, test, and explore its capabilities to unlock a world of creative possibilities, turning your sewing endeavors into seamless, precise, and visually stunning creations. So, step into the world of precision ruffling with confidence and elevate the craftsmanship of your sewing projects with the remarkable Ruffler foot.