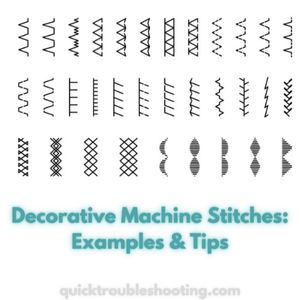
Decorative Machine Stitches: Examples & Tips
Unlocking a world of creativity, decorative machine stitches are invaluable for seamstresses seeking to infuse their creations with unique flair. Addressing the question, “What are decorative machine stitches?” these stitches offer seamstresses an array of possibilities to elevate their projects.
Beyond the traditional zig-zag and hemstitch, sewing machines now boast an extensive repertoire of decorative stitches that can breathe life into your designs.
In this guide, we’ll explore examples and share tips to empower you with the knowledge and inspiration needed to take your sewing endeavors to new heights.
Decorative Machine Stitches Tutorial
A plethora of intricate stitches is available on contemporary computerized sewing machines. Whether you own a trusted older model or the latest cutting-edge sewing machine, valuable tips exist to optimize the performance of any machine capable of executing decorative stitches.
Start With A Zig Zag
Embarking on your journey into the realm of decorative machine stitches, the optimal starting point lies in mastering the fundamental zig-zag stitch. This stitch serves as the cornerstone, both simple and versatile, forming the basis for a multitude of embellishments.
Executed effortlessly with either your all-purpose sewing foot or a specialized zig-zag foot, this stitch opens the door to a world of creative possibilities.
Delving into the intricacies of the zig-zag stitch, it is imperative to acquaint yourself with the diverse adjustments offered by your sewing machine. These adjustments encompass varying the width and length of the stitch, allowing for a spectrum of effects.
However, it’s essential to note that different sewing machine brands may present distinct procedures for tweaking the zig-zag settings. Familiarizing yourself with these nuances ensures a comprehensive understanding of how to manipulate the stitch to achieve desired outcomes.
As you embark on this learning process, consider experimenting with different adjustments and settings, gradually expanding your repertoire of zig-zag techniques. This hands-on exploration not only enhances your proficiency with the basic stitch but also lays a solid foundation for tackling more intricate decorative machine stitches in the future.
By thoroughly comprehending the nuances of the zig-zag stitch, you’ll find yourself equipped with a valuable skill set that extends beyond the stitch itself. This foundational knowledge fosters a sense of confidence and ease when navigating through the myriad stitches and variations that comprise the realm of decorative machine stitching.
As you progress, you’ll discover that the journey begins with the simplicity of the zig-zag but unfolds into a rich tapestry of creative expression.
Make Samples Of Decorative Stitches
Crafting samples of your decorative machine stitches stands as a crucial and insightful practice, offering a wealth of benefits to enhance your sewing prowess.
Begin this constructive process by acquiring affordable materials such as calico or seed cloth, along with a marking pen, to meticulously document your experimentation.
- Material Selection:
Begin with affordable materials like calico or seed cloth, accompanied by a marking pen for meticulous documentation. - Systematic Experimentation:
Delve into diverse stitches, recording crucial details, including stitch settings and relevant information. - Blueprint for Skill Development:
Transform meticulous documentation into a blueprint for evolving your repertoire of decorative machine stitches. - Organized Findings:
Dedicate fabric samples to each stitch type, systematically expanding and refining your skills as you progress. - Consecutive Stitch Execution:
Execute stitches in consecutive rows on fabric samples, noting vital specifics such as selection, size, and tension. - Shorthand Notation:
Employ a shorthand notation system (e.g., W.5 for width and L.2 for length) for quick and comprehensive future reference. - Memory Aid:
Detailed notes and visual representation serve as invaluable memory aids for effortless recreation of specific stitches. - Confidence Building:
Recreate stitches with ease, fostering confidence and efficiency in your sewing endeavors. - Personal Sewing Encyclopedia:
Elevate your documentation by adding insights like the most suitable foot or thread for each stitch. - Comprehensive Understanding:
Transform your documentation into a rich resource, providing a holistic understanding of nuances associated with each decorative stitch. - Navigation Through Machine Options:
Overcome initial daunting feelings when navigating machines with multiple options by utilizing comprehensive lessons and detailed handbooks. - Resource Utilization:
Harness the resources provided with modern machines to unravel their full potential. - Empowerment for Exploration:
Use resources to empower yourself, enabling exploration and mastery of a diverse range of decorative machine stitches with ease and creativity.
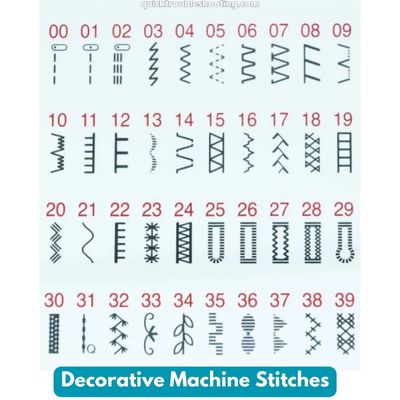
Types of Decorative Machine Stitches
Two main types of decorative machine stitches exist: dense or satin-type stitches and less dense but open stitches. Dense stitches are closely sewn with repetitions to form intricate patterns, while open stitches involve a series of smaller stitches repeated in a cohesive design.
Understanding these categories provides insight into the principles behind decorative stitches, allowing you to explore variations with a trained eye.
Dense Decorative Machine Stitches: Enhancing Precision and Texture
To delve into the art of dense decorative machine stitches, consider adding valuable tools to your sewing arsenal, such as a clear appliqué foot and an embroidery foot. These additions prove instrumental in achieving the intricacy and precision required for dense stitching.
The term “dense” is aptly applied to these stitches because of the close proximity of each thread, forming a tightly woven pattern. Rooted in the zig-zag concept, the needle moves laterally, creating a visually captivating and textured design.
An embroidery foot plays a pivotal role in this process by allowing the thread to accumulate beneath the foot, providing ample space for the stitch to develop its density.
Different types of feet cater to dense embroidery, with some featuring a wider opening under the foot at the back, facilitating smoother navigation around corners. Here are some essential tips for mastering the creation of dense decorative stitches:
- Check the Sewing Machine Needle:
Ensure that your machine is equipped with a new needle appropriate for the fabric you are using. The right needle makes a significant difference in the success of your decorative stitches. - Test the Stitch:
Take a test drive with your needle, fabric, and chosen stitch settings. The size, length, and intensity of dense stitches can be influenced by various machine settings, making it crucial to experiment before committing to your final project. - Thread Selection Matters:
Pay careful attention to the thread you use, particularly for embroidery stitches. The bobbin thread, in particular, should be finer if you are working with a thick and closely spaced stitch. Thread bulk can impact both the stitch appearance and tension. - Stabilize Effectively:
Utilize a high-quality stabilizer to prevent puckering and ensure the stitches maintain their intended design without bunching up. Proper stabilization is vital for the overall success of dense decorative stitches. - Practice, Practice, Practice:
Embrace the mantra of practice to hone your skills with decorative machine stitches. Experiment with available stitches, explore “mix and match” effects to create unique borders, and envision different areas where these dense stitches can elevate the visual appeal.
In summary, mastering dense decorative machine stitches involves a combination of the right tools, meticulous preparation, and dedicated practice. Once understood and perfected, these stitches unlock the potential for quick and easy embellishments, transforming ordinary projects into works of art.
Open Decorative Stitches
Open decorative stitches consist of repeating single stitches, forming intricate designs, and some machines can even create letters as part of their program. Special foot attachments are beneficial for these stitches, enabling easy needle reversal and providing visibility in front of the needle.
To create these stitches effectively, consider essential tips:
- Needle Selection:
Ensure you use a new needle suitable for the fabric, as it is crucial for achieving perfect open decorative stitches. - Stabilizer Choice:
Choose an appropriate stabilizer to enhance fabric firmness and prevent puckering or irregular stitches, considering options like iron-on stabilizers or spray-on starch. - Machine Settings Check:
Test the stitch on a fabric scrap and experiment with different settings, including width and stitch length. Keep a file of stitches for future reference, allowing you to reproduce successful results. - Manual Reference:
Consult the machine manual for guidance on using new stitches. Manuals often recommend suitable fabrics, correct thread types, and the most suitable foot for optimal stitch execution. - Lettering Practice:
If your machine offers lettering, practice this specialized skill to add a personal touch to your creations. Explore the various decorative stitch adaptations available. - Guidelines Utilization:
Employ guidelines to maintain stitch alignment. A marked centerline using a pen and a clear quilter’s ruler aids in keeping the stitch design straight, especially as the needle may change direction during the creation of open decorative stitches.
Advanced Machine Settings for Decorative Stitches: Unveiling the Precision of Modern Sewing Machines
In the realm of decorative stitching, modern sewing machines offer a plethora of advanced settings that empower seamstresses to elevate their creations to new heights of precision and intricacy.
This section serves as a comprehensive guide, unraveling the intricacies of these advanced machine settings and providing insights into how they can be leveraged to enhance decorative stitching.
Understanding the Stitch Width
One key aspect that distinguishes decorative stitches is the width of the stitch. Modern sewing machines allow for a remarkable degree of customization in stitch width, enabling users to create intricate patterns and designs. Exploring this setting opens up a world of possibilities, from delicate embellishments to bold, statement-making stitches.
Practical Tip:
Experiment with varying stitch widths on a scrap fabric to observe how the decorative stitch changes. Understanding the impact of different widths will guide you in selecting the perfect setting for your specific project.
Mastering Stitch Length for Precision
Precision in decorative stitching often hinges on the stitch length. Modern machines provide the flexibility to adjust the length of each stitch, allowing for meticulous detailing or creating more open and fluid designs. Delve into this setting to gain control over the intricacy and density of your decorative stitches.
Practical Tip:
When working on intricate patterns, opt for a shorter stitch length to achieve finer details. For more open and flowing designs, a longer stitch length can enhance the overall aesthetic.
Tension Control: The Art of Balance
Tension control plays a pivotal role in achieving the perfect decorative stitch. Modern sewing machines feature advanced tension settings that ensure a harmonious interplay between the upper and lower threads. A balanced tension setting is crucial for preventing issues such as puckering, thread breakage, or uneven stitching.
Practical Tip:
Before starting a decorative stitching project, conduct a tension test on a fabric scrap. Adjust the tension settings until you achieve a balanced and visually pleasing result.
Utilizing Stitch Patterns and Variations
Beyond the basic zig-zag and hemstitch, modern machines come equipped with an array of built-in stitch patterns designed for decorative purposes. Explore these patterns and variations, ranging from floral motifs to geometric shapes. Understanding how to select and customize these patterns adds a layer of sophistication to your decorative stitching repertoire.
Practical Tip:
Refer to your machine's manual for a guide on available stitch patterns. Experiment with different patterns to discover unique combinations that align with your creative vision.
Interactive Stitch Editing
Some advanced sewing machines offer interactive stitch editing capabilities, allowing users to manipulate and customize existing decorative stitches or create entirely new ones. This feature grants unparalleled creative freedom, enabling you to tailor stitches to suit specific projects or preferences.
Practical Tip:
If your machine supports stitch editing, invest time in exploring this feature. Create a personal library of custom stitches that align with your unique style and design preferences.
Stitch Memory and Sequencing
For intricate and complex decorative designs, machines with stitch memory and sequencing capabilities prove invaluable. These features enable users to program a sequence of stitches, ensuring seamless transitions between different patterns or variations.
Practical Tip:
When working on elaborate decorative projects, leverage stitch memory to pre-program sequences. This ensures a smooth and cohesive flow in your stitching, particularly useful for quilting or large-scale embroidery.
In the realm of decorative stitching, mastering advanced machine settings is akin to unlocking a realm of limitless creative potential. From controlling stitch width and length to achieving the perfect tension balance, modern sewing machines offer a sophisticated toolkit for every seamstress.
Embrace these advanced features, experiment fearlessly, and let your creativity flourish as you embark on a journey to create precise, intricate, and truly unique decorative stitches.
Sewing Machine Needle Guide for Decorative Stitches
I can provide a general guide on needle types that are commonly used for decorative machine stitches:
| Decorative Stitch Type | Recommended Needle Type | Recommended Needle Size Range | Example Brands |
|---|---|---|---|
| Satin Stitch | Embroidery Needle | 75/11 – 90/14 | Schmetz, Organ |
| Zigzag and Multi-Stitch Patterns | Universal Needle | 80/12 – 100/16 | Klasse, Inspira |
| Metallic Thread Stitches | Metallic Needle | 80/12 – 90/14 | Schmetz, Organ |
| Decorative Topstitching | Topstitch Needle | 80/12 – 100/16 | Organ, Singer |
| Appliqué Stitches | Appliqué or Embroidery Needle | 75/11 – 90/14 | Schmetz, Klasse |
| Decorative Quilting Stitches | Quilting Needle | 75/11 – 90/14 | Schmetz, Klasse |
| Chain Stitch | Universal Needle | 80/12 – 100/16 | Organ, Inspira |
Remember, the needle choice also depends on the fabric you are using, so consider the fabric type when selecting the needle. Always refer to the manufacturer's recommendations and test on a scrap piece of fabric before working on your final project.
Uses for decorative machine stitches: Unleashing Creativity in Every Corner
Decorative machine stitches are a versatile and creative addition to various items in your home, adding a wow factor to everyday objects. Consider enhancing the visual appeal of items in every room:
- Kitchen: Spruce up tea towels with decorative stitches.
- Dining Room: Elevate tablecloths and serviettes with creative stitching.
- Lounge: Decorate cushions and table mats for a personalized touch.
- Bedroom: Add flair to pillowcases and pajamas with unique machine stitches.
- Bathroom: Transform bath towels and facecloths with decorative stitching.
Moreover, explore diverse applications for decorative machine stitches:
- Bindings:
Add flair to project bindings with interesting decorative machine stitches, breaking away from traditional straight stitch approaches. - Couching:
Infuse originality by using decorative stitches to attach braids or ribbons, providing a fresh alternative to the standard zig-zag stitch. - Stitch in the Ditch and Quilting:
Adventure into quilt-making by incorporating decorative machine stitches in the ditch, adding extra color and texture to your quilts. - Adding Texture:
Enhance garments by incorporating decorative stitches on pockets, yokes, and other parts, creating captivating textures. - Appliqué:
Replace the standard zig-zag stitch with decorative machine stitches for appliqué, adding originality and texture to fabric shapes. - Adding Ribbon Strips:
Experiment with decorative stitches on ribbons, lace, or any trim to create unique and interesting patterns. Test on a scrap first to ensure a perfect fit.
From personalized monograms on birthday gifts to creative touches on Fido’s dog bandana, decorative machine stitches provide endless opportunities to infuse creativity into your surroundings.
Conclusion: Decorative Machine Stitches
In conclusion, decorative machine stitches stand as a captivating avenue for unleashing creativity in the realm of sewing. From the intricacies of dense satin-type stitches to the airy charm of open stitches, the possibilities are vast.
As we’ve explored various tips and examples, the journey of mastering these stitches involves not just skill but also a keen understanding of tools, materials, and the principles governing each stitch category.
Embarking on this creative endeavor requires attention to detail, from selecting the right needle and thread to experimenting with settings on your sewing machine.
Whether adorning your kitchen with embellished tea towels or adding personalized touches to bedroom linens, decorative stitches can transform ordinary items into unique, visually striking pieces.
As you venture into the world of bindings, couching, quilting, and appliqué, consider the valuable tips provided to enhance your stitching endeavors. Each stitch tells a story, adding texture, color, and originality to your creations.
So, with a trained eye, a touch of experimentation, and a commitment to practice, may your sewing journey with decorative machine stitches be as delightful and fulfilling as the stitches themselves. Happy stitching!