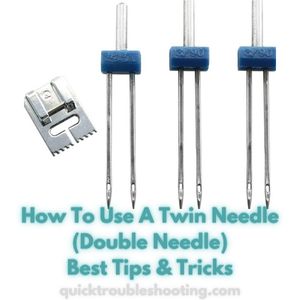
How To Use A Twin Needle (Double Needle) Best Tips & Tricks
Unlocking the secrets of a twin needle, also known as a double needle, can elevate your sewing game, especially when aiming for that polished finish on knit fabrics. Seamstresses, if you’re wondering how to use a twin needle effectively, you’ve come to the right place.
This versatile tool, composed of two needles joined together with a single shank at the top, is not only a game-changer for achieving professional-looking hems in knit fabrics but also a handy accessory for decorative purposes in woven fabrics, including pin tucking.
Dive into our best tips and tricks to harness the full potential of the twin needle and discover a whole new realm of sewing possibilities. Let’s unravel the mysteries and master the art of twin needle sewing together.
Tutorial: How To Use A Twin Needle (Double Needle)
Ever wondered how those impeccably stitched rows on the hems and sleeves of your favorite t-shirts are achieved? While commercial cover stitch machines are often behind the magic, you can recreate the same polished finish using a twin needle with your regular sewing machine!
Delve into the world of twin needle sewing and discover how this versatile tool can be your secret weapon for achieving flawless hems. Not just limited to t-shirts, you can also elevate your sewing game by learning how to use a twin needle to finish the elastic in leotard legs or necklines.
The best part? You don’t need a high-end sewing machine to get those professional-looking results—virtually all modern domestic sewing machines can handle a twin needle. Ready to unravel the secrets of creating beautiful twin needle hems? Let’s dive into our comprehensive guide, filled with the best tips and tricks for mastering this sewing technique.
What Is A Twin Needle Used For?
A twin needle, also referred to as a double needle, serves a dual purpose in the realm of sewing, offering both decorative and functional benefits. Its primary use is to create two parallel rows of stitches on the top side of the fabric, while simultaneously forming zig-zag or interlocked stitches on the underside.
The distinctive result is not only visually appealing but also serves specific functions, particularly when working with different types of fabrics.
In the context of woven fabrics, the application of a twin needle is largely decorative. The parallel stitching it produces adds a touch of sophistication and detail to garments without compromising the structural integrity of the fabric.
This decorative effect is often employed to enhance the aesthetic appeal of various projects, such as embellishing the edges of woven garments or creating intricate patterns.
However, the true versatility of the twin needle becomes evident when working with stretch fabrics. In this scenario, the twin needle becomes a valuable tool for creating hems that not only look attractive but also possess remarkable flexibility.
The parallel rows of stitches contribute to the visual appeal of the hem, while the zig-zag or interlocked stitches on the underside provide additional strength and resilience.
When sewing stretch fabrics, it becomes crucial to ensure that all seams and hems possess a similar level of stretch as the fabric itself. This is essential for preventing the stitches from breaking, especially in tighter-fitted clothing where the fabric is subjected to significant stretch and movement.
Failing to match the stretch characteristics can result in compromised durability and the formation of unsightly holes in the seams, undermining the overall quality of the garment.
What Twin Needle Supplies Аre Needed?
When venturing into the world of twin needle sewing, ensuring that you have the right supplies is crucial for a successful and enjoyable experience. Here’s a detailed list of the essential twin needle supplies you’ll need:
- Scrap Fabric or Project to Hem: A piece of scrap fabric is essential for practicing and testing your twin needle setup before working on your actual project. Alternatively, you can have the specific garment or fabric you intend to hem.
- Twin Needle: Choose a high-quality twin needle from reputable brands such as Schmetz, Birch, or Singer. Twin needles come in various sizes, so select one that suits the weight and type of fabric you’ll be working with.
- Zig-Zag Foot: An indispensable accessory for twin needle sewing. The zig-zag foot is crucial because the regular foot on your sewing machine may not have a wide enough opening to accommodate both needles of the twin needle. Ensure your zig-zag foot is compatible with your sewing machine model.
- Thread: Prepare two reels of thread for the top of your sewing machine. Since the twin needle creates two parallel rows of stitches, you’ll need a separate thread for each needle. Choose thread colors that complement your fabric or opt for a contrasting look for decorative purposes.
- Regular Bobbin: Despite using two needles on the top, you’ll only need one bobbin. Wind the bobbin with a thread color that matches or complements the fabric, as the bobbin thread will be visible on the underside of your stitches.
- Sewing Machine: The good news is that you don’t need a fancy sewing machine for twin needle sewing. As long as your sewing machine can execute a straight stitch, and you have a zig-zag foot with a wide enough opening to accommodate the twin needle, you’re all set. This makes twin needle sewing accessible to a wide range of sewing machines, including basic models.
Having these twin needle supplies ready and understanding how to set up your sewing machine for twin needle use will empower you to create professional-looking hems and decorative stitches with ease. Whether you’re a beginner or an experienced seamstress, these supplies form the foundation for successful twin needle sewing projects.
Types of Twin Needle: A Comprehensive Guide
Twin needles, also known as double needles, come in various types, catering to different sewing needs and fabric types. Understanding the key classifications will empower you to choose the right twin needle for your specific project. Here’s an in-depth look at the types of twin needles:
A twin needle is classified by their:
- Shank thickness
- Twin Needle Purpose
- Distance between the needles
Shank Thickness
Twin needles are classified by the thickness of their shank, denoted by numbers such as 75/11, 80/12, 90/14, and 100/16. The smaller the number, the thinner the needle, and the more suitable it is for lighter fabrics. For example, 75/11 is thinner and ideal for lightweight fabrics, while 100/16 is thicker and suitable for heavier fabrics.
Twin Needle Purpose
Twin needles are designed for specific fabric types, and their purpose can be categorized into different types, including:
- Jersey Twin Needle: Ideal for sewing jersey fabrics.
- Universal Twin Needle: Versatile and suitable for a range of fabrics.
- Ballpoint Twin Needle: Specifically designed for knits and stretch fabrics.
- Embroidery Twin Needle: Designed for embroidery work.
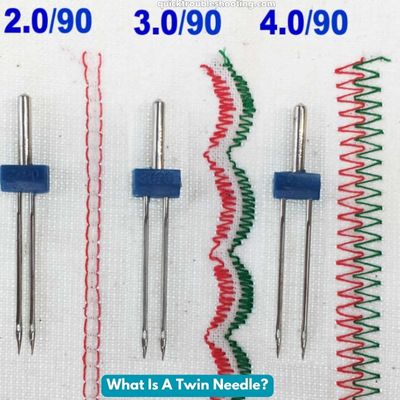
Distance Between Twin Needles
The distance between the two needles is measured in millimeters and includes options like 1.6mm, 2mm, 3mm, and 4mm. The choice of distance is often a matter of personal preference, with wider distances providing a unique aesthetic appeal.
Tips for Choosing the Right Twin Needle
- Prioritize the purpose of the twin needle based on the fabric you’ll be sewing.
- Consider shank thickness according to the weight of the fabric; smaller numbers for lighter fabrics and larger numbers for heavier fabrics.
- Pay attention to the distance between the needles, keeping in mind that the choice is often personal preference and aesthetics.
- Ensure that the chosen twin needle’s distance fits within the presser foot of your sewing machine to avoid any issues during stitching.
Important Note: When examining a twin needle, it's normal for one needle to be slightly shorter than the other. This intentional design contributes to the creation of interlocked stitches on the underside and is not a fault.
The wide array of twin needle options allows for customization based on your specific sewing requirements. By considering shank thickness, purpose, and the distance between needles, you can confidently select the right twin needle for your project, ensuring professional-looking and durable results.
How To Thread A Machine With A Twin Needle: Step-By-Step Guide
Threading a sewing machine with a twin needle may seem a bit daunting, but with these step-by-step instructions, you’ll master the process in no time. Whether your manual provides guidance or not, these tips will ensure a smooth setup:
Step 1 – Insert The Needle
Begin by placing the shank of the twin needle into your sewing machine. The top of the shank should insert into the machine just like a regular single needle. It typically pushes up into a designated hole and is secured in place by a screw. Ensure that the flat part of the shank faces towards the back of the machine.
Step 2 – Replace The Presser Foot
Switch out your regular presser foot for a zig-zag foot. The zig-zag foot has a wider slot to accommodate the twin needles. Double-check that the needles fit securely into the slot to prevent any issues during stitching.
Step 3 – Thread The Bobbin
Thread the bobbin in the usual manner. No changes are needed in this step, as the bobbin thread remains unchanged when using a twin needle.
Step 4 – Thread The First Reel
Take the first reel of thread and thread your sewing machine as you normally would. Guide the thread through the left needle.
Step 5 – Thread The Second Reel
Thread the second reel of thread through the machine in the usual way, directing it to the right side of the twin needle. Many sewing machines provide a designated space for the second reel of thread. If not, improvise by using the bobbin winder or attaching a wooden stick to the side of your machine. For regular use of a twin needle, consider investing in a spool holder that can be positioned beside your machine.
If you don't have two reels of thread in the same color, a practical solution is to wind a spare bobbin with the desired thread color and use it as the second reel.
These straightforward steps should have your sewing machine threaded and ready for twin needle stitching. Remember to follow the specific guidelines provided in your machine’s manual, if available. With a bit of practice, you’ll confidently achieve professional-looking results with your twin needle sewing projects.
How To Use A Twin Needle – Ready To Sew: A Step-By-Step Guide
Congratulations! You’re now prepared to embark on your twin needle sewing journey. Using a twin needle differs slightly from the conventional single needle sewing, especially when it comes to sewing hems. Here’s a detailed guide to help you seamlessly transition to twin needle sewing:
Twin Needle vs Single Needle Sewing
Traditionally, hems are sewn on the wrong side of the garment. However, with a twin needle, you’ll be sewing on the right side. This might feel a bit unusual initially, but as you become accustomed to this technique, you’ll find it becomes second nature.
Sewing With A Twin Needle
- Pin Under Your Hem: Place your fabric with the wrong side facing up and pin under the hem. Unlike single needle sewing, the pins should be on the right side where you will be sewing.
- Position the Foot: Set up your sewing machine with the zig-zag foot in position, ensuring that the twin needles fit securely within the wider slot of the foot.
- Determine Sewing Distance: Use your fingers to feel the edge of the fabric as you sew and determine the distance from the edge. The stitches should be close to the edge without crossing it.
- Hand-Wheel Check: Before starting the full sewing process, use the hand-wheel for the first couple of stitches. This precautionary step ensures that the needles won’t hit the side of the foot and potentially snap.
- Selecting Stitch Type: While straight stitches are commonly used for sewing hems with a twin needle, you can also explore other options such as a zig-zag or other decorative stitches. If opting for a straight stitch, set the stitch length to 2.0-2.5.
- Sewing Process: Begin sewing your hem, following the determined distance from the edge. Maintain a steady pace, and guide the fabric smoothly through the machine.
Important Note: The top side of your fabric will now feature two rows of stitching, creating a zig-zag appearance on the underside. This is a characteristic result of using a twin needle and is completely normal.
By following these detailed steps, you’ll confidently navigate the process of sewing with a twin needle. Experiment with different stitch types and lengths to achieve the desired look for your hems, and soon you’ll be creating professional-quality double hems with ease.
Troubleshooting How To Use A Twin Needle: Fixing Common Issues
While using a twin needle, you might encounter issues such as the formation of a crease or tunnel between the two rows of stitching, particularly in lightweight fabrics. This can prevent your hem from sitting flat. Here’s a comprehensive guide to troubleshooting and addressing this problem:
Issue: Crease or Tunnel Between Rows of Stitching
Cause: This problem often arises in lightweight fabrics where the zig-zag stitches at the back pull too tight, creating a crease or tunnel effect.
Solution:
- Hemming Tape or Double-Sided Interfacing: A highly effective solution is to add hemming tape under the hem. Hemming tape provides the fabric with additional body and thickness, preventing the excessive tension that leads to creasing. If hemming tape isn’t available, you can use double-sided interfacing cut into strips of approximately ⅜ inch (1cm) width as a substitute.
- Adjusting Machine Pressure: If your sewing machine has a pressure adjustment feature, try increasing the pressure. This adjustment helps in holding the hem flat as it is being stitched, minimizing the chances of creasing or tunneling.
- Tension Adjustment: Another troubleshooting step involves adjusting the sewing machine tension. If the tension is too tight, it can contribute to the formation of creases. Experiment with slightly loosening the tension to see if it alleviates the issue. Make small adjustments and test on a scrap piece of fabric before applying the changes to your actual project.
- Test Stitching: Before starting the actual hem on your garment, it’s advisable to conduct a test stitch on a scrap piece of fabric. This allows you to observe and address any issues before they affect your project.
- Consider Needle Size and Type: Ensure you are using the appropriate needle size and type for your fabric. The wrong needle may contribute to tension issues and affect the overall stitching quality.
- Check Thread Quality: Poor-quality or old thread can lead to tension problems. Ensure that you are using high-quality thread suitable for your fabric, and consider replacing old thread.
- Machine Maintenance: Regularly maintain and clean your sewing machine, including the bobbin area and needle plate. Accumulated lint and debris can affect the machine’s performance.
By systematically addressing these troubleshooting steps, you can resolve issues related to the formation of creases or tunnels between rows of stitching when using a twin needle. Experimenting with these solutions will help you achieve smooth and professional-looking twin needle hems on a variety of fabrics.
Alternatives to a Twin Needle: Exploring Alternative Stitching Methods
If a twin needle is not available, there are alternative stitching methods you can employ to achieve similar effects, especially when working on hems. Here’s a detailed exploration of alternative options:
1. Sewing Two Rows Individually: Instead of using a twin needle to create parallel rows of stitches, you can opt for the traditional approach of sewing two separate rows individually. This method involves sewing one row of stitches and then aligning the fabric to sew a second row alongside it. While this technique can produce a similar look, it may require more precision and attention to maintain uniformity.
2. Singular Zig-Zag Stitch for Stretch Hems: For stretch fabrics where maintaining elasticity is crucial, an alternative to the twin needle is using a singular zig-zag stitch. Zig-zag stitches accommodate the stretch of the fabric, reducing the risk of stitches popping when the garment is pulled or stretched.
Steps for Using a Singular Zig-Zag Stitch:
- Set your sewing machine to the zig-zag stitch option.
- Adjust the stitch width and length according to your preference and the requirements of the fabric.
- Place the fabric under the presser foot and start sewing, ensuring the zig-zag stitch covers the edge of the hem.
- Use a test piece of fabric to determine the ideal zig-zag settings for the specific stretch and weight of your material.
Considerations for Alternatives
- Precision is key when sewing two rows individually to achieve a neat and symmetrical look. Take your time to align the fabric accurately for each row.
- When using a singular zig-zag stitch, the stitch width and length play a crucial role. Experiment with different settings on a scrap piece of fabric to find the optimal configuration for your project.
Pros and Cons
- Twin Needle:
- Pros: Creates two parallel rows simultaneously, efficient for hems.
- Cons: Requires a specific needle and may not be readily available.
- Sewing Two Rows Individually:
- Pros: Can achieve a similar look to twin needle stitching.
- Cons: Requires precision and may take more time.
- Singular Zig-Zag Stitch:
- Pros: Maintains stretch in fabric, suitable for knit materials.
- Cons: Single row of stitching may not replicate the exact appearance of twin needle sewing.
Choosing the Right Alternative: The choice between sewing two rows individually or using a singular zig-zag stitch depends on the fabric type, the desired aesthetic, and the availability of materials. Experiment with both methods on scrap fabric before applying them to your actual project, ensuring you achieve the desired results.
Sewing Machine Compatibility with Twin Needles
Here’s a table listing some types and brands of sewing machines that are known for their compatibility with twin needles:
| Type of Sewing Machine | Brands Known for Twin Needle Compatibility |
|---|---|
| Mechanical Sewing Machine | –Singer |
| – Brother | |
| – Janome | |
| Computerized Sewing Machine | – Bernina |
| – Pfaff | |
| – Juki | |
| Serger/Overlock Machine | – Baby Lock |
| – Brother | |
| – Janome |
Please note that the compatibility with twin needles may vary within each brand and model, so it's essential to check the specific model's manual or product description to ensure it supports twin needle use.
Conclusion: How to Use a Twin Needle (Double Needle)
In conclusion, using a twin needle opens up a world of possibilities for achieving professional-looking hems and decorative stitches. Once you’ve mastered the threading process and familiarized yourself with troubleshooting techniques, the twin needle becomes a valuable tool for seamstresses.
If you have additional tips or insights on using a twin needle, feel free to share your expertise in the comments below.