How To Use A Walking Foot: Easy Guide For Beginners
Uncover the art of mastering the walking foot – a must-have for precision and ease in sewing. Our beginner-friendly guide demystifies How To Use A Walking Foot.
Explore the potential of your sewing machine as the walking foot effortlessly handles tricky fabrics, ensuring impeccable alignment of seams, stripes, and patterns. Ideal for sewing knits and slippery materials, this versatile accessory is a game-changer. Quilters, take note – achieve perfectly matched quilt block seams and seamless stitching through multiple layers.
Embark on a journey with our step-by-step guide, breaking down the intricacies of the walking foot, empowering you to elevate your sewing projects. Delve into the world of this incredible tool and make sewing a truly gratifying experience for enthusiasts of all levels.
Walking Foot Tutorial
In this guide, we’ll explore the concept of a walking foot, its applications, the appropriate scenarios for its usage, and provide step-by-step instructions on how to effectively utilize this versatile sewing machine attachment. Additionally, we’ll offer troubleshooting tips and alternative approaches for your convenience.

The sewing machine walking foot lives up to its practical name, serving as an attachment that guides you precisely through various processes. This singular foot is not only adaptable but also diligent, simplifying the task of sewing bulky fabrics.
Often referred to as a dual feed foot or even feed foot, the walking foot proves to be a valuable tool for a range of sewing applications. Join us as we delve into its uses and unveil the seamless ways it can enhance your sewing experience.
What Is A Walking Foot Sewing Machine?
A walking foot sewing machine refers to a type of sewing machine equipped with a walking foot attachment. While there are industrial sewing machines that incorporate a walking foot, the focus of this explanation is on the version designed for home machines.
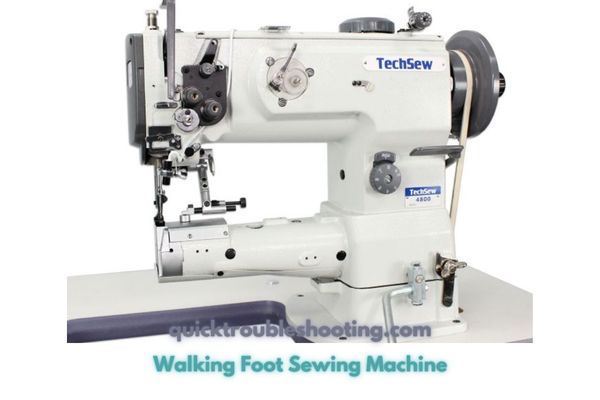
In the context of industrial machines, a walking foot is often used for specialized tasks such as sewing leather. These machines, though effective, can be characterized by their louder operation, somewhat akin to the sound of driving a truck. Despite the noise, they excel in sewing leather materials with precision and finesse.
However, it’s essential to note that the tutorial in question primarily addresses walking presser feet designed for home sewing machines. These domestic-grade walking feet are tailored for a range of tasks and are distinct from their industrial counterparts. The emphasis is on providing guidance for users of home sewing machines, offering insights into the features, uses, and benefits of walking presser feet in this specific context.
What Is A Walking Foot?
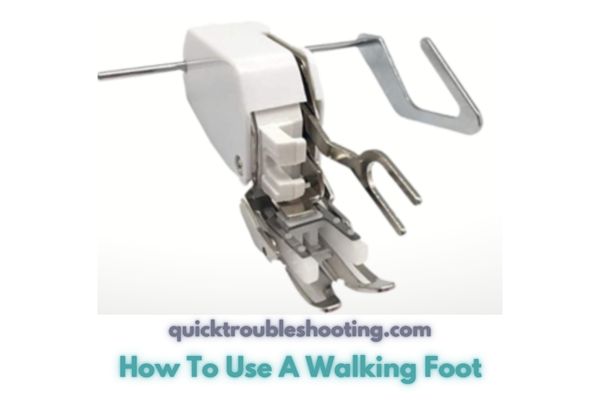
A walking foot, in the realm of sewing machines, is a specialized attachment designed to replace the conventional all-purpose presser foot, also known as the regular presser foot. What sets the walking foot apart is its unique construction, featuring an additional set of teeth on the underside. These extra teeth play a crucial role in guiding multiple layers of fabric uniformly through the sewing machine.
Wht is the primary purpose of a walking foot?
The primary purpose of a walking foot is to eliminate the problem of uneven feeding that can occur when sewing through thick or layered fabrics. By holding the top layer securely and synchronizing its movement with the machine’s feed dogs, the walking foot ensures that both the top and bottom layers progress at the same pace. This mechanism contributes to improved sewing quality and prevents issues such as fabric slippage or misalignment.
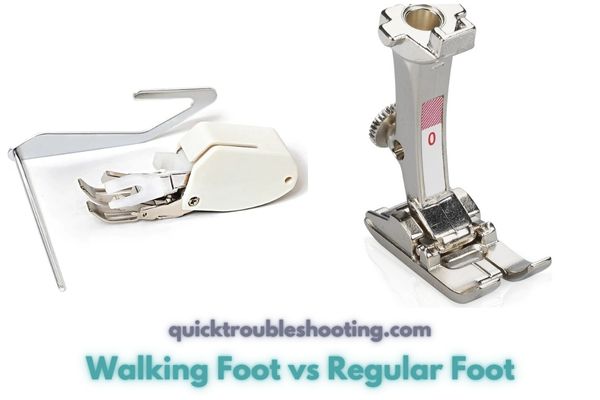
What are the advantages of using a walking foot over a regular presser foot?
While a regular presser foot may suffice for guiding two layers of fabric, the walking foot excels when dealing with several layers or situations requiring enhanced control. Despite its relatively large size, characterized by a box-like protrusion at the back of the machine housing the walking mechanism, the walking foot is an invaluable tool for specific sewing tasks.
Some brands offer walking feet with detachable or interchangeable sole plates at the bottom, catering to various sewing purposes. Although the walking foot may appear bulky, its actual feel on the machine is not drastically different from a regular foot once attached.
One distinctive feature of the walking foot is its lifting and lowering action, as opposed to the continuous contact of a regular foot with the fabric. This unique movement aids in releasing any tension, pulling, or puckering that may occur on the top or bottom layers during sewing. This makes the walking foot particularly advantageous when working with challenging fabrics such as those that are bulky, stretchy, or slippery.
In essence, the walking foot is a versatile and essential accessory for sewists, offering improved control, even fabric feeding, and enhanced ease when working with difficult materials. With a straightforward attachment process and a bit of practice, the walking foot becomes a valuable asset, elevating the sewing experience, especially when dealing with intricate projects and fabrics that require special attention and care.
What Is A Walking Foot Attachment Used For?
A walking foot attachment is utilized to enhance the sewing process on various fabrics, ensuring a smoother and more professional finish. Its primary function is to control the movement of fabric layers, preventing issues like puckering and fabric shifting. While its application is broad, here are some key uses for a walking foot attachment:
- Thick Quilting Projects: Invaluable for thick quilting projects, including stitch in the ditch quilting, the walking foot excels in providing even stitches over multiple layers of fabric.
- Handling Thick Fabrics and Bulky Seams: The extra set of teeth on the walking foot grips material from above, making it ideal for sewing over thick fabrics and bulky seams with precision.
- Versatility with Different Fabrics: The teeth on the top of the walking foot enable a secure grip on various fabrics, including stretch materials and silky fabrics, ensuring smooth and controlled stitching.
- Sewing Specific Garment Features: The walking foot is adept at climbing over bulky seams and is used for sewing waistbands, fly openings, crotch seams, as well as for garment sewing and stitching bindings, hems, and pockets.
- Preventing Puckering and Shifting: In many sewing projects, the walking foot plays a crucial role in preventing undesirable effects such as puckering and shifting of the fabric, resulting in a neater final product.
- Accurate Matching of Stripes or Plaids: The walking foot’s ability to hold the fabric in place proves advantageous when sewing patterns like stripes or plaids, ensuring accurate matching for a polished look.
The walking foot attachment is a versatile tool that contributes to the precision and ease of sewing, making it an essential accessory for a variety of sewing projects, from quilting to garment construction.
When to Use a Walking Foot:
- Machine Quilting and Quilt Binding: Achieve precise and even stitching when quilting or binding layers.
- Bulky Seams and Thick Fabrics: Navigate effortlessly through bulky seams, ideal for heavy fabrics like denim.
- Slippery Fabrics: Securely handle stretchy and slippery materials such as Lycra and knits.
- Thick Straps on Tote Bags: Eliminate ripples caused by a regular foot when sewing thick straps on tote bags.
- Pattern Matching: Ensure accurate alignment when sewing stripes, plaids, or directional prints.
- Leather and Sticky Fabrics: Effectively sew through leather, vinyl-coated fabrics, and other sticky materials.
- Stretch Fabrics: Control the movement of stretch fabrics to prevent uneven stitches.
When Not to Use a Sewing Machine Walking Foot:
- Free Motion Embroidery: Unsuitable for free motion embroidery as the feed teeth restrict the fabric’s independent movement.
- Reversing: Inappropriate for backstitching ends as walking presser feet lack a reversing capability.
- Wide Stitches: Not suitable for wide stitches; best used with straight stitches or very narrow stitches.
Comparison Table: When and When Not to Use a Walking Foot
| Situation | When to Use a Walking Foot | When Not to Use a Walking Foot |
|---|---|---|
| Quilting and Binding | Achieve even and precise stitching in quilt projects. | Not recommended for free motion embroidery due to restricted movement. |
| Bulky Seams and Fabrics | Navigate effortlessly through heavy fabrics and seams. | Inappropriate for backstitching; lacks a reversing capability. |
| Slippery Fabrics | Securely handle stretchy and slippery materials. | Unsuitable for wide stitches; best with straight or narrow stitches. |
| Thick Straps on Tote Bags | Eliminate ripples when sewing thick straps. | Not ideal for free motion embroidery due to feed teeth control. |
| Pattern Matching | Ensure accurate alignment in stripes or plaids. | Should not be used for wide stitches. |
| Leather and Sticky Fabrics | Effectively sew through leather and sticky materials. | |
| Stretch Fabrics | Control the movement of stretch fabrics. |
This comparison table highlights the specific situations in which a walking foot is beneficial and instances where its usage may not be optimal, providing a comprehensive guide for sewists to make informed decisions based on their sewing projects.
Brands of Walking Foot: A Detailed Overview
When it comes to walking presser feet, there is a variety of brands available, catering to different sewing machine models and user preferences. Some popular brands include Janome, Brother, and Singer, each offering walking feet designed to seamlessly integrate with their respective sewing machines.
Popular Brands of Walking Foot
Here is a detailed look at these brands:
Janome:
Janome, a well-established brand in the sewing industry, provides walking presser feet tailored for its sewing machine models. These walking feet are crafted to meet Janome’s high standards of quality and compatibility. When considering a walking foot for a Janome machine, it’s recommended to opt for the brand’s own accessory to ensure a perfect fit and optimal performance.
Brother:
Brother, another leading name in the sewing machine market, offers walking feet designed specifically for Brother sewing machines. These walking feet are engineered to work seamlessly with Brother machines, ensuring smooth fabric feeding and precise stitching. Choosing a Brother-branded walking foot for your Brother sewing machine is a reliable way to maintain compatibility and performance.
Singer:
Singer, a renowned brand with a rich history in sewing, provides walking presser feet compatible with its sewing machine models. Singer’s walking feet are designed to uphold the brand’s reputation for durability and functionality. If you own a Singer sewing machine, opting for a Singer-branded walking foot is a wise choice to ensure a perfect match and optimal sewing results.
Generic Brands:
In addition to brand-specific walking feet, there are numerous generic options available in the market. These generic walking feet are designed to fit a variety of sewing machines, providing a versatile solution for users with different machine brands. Generic walking feet are often more affordable and accessible, making them a popular choice for sewists seeking a budget-friendly option.
Availability and Purchasing:
Walking presser feet from these brands are readily available at various outlets, including local haberdasheries, online retailers like Amazon, and auction platforms like eBay. This accessibility ensures that users can easily find the right walking foot for their specific sewing machine model.
Considerations Before Purchasing:
Before making a purchase, it is crucial to determine whether your sewing machine has a high shank or low shank. This information ensures that the walking foot is compatible with your machine’s design.
High shank and low shank refer to the distance between the screw that holds the foot in place and the bottom of the foot. Matching the shank type ensures a secure and proper fit, allowing the walking foot to function effectively.
In summary, brands such as Janome, Brother, and Singer offer dedicated walking presser feet for their sewing machines, ensuring compatibility and optimal performance.
Additionally, generic options provide a versatile solution for users with various machine brands, offering accessibility and affordability. Before purchasing, always check and match the shank type of your sewing machine to guarantee a seamless fit and enhance your sewing experience.
How To Use A Walking Foot Instructions
Here is how to use a walking foot, including the best stitches, and needles, and attaching it to your sewing machine.
What Stitches to Use With a Walking Foot: A Detailed Explanation
When it comes to the stitches you can use with a walking foot, it’s essential to understand that this specialized presser foot has some limitations in terms of versatility. The walking foot, true to its name, prefers to stay on the straight and narrow path.
Here’s a detailed exploration of what stitches are suitable and not suitable for use with a walking foot:
- Straight Stitches: The walking foot excels at executing straight stitches. This includes the basic straight stitch commonly used for various sewing projects. Its design and functionality are optimized for this fundamental stitch, ensuring smooth and even fabric feeding.
- Narrow Width Stitches: Alongside straight stitches, the walking foot is well-suited for narrow width stitches. While it may not be compatible with fancy wide decorative stitches, it performs admirably with stitches of a more modest width. This makes it ideal for tasks that require precision and control.
- Completion of Quilts: The walking foot is particularly beneficial for quilting projects. It plays a crucial role in the completion of quilts, especially when using the space bar included with a walking foot kit. This accessory enhances the walking foot’s ability to guide multiple layers of fabric smoothly, contributing to the overall quality of quilt stitching.
What Stitches Not to Use With a Walking Foot:
- Reverse Stitch: One limitation of the walking foot is its inability to perform a reverse stitch. The mechanism of the walking foot is designed for forward movement, making it unsuitable for tasks that require stitching in reverse.
- Fancy Wide Decorative Stitches: The walking foot is not designed for executing fancy wide decorative stitches. Its functionality is optimized for straightforward stitching, and its structure may not accommodate the intricate movements required for decorative stitch patterns.
Key Considerations:
When using a walking foot, it's essential to align your expectations with its primary strengths – straight stitches and narrow width stitches. This presser foot is a valuable tool for projects where precision and even fabric feeding are paramount, such as quilting and working with multiple layers of fabric.
The walking foot is best suited for straight stitches and narrow width stitches. It excels in projects that demand precision, such as quilting, and its limitations include the inability to perform reverse stitches and fancy wide decorative stitches. Understanding these strengths and limitations will help you make the most of the walking foot in your sewing endeavors.
What Needle to Use With a Walking Foot
Choosing the right needle is crucial when using a walking foot, as it ensures optimal stitching results and prevents issues such as breakage. Here’s a detailed guide on what needles to use with a walking foot, taking into account different fabric types:
- Regular Needles for General Use: For most standard sewing projects, you can use your regular sewing machine needles that are matched to the type of fabric you’re working with. Ensure the needle size and type are appropriate for the fabric, considering factors like weight and thickness.
- Thicker Needles for Thicker or Bulkier Fabrics: When sewing thicker or bulkier fabrics, it’s advisable to choose a thicker needle that can withstand the demands of the material. Thicker needles are less likely to break and provide better penetration through dense fabrics.
- Specialized Needles for Specific Fabrics: Consider using specialized needles for specific fabrics to enhance the overall sewing experience. Here are some examples:
- Quilts: When quilting, especially through multiple layers, it’s beneficial to use quilting needles. These needles are designed to handle the demands of quilting projects, providing the necessary strength and precision.
- Leather: For leather projects, opt for leather needles. Leather needles have a chisel point that allows them to pierce through leather without tearing or damaging the material.
- Cotton Straps: Thicker universal needles are recommended for sewing cotton straps. These needles can penetrate the thickness of the straps more effectively.
Key Considerations:

Pay attention to the thickness and weight of the fabric you're working with. Thicker fabrics may require a larger or heavier needle to ensure smooth stitching.

Always check your sewing machine manual for recommendations on needle size and type. The manual often provides valuable information on the appropriate needles for specific machine models.
When using a walking foot, the general rule is to use regular needles that match your fabric type. Adjust the needle size based on the thickness of the fabric, opting for thicker needles when working with bulkier materials.
Additionally, consider specialized needles for specific fabrics like quilting needles for quilts, leather needles for leather, and thicker universal needles for cotton straps. Following these guidelines will help you achieve optimal results with your walking foot and ensure a smooth and successful sewing experience.
What Thread to Use With a Walking Presser Foot
Selecting the appropriate thread when using a walking presser foot is crucial for achieving strong, durable, and visually appealing stitches, especially when dealing with bulky or challenging fabrics. Here’s a detailed guide on what thread to use with a walking presser foot:
Match Thread to Fabric Type:
The fundamental principle when choosing thread for a walking presser foot is to match it to the type of fabric you are sewing. Different fabrics have unique characteristics, and selecting a thread that complements these properties ensures optimal results. For example:
- Cotton Fabric: Use cotton thread for sewing cotton fabrics.
- Polyester Fabric: Choose polyester thread for synthetic fabrics like polyester or blends.
- Denim Fabric: Opt for a sturdy, heavy-duty thread suitable for denim.
Consider Thread Strength:
Given that a walking presser foot is often used for sewing bulky or difficult fabrics, it is advisable to use a thread with sufficient strength. A strong thread helps prevent breakage and ensures the durability of your stitches, especially when dealing with challenging materials.
Types of Threads to Consider:
- Polyester Thread: Versatile and suitable for a wide range of fabrics, polyester thread is known for its strength, resilience, and colorfastness. It’s an excellent choice for everyday sewing projects.
- Cotton Thread: Ideal for natural fibers like cotton, linen, and rayon, cotton thread provides a soft and breathable finish. It’s commonly used in quilting and garment sewing.
- Heavy-Duty Thread: For sewing through tough materials such as denim, canvas, or leather, consider using a heavy-duty thread designed for strength and durability.
- Quilting Thread: If you’re working on quilting projects, using a dedicated quilting thread can enhance stitch definition and withstand the demands of multiple fabric layers.
Thread Size and Weight:
- Thread comes in various sizes and weights, denoted by numbers. Thicker threads (lower numbers) are suitable for heavy fabrics, while finer threads (higher numbers) work well with lightweight fabrics. Consider the weight of your fabric and adjust the thread size accordingly for balanced stitches.
Key Considerations:

Always refer to the recommendations in your sewing machine manual regarding the appropriate thread types and sizes for your specific machine model.

Test your chosen thread on a scrap piece of fabric before starting your project to ensure compatibility and to adjust tension settings if necessary.
The thread to use with a walking presser foot should be carefully chosen based on the type of fabric you are sewing. Match the thread material to the fabric, consider the strength of the thread, and select an appropriate size or weight based on the fabric’s characteristics.
Whether it’s polyester, cotton, heavy-duty, or quilting thread, the right choice will contribute to successful sewing outcomes with your walking presser foot, particularly when working with bulky or challenging fabrics.
How to Use a Walking Foot on Your Machine: Step-by-Step Guide
Using a walking foot on your sewing machine might seem challenging at first, but with practice, it becomes a valuable tool for various projects. Here’s a detailed step-by-step guide to help you set up and use a walking foot on your machine:
Step 1: Remove the Original Presser Foot
- Start by turning off your sewing machine and unplugging it for safety.
- Remove the current presser foot and presser foot holder. Keep the screw from the presser foot holder on one side or avoid removing it completely.
- Place the removed presser foot in a safe location.
Step 2: Attaching the Walking Foot
- Ensure the needle is up and out of the way.
- Slip the walking foot into place without screwing it in yet.
- When attaching the walking foot, position the lever over your needle clamp screw. This is the claw-like extension at the side of the foot.
- Use the utility screwdriver from your machine to tighten the screw securely.
- Confirm that the lever is set over the needle bar. This resting position ensures synchronization between the top and bottom feeds.
Note: Different machine brands may have variations in the lever design. Some may have a straight bar, while others have a claw-like end.
Optional Extra: Using the Quilting Bar
- If your walking foot comes with a quilting bar, slide it through the holes provided on the walking foot.
- Set the quilting bar at the desired width to sew evenly spaced lines along the quilt.
- While the quilting bar is not essential for all projects, it is particularly useful for maintaining an equal distance of stitching in quilted projects.
Step 3: Sewing with the Walking Foot
- Thread your bobbin as usual and ensure your machine is set to sew in straight lines.
- Start sewing, but go a little slower to allow the walking foot mechanism to move up and down smoothly.
- Adjust your machine’s speed settings if available. If your machine doesn’t have a speed regulator, control the speed with the foot pedal.
- Keep in mind that the walking foot doesn’t sew backward, so start near the edge and sew forward.
- To prevent the ends from unraveling, pull the threads to the back and knot the ends. Alternatively, secure the ends by making the first inch with small stitches and then switch to your regular stitch length.
Tips for Successful Use:
- Practice on scrap fabric before starting your actual project to get familiar with the walking foot’s behavior.
- Experiment with different fabric types and thicknesses to understand how the walking foot performs in various scenarios.
Following these steps and tips will help you confidently set up and use a walking foot on your sewing machine, opening up possibilities for smoother sewing, especially when working with challenging fabrics or engaging in quilting projects.
Supplies for Using a Sewing Walking Foot
When preparing to use a sewing walking foot, having the right supplies is essential for a smooth and successful sewing experience. Here’s a list of supplies you’ll need:
- Walking Foot: The primary supply is the walking foot itself. This specialized presser foot is designed to feed multiple layers of fabric evenly, making it a crucial tool for various sewing projects.
- Screwdriver: A screwdriver is required to attach the walking foot to your sewing machine. Most machines come with a screwdriver that is appropriately sized for this purpose.
- Quilting Bar (Optional): Some walking foot kits come with a quilting bar. This optional accessory is ideal for quilting projects, allowing you to sew evenly spaced lines. Slide it through the holes provided on the walking foot.
Note: Always refer to your sewing machine manual for specific recommendations and instructions related to your machine model.
Troubleshooting The Walking Foot
If you encounter difficulties with your walking presser foot, here are some recommended solutions to address common problems:
Foot Not Walking Smoothly:
Possible Solution: If you notice that your walking presser foot is not moving smoothly, addressing the issue involves careful examination and adjustment:
- Check Attachment: Ensure that the walking foot is correctly attached to the sewing machine. Examine the screw holding the foot in place to confirm it is securely fastened.
- Verify Lever Position: Check the position of the lever on the walking foot. It should be correctly placed over the needle bar. Proper synchronization between the foot and the needle bar is crucial for smooth operation. Adjust the lever if necessary.
- Synchronization Importance: Recognize that synchronization between the walking foot and the needle movement is essential. Any misalignment or incorrect attachment can lead to uneven feeding of fabric layers.
Won’t Backstitch:
Possible Solution: If your walking foot is not designed for reverse sewing, follow these steps for a smooth sewing experience:
- Understand Limitations: Acknowledge that the walking foot is not intended for backstitching or sewing in reverse. This is a characteristic of its design.
- Sew Forward: Always sew in a forward direction when using the walking foot. This ensures that the foot’s mechanism functions as intended. Avoid attempting to sew backward, as it can result in issues and affect the overall performance.
- Secure Thread Ends: To prevent unraveling at the beginning and end of your stitches, tie the ends of the threads securely. This simple step contributes to the overall neatness and durability of your sewing projects.
Skipping Stitches:
Possible Solution: Addressing skipped stitches involves a closer look at both the needle and thread:
- Examine the Needle: Check the needle for any signs of damage, bending, or dullness. If the needle is compromised, replace it with a new one of the appropriate type and size for your fabric.
- Thread Selection: Verify that the thread being used is suitable for the fabric type. Mismatched needle and thread weights can result in inconsistent stitches. Choose a thread that complements the fabric and the needle being used.
- Needle-Thread Compatibility: Ensure that the needle and thread are compatible, considering factors such as fabric weight and type. A harmonious combination of needle and thread contributes to a smoother sewing experience.
Won’t Attach to the Machine:
Possible Solution: If your walking foot is having difficulty attaching to the machine, consider the following steps:
- Check Compatibility: Confirm that the walking foot is compatible with your specific sewing machine brand and model. Not all walking feet are universally compatible across different machines.
- Consult the Manual: Refer to your sewing machine manual for specific recommendations regarding walking foot compatibility. The manual provides valuable information on accessories and attachments suitable for your machine.
- Explore Brand Options: If compatibility issues persist, explore alternative walking foot options that are designed explicitly for your sewing machine brand. Some manufacturers offer walking feet tailored to their machines.
- Seek Professional Advice: If uncertainties persist, consider seeking advice from your sewing machine manufacturer or a professional sewing machine technician. They can provide insights into compatibility issues and recommend suitable solutions.
Table: Walking Foot Troubleshooting Guide
| PROBLEM | POSSIBLE SOLUTION |
|---|---|
| Foot Not Walking Smoothly | Check correct attachment to the machine. Confirm the screw is secure and that the lever is over the needle bar. |
| Won’t Backstitch | Understand the walking foot doesn’t sew in reverse. Always sew forward. Tie thread ends to prevent unraveling. |
| Skipping Stitches | Examine the needle for damage or bending. Use the appropriate thread weight and type for consistent stitches. |
| Won’t Attach to Machine | Verify brand compatibility. Not all walking feet work universally; check your machine manual for recommendations. |
By addressing each troubleshooting scenario with detailed solutions, you can enhance your understanding of potential issues with the walking foot and confidently resolve them during your sewing projects. Always refer to your machine manual for guidance specific to your sewing machine model.
Alternatives to the Walking Sewing Foot: Teflon Presser Foot vs. Walking Foot
When confronted with the challenge of sewing bulky fabrics, knit fabrics, or quilts, the walking foot stands out as the optimal choice. However, for more delicate fabrics such as Lycra and knits, an alternative comes into play—the Teflon presser foot, a more compact option.
The Teflon presser foot, being smaller in size, easily snaps onto the regular-sized sewing machine foot, making it exceptionally manageable and suitable for sewing curves. Its distinctive feature lies in its construction or coating entirely made from Teflon. This unique attribute allows the foot to effortlessly glide over fabrics that would typically cause sticking, resulting in uneven or skipped stitches.
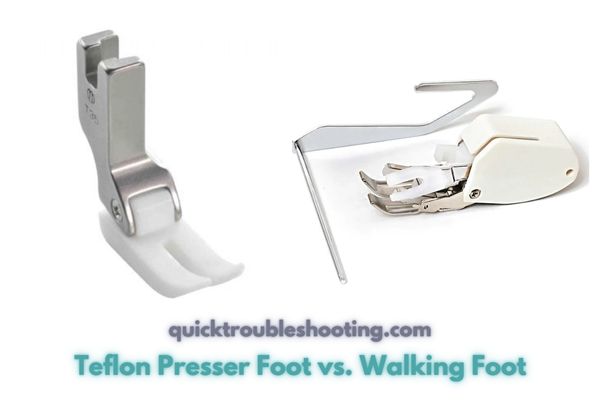
The walking foot proves unparalleled for heavy-duty sewing tasks involving bulky or challenging materials. On the other hand, the Teflon presser foot serves as a practical alternative for sewing finer fabrics, offering ease of maneuverability and preventing common issues associated with fabric adherence. Each option caters to specific needs, providing versatility in handling various sewing projects.
Explore More Sewing Insights
Thank you for delving into the world of sewing with our guide on using a walking foot! If you’re hungry for more knowledge about Sewing, Quilting and Embroidery machine feet, we’ve got you covered. Check out these additional articles on our website:
- Quilting Foot: A Guide to the 15 Best Presser Feet for Quilting
- Sewing Machine Feet Сomplete Guide: All the Presser Feet You Need
- Straight Stitch Foot – Perfect Straight Stitching
Feel free to click on the links above to expand your expertise and make your sewing journey even more enjoyable.
Conclusion: How To Use A Walking Foot
In conclusion, mastering the use of a walking foot opens up a world of possibilities for seamless and precise sewing. This indispensable tool, highlighted in our easy guide for beginners, ensures smooth fabric feeding, making it ideal for various projects, from quilting to handling tricky fabrics.
By following the step-by-step instructions and troubleshooting tips, beginners can confidently elevate their sewing skills and achieve professional-looking results with ease. Embrace the walking foot as your sewing ally, and enjoy a gratifying and frustration-free sewing experience.