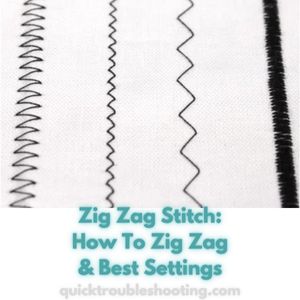
Zig Zag Stitch: How To Zig Zag & Best Settings
Unlocking the versatility of the zig-zag stitch is like discovering a hidden gem in the world of sewing. Wondering how to achieve the perfect zig-zag stitch and optimize your machine settings for the best results? Look no further!
The zig-zag stitch, with its charming name and simplicity, holds immense value for seamstresses. Nearly every sewing machine boasts this feature, making it easily accessible for all. With just a simple adjustment of the dial, you’ll be ready to embark on a journey of seamless zigging and zagging.
Let’s delve into the intricacies of mastering this stitch and explore the optimal settings to enhance your sewing prowess.
What Is Zig Zag Stitch?
The zig-zag stitch is a fundamental and versatile side-to-side sewing technique employed for various purposes, ranging from seam finishing to decorative embellishments and accommodating the demands of sewing stretch fabrics. What sets the zig-zag stitch apart is its geometrically inclined pattern, executed by the sewing machine in a series of lateral movements.
To achieve optimal results with the zig-zag stitch, it is essential to understand and manipulate the settings on your sewing machine. The stitch length can be adjusted, with a higher numerical value resulting in a longer zig-zag pattern.
Simultaneously, the width dial on the machine allows you to control the breadth of the stitch, providing the flexibility to make it wider or narrower based on your specific sewing needs.
One intriguing aspect of the zig-zag stitch is its adaptability for creating different effects. When the zig-zag stitches are executed closely together, it produces what is known as a satin stitch.
This particular stitch is characterized by its smooth and closely packed appearance, making it ideal for applications such as appliqué work or crafting buttonholes. On the other hand, the zig-zag stitch can be just as utilitarian when executed with a bit more spacing, suitable for both plain and highly decorative sewing projects.
In essence, the zig-zag stitch serves as a go-to technique for seamstresses seeking a reliable method for finishing seams, adding decorative flair, and accommodating the unique demands of sewing stretch fabrics.
Its adaptability, coupled with the ability to fine-tune its parameters, makes it an indispensable tool in the repertoire of any sewing enthusiast.
Best Tension for Zig Zag Stitch
Achieving the ideal tension is crucial for ensuring the success of a zig-zag stitch. The zig-zag stitch, known for its strength and versatility, can encounter issues such as puckering and snapping if the tension is not properly adjusted. Here’s an in-depth guide on finding the best tension for a zig-zag stitch:
- Understanding Tension:
Tension in sewing refers to the tightness or looseness of the stitches formed by the upper and lower threads meeting in the fabric. Achieving the right tension is essential for preventing issues like puckering and breakage in zig-zag stitches. - Check Machine Tension:
Before attempting a zig-zag stitch on new fabrics, always check your sewing machine’s tension settings. Each machine has a tension control mechanism, usually represented by a numbered dial. Refer to your machine’s manual for guidance on where the optimal tension settings lie. - Test on Scrap Fabric:
To determine the best tension for your zig-zag stitch on a specific fabric, start by testing on a scrap piece of the same material. This allows you to observe how the stitches form and identify any tension-related issues. - Puckering and Snapping:
If the tension is too tight, you may notice puckering, where the fabric gathers unnaturally. Additionally, overly tight tension can lead to thread breakage, compromising the integrity of the zig-zag stitch. - Adjust Tension Settings:
Gradually adjust the tension settings on your sewing machine. If puckering occurs, try reducing the tension. Conversely, if the stitches are too loose or if there’s a tendency for the threads to pull out easily, consider increasing the tension. - Balance the Tension:
Strive for a balanced tension where the upper and lower threads evenly contribute to the formation of the zig-zag stitch. This balance prevents the fabric from being distorted while maintaining the strength and integrity of the stitch. - Consider Fabric Type:
Keep in mind that different fabrics may require different tension settings. Thicker fabrics might need a slightly looser tension, while lighter fabrics may benefit from a slightly tighter tension to prevent puckering. - Machine-Specific Recommendations:
Some sewing machines come with specific recommendations for tension settings when using the zig-zag stitch. Refer to your machine’s manual or markings on the machine itself for any guidance provided by the manufacturer. - Avoid Hand Sewing Zig-Zag:
While it is technically possible to hand-sew a zig-zag stitch, it’s not a necessary skill to learn, especially considering that most sewing machines offer this stitch option. Utilizing a sewing machine ensures greater precision and efficiency in achieving the desired tension for zig-zag stitching.
Finding the best tension for a zig-zag stitch involves a combination of understanding your sewing machine’s settings, testing on scrap fabric, and making incremental adjustments to achieve a balanced and secure stitch.
Regularly checking and adjusting tension will contribute to the success of your zig-zag stitching on various fabrics and projects.
How To Zig Zag Stitch
Mastering the art of the zig-zag stitch is a crucial skill for any seamstress, and the process begins with meticulous testing and adjustment. Here’s a detailed guide on how to achieve the perfect zig-zag stitch:
- Prepare Your Fabric:
Start by testing your zig-zag stitch on a scrap piece of fabric. For optimal results, fold the fabric double, ensuring that you are sewing through two layers. This simulates the conditions you may encounter in your actual sewing projects. - Set Your Stitch Selector:
Adjust your sewing machine’s stitch selector to the zig-zag stitch setting. This is usually represented by an icon that resembles a zig-zag pattern. - Choose Width and Length:
Select the initial width and length settings for your zig-zag stitch. A good starting point is a width of 5.0 and a length of 2.0. This combination produces a medium-sized zig-zag stitch that is still relatively open. - Position Your Fabric:
Place your fabric under the presser foot of the sewing machine, ensuring it is positioned correctly for the desired stitching. - Lower the Presser Foot:
Lower the presser foot onto the fabric before you start sewing. Take a moment to ensure that the fabric is securely held in place. - Start Sewing Slowly:
Begin sewing slowly, especially when you are just starting. It’s crucial to maintain control, and starting slowly allows you to gauge the stitch quality. - Hold the Thread Tails:
As you start sewing, hold onto the tails of the threads. This precaution prevents them from getting tangled in the dog feed, the mechanism that moves the fabric under the needle. - Evaluate Your Test Scrap:
Once you’ve completed a segment of stitching on your scrap fabric, evaluate the results. Check the width and length of the zig-zag stitches to determine if they meet the requirements of your project. - Adjust Settings as Needed:
Based on your evaluation, make necessary adjustments to the stitch width and length. Refer to the suggested settings provided in the uses section below for guidance on different projects. - Refine and Test Again:
Repeat the process as needed, making incremental adjustments to achieve the perfect zig-zag stitch for your specific sewing project. Continue testing on scraps until you are confident in the stitch quality and settings.
By following these detailed steps and being attentive to the adjustments, you’ll be able to unlock the full potential of the zig-zag stitch for your sewing endeavors.
Settings for Zig Zag Stitch Sewing
Achieving the perfect zigzag stitch involves selecting the appropriate settings on your sewing machine based on the specific purpose of your project. Here are suggested zigzag stitch settings for various projects:
| Project | Purpose | Width | Length | Description |
|---|---|---|---|---|
| Seam Finishing | Finish raw edges to prevent fraying | 3.0 | 3.0 | Medium-width and medium-length zigzag for a secure edge |
| Stretch Seams | Sew seams on stretch fabrics | 1.0 | 2.5 | Narrow zigzag with a slightly longer length for elasticity |
| Applique | Attach decorative fabric pieces | 3.0 | 0.5 | Wider zigzag with a shorter length for precision |
| Gathering Cord | Create gathers or ruffles using a cord | 3.0 | 3.0 | Medium-width and medium-length zigzag for effective gathering |
| Sewing Buttons | Attach buttons to fabric | 0.0 | Varies | Switch to straight stitch with zero width; vary length based on button size and fabric thickness |
| Lace Trim | Attach lace trim to fabric | 2.0 | 2.0 | Moderate-width and moderate-length zigzag for secure attachment without overwhelming the lace |
Notes:
- These settings serve as general guidelines; slight adjustments may be needed based on fabric characteristics.
- Always test the zigzag stitch on a fabric scrap before applying it to the actual project.
- Refer to your sewing machine manual for any specific recommendations or features related to zigzag stitching.
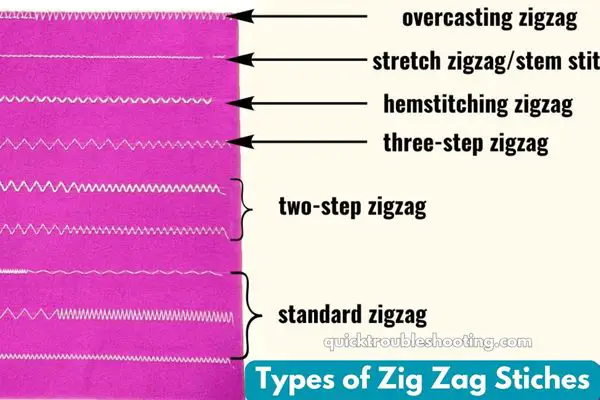
What Is A 3-Step Zigzag Stitch?
A 3-step zigzag stitch is a specialized and preset decorative stitching pattern that adds both flair and functionality to sewing projects. This unique stitch is characterized by its formation through three consecutive straight stitches that alternate between moving to the left and right, creating a distinctive zigzag pattern.
Here’s a detailed exploration of what makes a 3-step zigzag stitch noteworthy:
- Decorative Nature:
The primary appeal of the 3-step zigzag stitch lies in its decorative quality. The repeated left and right movements of the straight stitches produce a visually interesting zigzag pattern, adding a touch of creativity to various sewing projects. - Composition of the Stitch:
Unlike a standard zigzag stitch, which consists of a continuous, fluid motion, the 3-step zigzag is composed of three separate straight stitches. This composition allows for more control over the stitch, making it particularly advantageous for specific applications. - Purpose and Applications:
The 3-step zigzag stitch is commonly employed in sewing lingerie and stretch fabrics. Its unique structure provides added stability and durability to seams in garments made from materials that require a bit more flexibility, such as those used in lingerie or stretchy textiles. - Tricot Stitch Alias:
Another term often used interchangeably with the 3-step zigzag is the “tricot stitch.” Tricot refers to a type of knit fabric, and the 3-step zigzag is particularly well-suited for sewing and finishing seams on knit fabrics. This stitch helps prevent fraying and enhances the overall durability of the garment. - Applications in Stretch Fabrics:
Stretch fabrics, known for their elasticity, benefit significantly from the 3-step zigzag stitch. The stitch allows for the necessary give and flexibility in the seams, ensuring that the finished garment accommodates the inherent stretchiness of the fabric without compromising structural integrity. - Securing and Finishing Seams:
Beyond its decorative aspects, the 3-step zigzag stitch is effective in securing and finishing seams. This is particularly important in garments like lingerie, where comfort, durability, and a polished appearance are key considerations. - Machine Settings:
To use the 3-step zigzag stitch, set your sewing machine to this specific stitch option. Refer to your sewing machine manual for guidance on selecting and adjusting stitch settings. These may include options to control the stitch width and length, allowing for customization based on the specific requirements of your project. - Experimentation and Creativity:
Seamstresses can leverage the 3-step zigzag stitch to experiment with different design elements in their projects. Whether creating decorative accents on garments or adding functional strength to stretchy fabrics, this stitch provides an opportunity for creative expression.
In essence, the 3-step zigzag stitch is a versatile and decorative stitching option with specific applications in sewing lingerie and stretch fabrics.
Its distinctive pattern, often referred to as a tricot stitch, combines aesthetics with functionality, making it a valuable tool for seamstresses seeking to enhance both the visual appeal and structural integrity of their creations.
Best Presser Foot for a Zig Zag Stitch
Selecting the best presser foot is crucial for achieving optimal results when sewing a zigzag stitch. Here’s a detailed exploration of the presser foot options for zigzag stitching:
All-Purpose Presser Foot:
- Description: In many cases, the all-purpose presser foot, which comes standard with most sewing machines, is suitable for sewing zigzag stitches. This foot is versatile and designed for general sewing tasks. It typically has a wide flat base that provides stability and works well for various stitch types, including zigzag.
- Advantages:
- Widely available and comes standard with most sewing machines.
- Versatile and suitable for a range of sewing tasks.
- Provides stability during zigzag stitching.
- Considerations:
- While the all-purpose foot is versatile, it may lack some features specific to certain stitch types.
Zigzag Foot or Satin Stitch Foot:
- Description: Some sewing machines come with specialized zigzag or satin stitch feet designed explicitly for these types of stitches. The zigzag foot typically has a slight groove underneath and a wider hole compared to the all-purpose foot. This design accommodates the side-to-side movement of the needle during zigzag stitching.
- Advantages:
- Specialized design for zigzag stitches, providing better visibility and control.
- The slight groove underneath helps guide the fabric during stitching.
- Wider hole allows for the needle to move freely in a side-to-side motion.
- Considerations:
- Not all sewing machines come with a zigzag foot, so it may need to be purchased separately.
- While highly effective for zigzag stitches, it may not be as versatile for other types of stitches.
Choosing the Right Presser Foot:
- Consider Your Machine’s Accessories: Check the accessories that came with your sewing machine. If a zigzag foot is included, it’s likely optimized for this type of stitch.
- Fabric and Project Type: Consider the type of fabric you are working with and the specific requirements of your project. If you are primarily sewing zigzag stitches, a specialized foot may offer enhanced control.
- Experiment and Test: Regardless of the foot you choose, it’s essential to experiment and test on scrap fabric before starting your actual project. This allows you to fine-tune settings and ensure the desired outcome.
While the all-purpose presser foot is often sufficient for zigzag stitching, a specialized zigzag or satin stitch foot can provide added benefits in terms of visibility, control, and accommodating the unique characteristics of the stitch. Choose the presser foot that aligns with your machine’s capabilities and your specific sewing needs.
10 Uses for the Zig Zag Stitch
Explore these 10 applications for the zigzag stitch, accompanied by suggested settings for each. Experiment with these settings on a fabric scrap, and fine-tune them according to your personal preferences. Adjustments may be necessary to accommodate the specific fabric you’re working with or to achieve the desired visual appeal.
Here are 10 detailed uses for the zigzag stitch along with recommended settings for each:
Seam Finishing:
- Purpose: Neatening raw edges to prevent fraying.
- Recommended Settings: Length 3.0 and Width 3.0
- Description: Ideal for finishing seam edges by stitching a little way in from the edge or right on the edge to prevent fraying.
Sewing Stretch Fabric (Seams):
- Purpose: Creating stretchable seams in garments like leotards.
- Recommended Settings: Length 2.5 and Width 1.0
- Description: A narrow zigzag stitch prevents seam breakage in stretch fabrics, commonly used in leotards and swimwear.
Sewing Stretch Fabric (Finishing):
- Purpose: Reinforcing seams on stress-prone areas in stretch fabric.
- Recommended Settings: Length 3.0 and Width 3.0
- Description: Adding a second row of zigzag along the seam edge for durability in high-stress areas.
Appliqué:
- Purpose: Attaching decorative fabric pieces.
- Recommended Settings: Length 0.5 and Width 3.0
- Description: Utilizing a wider zigzag for a close edging stitch, ideal for appliqué work.
Mending:
- Purpose: Covering worn or torn parts of a garment.
- Recommended Settings: Varies based on the repair needs.
- Description: The zigzag stitch covers and strengthens small worn or torn areas in clothing.
Zigzag Hems:
- Purpose: Creating decorative edges for hems and sleeves.
- Recommended Settings: Varies based on desired decorative effect.
- Description: Stitching close to the edge and pulling the fabric to create a decorative lettuce edge effect.
Decorative Zig Zags:
- Purpose: Adding decorative elements to sewing projects.
- Recommended Settings: Varies based on desired decorative effect.
- Description: Experimenting with zigzag settings to create unique decorative patterns.
Gathering With A Zig Zag:
- Purpose: Creating gathers using a zigzag stitch.
- Recommended Settings: Varies based on gathering needs.
- Description: While traditionally done with a straight stitch, using a zigzag can be advantageous in certain circumstances.
Buttonholes And Buttons:
- Purpose: Sewing on buttons or creating buttonholes.
- Recommended Settings for Buttons: Length 0.0, Width varies based on button size.
- Recommended Settings for Buttonholes: Zigzag down the sides and wider zigzag at the ends.
- Description: Zigzag stitch can be used for sewing buttons and creating buttonholes.
Sewing Lace And Trim:
- Purpose: Attaching lace trim or other decorative trims.
- Recommended Settings: Length 2.0 and Width 2.0 for lace.
- Description: Zigzag stitch secures lace trim, sequins, fringing, or ric-rac, adding a professional touch to sewing projects.
These settings serve as starting points; always test on a fabric scrap and make adjustments based on your preferences and project requirements. The versatility of the zigzag stitch makes it a valuable tool for a wide range of sewing applications.
Sewing Machine Needles for Zigzag Stitches: Types, Sizes, and Recommended Brands
| Needle Type | Needle Size Range | Recommended Brands |
|---|---|---|
| Universal | 70/10 – 100/16 | Schmetz, Organ, Singer, Janome |
| Ballpoint/Jersey | 70/10 – 100/16 | Schmetz, Organ, Klasse |
| Stretch | 75/11 – 90/14 | Schmetz, Organ, Singer |
| Quilting | 75/11 – 90/14 | Schmetz, Clover, Klasse |
| Embroidery | 75/11 – 90/14 | Schmetz, Organ, Janome |
| Metallic | 80/12 – 100/16 | Schmetz, Organ, Klasse |
| Topstitch | 80/12 – 100/16 | Schmetz, Organ, Bernina |
Please note that the needle size may vary based on the fabric type and thickness. It's recommended to consult the sewing machine manual and test on scrap fabric before starting your project. Additionally, the mentioned brands are popular, but there are other reputable brands available in the market.
Conclusion: Zig-Zag Stitch
In conclusion, the zigzag stitch proves to be an incredibly versatile tool in the seamstress’s repertoire, offering a range of applications from practical seam finishing to creative embellishments.
The recommended settings provided for each use serve as valuable starting points, but the flexibility of this stitch encourages experimentation and customization.
By trying these techniques on fabric scraps and adjusting settings based on individual preferences and fabric characteristics, seamstresses can harness the full potential of the zigzag stitch for both functional and decorative purposes.
Whether securing seams, mending, or adding intricate appliqué, the zigzag stitch stands as a reliable and creative ally in the world of sewing.