Magicfly 59 Stitches Common Problems and Troubleshooting
If you own a Magicfly 59 Stitches sewing machine, you might encounter some common problems while using it. In this article, we will address these issues and provide troubleshooting tips to help you get the most out of your sewing machine.
The Magicfly 59 Stitches machine is a versatile and reliable sewing tool, equipped with 59 built-in stitches and practical features that make it suitable for a wide range of sewing projects.
Let’s delve into the common problems and their solutions to ensure smooth and enjoyable sewing experiences with the Magicfly 59 Stitches sewing machine.
Magicfly 59 Stitches Overview
The Magicfly 59 Stitches sewing machine is a high-quality, heavy-duty model designed to meet various sewing needs. It offers 59 built-in stitch patterns, including utility, decorative, blind hem, and elastic stitches.
The machine also features a reverse stitch function for reinforcement, providing added durability to your sewing projects. With 14 basic stitches in 4 different widths and 3 buttonhole stitches, this sewing machine is well-equipped for your daily sewing requirements.
Please note that the Magicfly 59 Stitches machine cannot be used for free motion quilting.
Product Details and Features:
- Brand: Magicfly
- Color: White
- Material: Metal
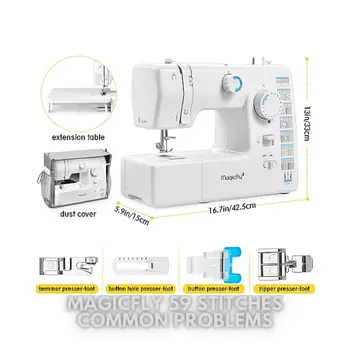
- Product Dimensions: 5.91″D x 16.73″W x 12.99″H
- Power Source: Corded Electric
- Is Electric: Yes
Highlighted Features:
- Extension Table & Free Arm: The extension table expands your working area, making it suitable for large projects like quilts. The free arm allows you to sew pant legs, sleeves, and other cylindrical items with ease.
- Easy to Use: The sewing machine features a quick reference chart on the front, facilitating easy stitch selection. The illumination function helps when working on dark fabrics or in low-light conditions. The foot controller allows you to adjust the sewing speed conveniently.
- Suitable for Multiple Layers of Fabrics: The powerful motor and extension table enable smooth sewing of multiple layers of fabrics. The heavy-duty metal frame ensures a stable and skip-free sewing experience.
- Practical Accessory Kit: The package includes a high-quality dust cover to protect the sewing machine from dust and potential damages. Additionally, it comes with 4 replaceable presser feet for various garment making tasks (button presser-foot, buttonhole presser-foot, hemmer presser-foot, and zipper presser-foot).
Product Specification
| Product Dimensions | 16.73 x 5.91 x 12.99 inches |
|---|---|
| Item Weight | 16.42 pounds |
| Manufacturer | Magicfly |
| ASIN | B09DFHVCB4 |
| Item model number | Magicfly 59 |
Causes of Common Problems with the Magicfly 59 Stitches
In this section, we will explore some of the common problems that users may encounter while using the Magicfly 59 Stitches sewing machine. We will also provide effective troubleshooting solutions to resolve these issues and ensure seamless sewing experiences. Let’s address each problem one by one and learn how to overcome them.
1. Bobbin Thread Tension Issue
Description of the problem: The bobbin thread is too loose or too tight, causing uneven or messy stitches on the fabric.
Cause of the problem: Incorrect bobbin tension settings or improperly wound bobbin can lead to thread tension issues.
Troubleshooting step-by-step:
- Remove the bobbin from the bobbin case and check if the thread is wound smoothly and evenly.
- Adjust the bobbin tension by turning the small screw on the bobbin case slightly clockwise to increase tension or counterclockwise to decrease tension.
- Reinsert the bobbin into the bobbin case and test sew on a scrap fabric to check the tension. Repeat the adjustment if necessary until the stitches look even and balanced.
2. Needle Breakage
Description of the problem: The needle keeps breaking while sewing, causing interruptions and frustration.
Cause of the problem: Needle breakage can occur due to using the wrong needle size, sewing through thick layers without proper adjustments, or using a damaged or bent needle.
Troubleshooting step-by-step:
- Ensure you are using the correct needle size and type for the fabric you are sewing.
- When sewing through multiple layers or thick fabrics, decrease the sewing speed and use the appropriate presser foot to avoid putting excessive strain on the needle.
- Replace the needle with a new one if it is damaged or bent. Make sure to install it correctly, following the machine’s manual instructions.
3. Uneven Feed Dog Movement
Description of the problem: The feed dogs (the metal teeth under the presser foot) are not moving evenly, causing fabric feeding issues.
Cause of the problem: Dust, lint, or debris accumulation can obstruct the feed dog’s movement, or the feed dog mechanism might need lubrication.
Troubleshooting step-by-step:
- Turn off the sewing machine and unplug it for safety.
- Clean the feed dogs and surrounding area using a brush or vacuum cleaner to remove any lint or debris.
- If the feed dog still doesn’t move smoothly, apply a small amount of sewing machine oil to the moving parts as per the machine’s manual instructions.
4. Skipped Stitches
Description of the problem: The machine skips stitches, leaving gaps in the fabric, which can compromise the seam’s strength.
Cause of the problem: Skipped stitches may be due to using the wrong needle for the fabric, improper thread tension, or a damaged needle.
Troubleshooting step-by-step:
- Ensure you are using the appropriate needle size and type for the fabric you are working with. Different fabrics require different needle sizes, so check the machine’s manual or the needle packaging for guidance.
- Check the needle for any signs of damage, such as bending or dullness. If the needle is damaged, replace it with a new one to avoid further issues.
- Review the thread tension settings. Improper tension can cause skipped stitches. Re-thread the machine, ensuring the thread is correctly placed through all the tension discs and guides. You may need to adjust the tension dial according to the fabric you are using.
- Clean the machine’s bobbin area and feed dogs. A build-up of lint or debris in these areas can interfere with smooth stitching. Regularly clean and oil your machine as per the manufacturer’s instructions.
- Slow down the sewing speed and avoid pulling or pushing the fabric forcefully. Let the machine feed the fabric at its own pace to reduce the chances of skipped stitches.
- If the problem persists, try using a different thread brand or type. Some threads may not work well with certain machines and fabrics.
- Test the machine on a scrap piece of fabric before starting your actual project to ensure it is stitching correctly.
- If all else fails, consult the machine’s user manual or contact a professional for further assistance.
5. Thread Bunching Underneath the Fabric
Description of the problem: The thread forms knots or bunches underneath the fabric instead of forming neat stitches on top.Cause of the problem: Thread bunching can result from incorrect threading of the upper thread, a poorly wound bobbin, or the bobbin tension being too tight.
Troubleshooting step-by-step: First, rethread the upper thread following the machine’s manual instructions carefully.- Check the bobbin to ensure it is wound correctly and inserted into the bobbin case properly.
- Adjust the bobbin tension slightly by turning the small screw on the bobbin case as needed to achieve balanced tension.
Description of the problem: The stitch length is inconsistent, with some stitches being longer or shorter than others.
Cause of the problem: Uneven stitch length can occur due to inconsistent pressure on the foot controller or incorrect stitch length settings.Troubleshooting step-by-step:
Ensure that you are applying consistent pressure on the foot controller while sewing.Check the stitch length settings and adjust them as needed to achieve the desired stitch length.
7. Thread Keeps Breaking
Description of the problem: The thread keeps breaking frequently during sewing.Cause of the problem: Thread breakage can be caused by a rough or burry needle eye, incorrect threading, or using low-quality or old thread.
Troubleshooting step-by-step:
- Inspect the needle’s eye for any burrs or rough spots, and replace the needle if necessary.
- Re-thread the upper thread, making sure to follow the correct thread path through all the thread guides and the tension discs.
- Use high-quality, fresh thread suitable for your sewing project.
8. Machine Jamming or Stuck Needle
Description of the problem: The sewing machine gets jammed, and the needle becomes stuck while sewing.
Cause of the problem: Jamming can be caused by fabric getting trapped in the feed dogs or bobbin area, or the needle hitting a pin or hard object while sewing.
Troubleshooting step-by-step:
-
Turn off the sewing machine and unplug it for safety.
-
Carefully remove any tangled fabric or threads from the feed dog area and bobbin case.
-
Check the needle for any damage, and replace it if necessary.
9. Noisy Operation
Description of the problem: The sewing machine operates loudly and makes unusual noises while sewing.
Cause of the problem: Noisy operation can be due to loose components, lack of lubrication, or foreign objects stuck in the machine. Troubleshooting step-by-step:
-
Check all the screws and components to ensure they are securely tightened.
-
Lubricate the moving parts of the sewing machine following the manufacturer’s recommendations.
-
Inspect the machine for any foreign objects, such as broken needles or pins, and remove them carefully.
10. Thread Fraying or Breaking at the Needle
Description of the problem: The thread frays or breaks frequently at the needle, causing sewing interruptions.
Cause of the problem: Thread fraying or breaking can be caused by using the wrong needle size for the thread thickness or sewing at high speeds with too much tension.
Troubleshooting step-by-step:
- Check that you are using the correct needle size and type for the thread being used.
- Reduce the sewing speed, especially when using thicker threads, and adjust the thread tension accordingly.
11. Uneven Thread Tension
Description of the problem: The thread tension is uneven, with one side of the fabric having tighter stitches than the other.
Cause of the problem: Uneven thread tension can result from incorrect threading, damaged tension discs, or using different thread types in the bobbin and the upper thread.
Troubleshooting step-by-step:
- Re-thread the upper thread, ensuring it passes correctly through all the thread guides and tension discs.
- Check the tension discs for any damage or debris and clean if necessary.
- Ensure that the bobbin thread matches the upper thread in type and thickness.
12. Feed Dogs Not Moving
Description of the problem: The feed dogs do not move or rise above the needle plate while sewing.
Cause of the problem: The feed dog mechanism may be jammed, or the machine might be in the free-motion mode.
Troubleshooting step-by-step:
- Check the machine’s manual to ensure the machine is not in the free-motion mode. If it is, switch back to regular sewing mode.
- Clean the feed dogs and the surrounding area to remove any debris that might be obstructing their movement.
13. Stitch Misalignment
Description of the problem: The stitches appear misaligned or skewed, not forming a straight line.
Cause of the problem: Stitch misalignment can occur due to improper fabric handling, uneven pressure on the foot controller, or incorrect stitch selection.
Troubleshooting step-by-step:
- Practice sewing straight lines on scrap fabric to improve fabric handling and sewing techniques.
- Ensure consistent pressure on the foot controller while sewing to maintain a steady sewing speed.
- Verify that you have selected the correct stitch pattern for the desired outcome.
14. Bobbin Winding Issue
Description of the problem: The bobbin winding process is not working correctly, leading to unevenly wound bobbins or bobbins that won’t wind at all.
Cause of the problem: Bobbin winding issues can arise from incorrect bobbin placement or problems with the bobbin winding mechanism.
Troubleshooting step-by-step:
- Ensure the bobbin is placed correctly on the bobbin winder spindle.
- Check for any visible obstructions or tangles in the bobbin winding mechanism and remove them carefully.
- Test the bobbin winding function on a scrap fabric to verify that the issue has been resolved.
15. Needle Threader Malfunction
Description of the problem: The needle threader feature is not working properly or fails to thread the needle.
Cause of the problem: The needle threader may be misaligned, damaged, or not engaging correctly with the needle eye.
Troubleshooting step-by-step:
- Check the needle threader for any visible damage or misalignment, and gently adjust it if needed.
- Ensure that the needle is in the correct position for the threader to engage with the needle eye.
- Try threading the needle manually if the threader continues to malfunction.
16. Fabric Skipping or Puckering
Description of the problem: The fabric skips stitches or puckers while sewing, resulting in an uneven or distorted seam.
Cause of the problem: Fabric skipping and puckering can be caused by incorrect fabric feeding, using the wrong needle, or improper tension settings.
Troubleshooting step-by-step:
- Check that the fabric is feeding smoothly through the machine and adjust the presser foot pressure if necessary.
- Ensure you are using the correct needle type and size for the fabric you are sewing.
- Adjust the thread tension as needed to prevent excessive tightness or looseness.
17. Thread Keeps Tangling or Knotting
Description of the problem: The thread tangles or knots frequently, causing disruptions in the sewing process.
Cause of the problem: Thread tangling can occur due to improper threading, using low-quality thread, or a problem with the tension system.
Troubleshooting step-by-step:
- Re-thread the machine, ensuring that the thread follows the correct path and passes through all thread guides and tension discs properly.
- Use high-quality thread suitable for your sewing project to minimize tangling.
- Check the tension settings and adjust them to achieve balanced tension.
18. Motor Overheating
Description of the problem: The sewing machine’s motor becomes excessively hot during prolonged use.
Cause of the problem: Motor overheating can be caused by sewing at high speeds for extended periods or using the machine beyond its recommended capacity.
Troubleshooting step-by-step:
- Give the machine a rest and allow the motor to cool down if it becomes too hot during use.
- Reduce the sewing speed when working on lengthy projects to prevent excessive strain on the motor.
- Follow the manufacturer’s guidelines regarding the machine’s usage and recommended sewing time.
19. Uneven Buttonholes
Description of the problem: The buttonholes sewn by the machine appear uneven or have inconsistent stitching.
Cause of the problem: Uneven buttonholes can be caused by incorrect buttonhole settings, improper fabric positioning, or a damaged buttonhole presser foot.
Troubleshooting step-by-step:
- Double-check the buttonhole settings and ensure that they match the size and type of button you are using.
- Position the fabric correctly in the buttonhole foot and secure it in place before starting the buttonhole stitching.
- If the buttonhole presser foot is damaged, replace it with a new one to improve the buttonhole quality.
20. Uneven Thread Tension in Zigzag Stitches
Description of the problem: The thread tension is uneven when sewing zigzag stitches, resulting in one side of the stitch being tighter than the other.
Cause of the problem: Uneven thread tension in zigzag stitches can be caused by incorrect tension settings or using the wrong needle size for the chosen stitch width.
Troubleshooting step-by-step:
- Adjust the tension settings, making sure both the upper thread and bobbin thread have balanced tension.
- Verify that you are using the appropriate needle size for the chosen zigzag stitch width.
21. Thread Jamming in the Bobbin Area
Description of the problem: The thread frequently jams or gets tangled in the bobbin area, halting the sewing process.
Cause of the problem: Thread jamming in the bobbin area can be caused by improper bobbin placement, using the wrong bobbin type, or debris accumulation.
Troubleshooting step-by-step:
- Check that the bobbin is inserted correctly into the bobbin case and rotates smoothly.
- Ensure you are using the correct bobbin type for your sewing machine model.
- Clean the bobbin area regularly to remove any lint, dust, or debris that may cause thread jamming.
22. Skipped Stitches When Sewing Thick Fabrics
Description of the problem: The machine skips stitches when sewing through thick or multiple layers of fabric.
Cause of the problem: Skipped stitches on thick fabrics can be caused by using a regular needle instead of a heavy-duty needle or inadequate presser foot pressure.
Troubleshooting step-by-step:
- Switch to a heavy-duty needle specifically designed for sewing thick fabrics.
- Adjust the presser foot pressure to provide adequate tension when sewing through multiple layers of fabric.
23. Thread Looping on the Underside of Fabric
Description of the problem: The thread creates loops or knots on the underside of the fabric, affecting the seam quality.
Cause of the problem: Thread looping can occur due to incorrect threading, improperly wound bobbin, or incorrect upper thread tension.
Troubleshooting step-by-step:
- Re-thread the machine, ensuring the upper thread is correctly passing through all the thread guides and tension discs.
- Check the bobbin to ensure it is wound smoothly and inserted into the bobbin case properly.
- Adjust the upper thread tension as needed to achieve balanced tension between the upper and lower threads.
24. Sewing Machine Not Powering On
Description of the problem: The sewing machine does not power on, and there are no signs of life.
Cause of the problem: Power issues can be caused by a loose power cord connection, a blown fuse, or a malfunctioning power switch.
Troubleshooting step-by-step:
- Check that the power cord is securely plugged into both the sewing machine and the power outlet.
- Inspect the power cord for any visible damage or fraying, and replace it if necessary.
- Check the machine’s fuse and replace it if it’s blown.
- Test the power switch to ensure it is functioning correctly.
Magicfly 59 Stitches Sewing Machine User Reviews
When considering purchasing a new sewing machine like the Magicfly 59 Stitches, it’s essential to explore the experiences of other users. Below, we have summarized some user reviews from various sources, focusing on both the positive and negative aspects of the machine.
Positive Reviews from Magicfly 59 Stitches Sewing Machine Users:
- Some users were satisfied with the following parameters associated with the Magicfly 59 Stitches sewing machine:
- The smooth and easy sewing experience.
- The simplicity of threading and setup.
- The ability to sew various fabric types, including quilts.
- One user appreciated the machine’s performance and ease of use, mentioning that even as a first-time sewer, they could thread the machine and sew without any difficulty. They also mentioned no issues with binding, snagging, or other problems.
- Another user highlighted the machine’s affordable price and its efficient operation for quilt-making.
- Customers also praised the sewing machine’s capability to handle various sewing tasks without any significant problems, indicating that it works perfectly for their needs.
- One user mentioned that the sewing machine is easy to handle, making it a great item for users of all skill levels.
Negative User Reviews of the Magicfly 59 Stitches Sewing Machine:
- Some users were not satisfied with the following problems associated with the Magicfly 59 Stitches sewing machine:
- The machine’s performance was disappointing, with issues like needle breakage and jamming, especially while sewing through thick fabrics.
- Several users reported problems with the bobbin area, such as thread tangling and frequent jams.
- A few users expressed disappointment with the machine’s build quality, mentioning issues with plastic parts and overall durability.
- There were also complaints about the machine’s lack of reliability, with some users experiencing malfunctions and breakdowns after a short period of use.
- Additionally, a few users faced difficulties with the machine’s threading process and needle threader functionality.
- One user mentioned that the machine’s instruction booklet was challenging to understand due to poor English and vague troubleshooting sections.
- Another user expressed frustration with the lack of tech support when their machine encountered issues, leaving them with an unusable product.
- Some users experienced disappointment with the machine’s performance, noting that it stopped working properly or entirely within a short time after purchase.
- A few users had difficulties with the machine’s power, as it failed to pick up the thread or had problems with the motor.
Despite the negative feedback from some users, the majority of Magicfly 59 Stitches sewing machine customers seem to have had positive experiences. It’s important to consider these reviews along with other factors such as personal preferences, sewing needs, and budget before making a decision.
Each user’s sewing requirements may vary, so it’s beneficial to weigh the pros and cons carefully to determine if the Magicfly 59 Stitches sewing machine is the right choice for you.
Magicfly 59 Stitches Common Problems
Brother GX37 Common Problems
Brother LB5000M Common Problems
For detailed operating instructions and information about the Magicfly 59 Stitches sewing machine, users can refer to the manufacturer’s website.
The official manual, containing comprehensive guidelines on setting up, using, and maintaining the machine, can be found on the manufacturer’s website.
It is recommended to consult the manual for a better understanding of the machine’s features and troubleshooting techniques.
Magicfly 59 Stitches Frequently Asked Questions
How can I adjust the thread tension?
To adjust the thread tension on the Magicfly 59 Stitches sewing machine, locate the tension dial usually located on the front or top of the machine. Turn the dial clockwise for tighter tension and counterclockwise for looser tension. It’s essential to find the right tension setting for the type of fabric and thread you are using to achieve optimal stitching results.
What needle should I use for different fabric types?
The appropriate needle type and size depend on the fabric you are sewing. For lightweight fabrics like silk or chiffon, use a fine needle (e.g., size 9 or 11). For medium-weight fabrics like cotton or linen, a universal needle (e.g., size 14 or 16) is suitable. For heavy or thick fabrics like denim or canvas, use a heavy-duty needle (e.g., size 18 or 20) to prevent breakage.
Conclusion
Whenever you encounter a problem with your Magicfly 59 Stitches sewing machine, it is recommended to refer to the manual first. The manual provides essential guidance on setup, operation, and troubleshooting specific to your machine model.
If the issue persists, do not hesitate to reach out to the manufacturer’s customer service or visit an authorized service center for assistance. Proper maintenance and understanding of your sewing machine will help ensure enjoyable and trouble-free sewing experiences.