SINGER M1505 Sewing machine upper thread breaking
With the SINGER M1505 sewing machine, thread-breaking issues can arise from a variety of circumstances such as snags in fabric or incorrect threading. To guarantee successful stitching sessions, ensure that you check your tension settings, select the correct needle size and type for your project, use quality thread and replace needles regularly to stay sharp and effective.
Causes of SINGER M1505 Sewing machine Upper Thread Breaking
If you’re experiencing upper thread breakage with your SINGER M1505 sewing machine, the culprit could be one of many possible causes. Improper needle positioning or threading and tight tension are common issues; however, a blunted or bent needle point, an ill-suited sized thread for the needle in question, burrs on the presser foot that can snag fabric as it moves through, too long a needle for this model sewing machine’s specifications, worn out take-up springs or excessively used tension discs with grooves may also be to blame.
Moreover, the imbalanced speeds of stitching can also be an issue that should not be overlooked. To prevent any thread breaking on your SINGER M1505 sewing machine, all these problems must be taken into account.
Here are 9 the most common causes of upper thread breaking on a SINGER M1505 sewing machine and how you can fix them:
Your SINGER M1505 Sewing machine Is Not Threaded Correctly
To ensure your upper thread won’t break and that your SINGER M1505 sewing machine works perfectly, check that the upper thread is threaded properly – this simple step could prevent any future issues or breaking.
How to Correctly Thread a SINGER M1505 Sewing Machine?
Although this is a straightforward task, it’s essential to get it right – otherwise, you may end up with some serious sewing issues.
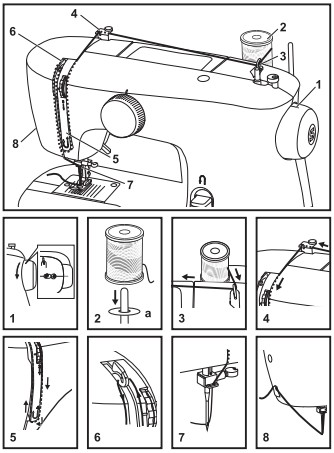
Threading the Upper Thread:
- Rotate the handwheel counterclockwise until the mark on it is facing upwards. This will elevate your needle to its peak position. Once finished, lift up the presser foot in order to undo any tension that may be set by the discs.(1)
- Securely affix the thread and spool pin felt (a) onto the spool pin for optimal results.(2)
Note: For safety reasons, make sure to turn off the power before threading – it is strongly recommended!
- Carefully draw the thread from the spool and guide it through the upper thread guide. (3)
- Carefully maneuver the thread around the thread guide as shown in the illustration. (4)
- To tension your thread, draw the thread down right channel and up to the left-hand channel. (5) For best results, hold onto the thread between its spool and guide as you do this.
- At the top of this movement pass thread from right to left through the slotted eye of the take-up lever and then downwards again. (6)
- Guide the thread behind the slender wire needle clamp guide (7) and then underneath it to the needle which should be threaded from front to back.
- Gently tug about 6-8 inches of thread away from the needle eye, then neatly cut it to length with the built-in thread cutter. (8)
Your SINGER M1505 Sewing machine Thread Tension Is Too Tight. Adjusting Thread Tension on SINGER M1505 Machine for Even Stitches
The SINGER M1505 sewing machine thread tension must be tweaked depending on the weight of your fabric and thread. When both upper and lower threads are equal in weight, it creates even tension between them. If you tighten the thread too much, chances are that it will break easily – to reduce pressure simply rotate the dial towards counterclockwise direction. In case you struggle with fine-tuning bobbin tension or if something doesn’t seem right – ask a qualified technician for help!
Your SINGER M1505 Sewing machine Thread Is Poor Quality
When sewing with a SINGER M1505 sewing machine, it is crucial to use high-quality thread. Thin and weak threads will snap easily when pulled while thick ones can break in the eye of the needle or tension discs. Buying bulk packages of thread might result in low quality which cannot handle strain from your SINGER M1505 sewing machine. For optimal results and minimal breaks, make sure you choose superior quality thread for all your projects!
Your SINGER M1505 Sewing machine Needle Is Damaged, Bent, or Dull
Over time, the SINGER M1505 sewing machine needle may become bent or broken due to extensive use of thick materials. There is also a chance that manufacturing flaws are present on the needle itself.
If you suspect deformation of needle, it’s definitely worth replacing the existing one for optimal performance! For best results we recommend switching out your needle after each project; however, if you find yourself dealing with more thread breakage than usual while sewing then its time to get a new needle.
You Are Not Using the Correct Needle in SINGER M1505 Sewing machine
To avoid thread breakage and snag while sewing with your SINGER M1505 machine, make sure to replace the needle prior to each project. It is especially significant if you’re working on thicker fabrics such as corduroy, denim, or leather – they require specialized needles that can handle extra thickness. By ensuring you’ve selected the right needle for the job will significantly reduce chances of thread snapping.
Your SINGER M1505 Sewing machine Needle Is Not Inserted Correctly
For the best stitching performance, correctly insert your SINGER M1505 sewing machine needle – with one flat side placed towards the back of your machine. When inserting the needle, be aware of the flat side that should face towards the back of your SINGER M1505 sewing machine–this is located atop its shank. With this knowledge in mind, you’ll reap reliable and consistent results each time.
To avoid a possible catastrophic event, double check that your needle is inserted all the way up and fastened securely. If you notice the screw has become loose or if it gets bumped, take extra precaution to make sure the needle isn’t hitting any part of your SINGER M1505 sewing machine such as the bobbin case or throat plate. It’s also important to ensure you’re not inserting it backward – this can lead to breaking of needles too.
Your SINGER M1505 Sewing machine Take-Up Lever Spring Is Broken
The SINGER M1505 sewing machine may break its upper thread if the take-up lever spring is broken or bent. If the thread breaks right away when starting to sew, or there is no movement of the take-up lever, then this issue needs to be addressed by a professional sewing machine repair technician, who will replace the spring.
Your SINGER M1505 Sewing machine Bobbin Case Is Full of Lint
If lint accumulates in the bobbin case of a SINGER M1505 sewing machine, it can lead to frequent thread breaks due to incorrect hook timing. Keeping your SINGER M1505 sewing machine clean and free from excess lint buildup is essential for smooth, snag-free sewing.
You Are Sewing Too Fast
If you’re stitching too quickly, it can cause the thread to break due to uneven tension. It’s essential to take your time when sewing, especially if you have a lot of fabric or many layers. This allows the SINGER M1505 sewing machine enough time to effectively make the locking stitch without causing thread breakage.
Conclusion
Thread breaking on a SINGER M1505 sewing machine can be caused by incorrect needle insertion, using the wrong needle size for the fabric, improper thread tension, broken/bent lever spring and stitching too quickly. To prevent these issues from happening again, it is essential to have correct maintenance and troubleshooting of the SINGER M1505 sewing machine as this will help ensure successful projects are created with no further interruptions.