SINGER M1600 Sewing machine stitch problems and solutions
If you’re having problems with stitching on your SINGER M1600 sewing machine, it’s likely due to incorrect tension settings, an incorrect needle size or type installed, improper threading of the needles, inadequate pressure when joining fabric pieces together, adjustments to the stitch regulator that are wrong or clogged feed dogs blocking progress. Additionally, a presser foot not suited to the project being attempted can lead to difficulties.
What’s the best thing to do when my SINGER M1600 sewing machine is having stitch problems?
If your SINGER M1600 sewing machine is having stitch problems, it’s important to take immediate action. Check that the tension of the bobbin is correct, remove any lint buildup and make sure you are using an appropriate needle type for the fabric material.
If these steps don’t help fix the issue, contact a professional right away. Taking proper care of this machine now will save you from costly repairs in the future. With a little effort, you can ensure your SINGER M1600 runs smoothly for many years!
What is the most common SINGER M1600 sewing machine stitch problem?
The most common issue with a SINGER M1600 sewing machine is that it isn’t producing tight stitches. This typically happens when the lint buildup in the machine causes tension inconsistencies, or when an incorrect needle size and/or tension setting are used.
To solve this problem, make sure to regularly clean out any lint from the machine. Additionally, check the needle size and tension settings you’re using against the manufacturer’s instructions to ensure they match what your project requires. Once these adjustments have been made, you should be able to achieve tight and consistent stitching on your projects!
Additionally, if you’re still having trouble achieving precise stitching with your SINGER M1600 sewing machine, consider investing in a few accessories such as a seam ripper or a walking foot. A seam ripper can help remove any erroneous stitches, while using a walking foot will provide your fabric with greater stability and ensure you get even stitching across the entire project. This will make sure that all of your future projects look professional and polished!
Finally, practice makes perfect! As you become more familiar with the machine, its features and settings, you’ll be able to master consistent stitching in no time. Make sure to take advantage of all the resources available online – from blogs to tutorials – so that you can expand your skills as fast as possible. With enough practice, you’ll soon have perfectly straight seams on every project!
16 Сommon SINGER M1600 sewing machine stitch problem
Facing difficulties with your SINGER M1600 sewing machine? No need to fret! Our comprehensive guide, loaded with 16 unique stitch problems and their own solutions is here to help you get it running in no time.
SINGER M1600 sewing machine is loose stitches problems and solutions. Fixing Loose Stitches
The SINGER M1600 sewing machine may produce loose stitches due to lint blocking the feed dog, using the wrong needle size for the material, or incorrect tension settings.
To fix these issues, correctly wind and seat the bobbin in its holder, adjust the thread tension accordingly and set the presser foot to its lowest level before starting your project. Additionally, make sure that the needle is securely inserted into its holder.
Following these steps should solve any loose stitching problems with your SINGER M1600 sewing machine.
Tension problems on SINGER M1600 sewing machine zig zag stitch. Zigzag Stitch not Working
Problems with the zigzag stitch on a SINGER M1600 sewing machine can be tricky to deal with. If dirt has gotten into the machine, it could prevent it from working correctly. It is also possible that you have accidentally switched the double-needle option, limiting your stitching options to just those involving two needles.
Fortunately, these zigzag stitch on a SINGER M1600 sewing machine difficulties are usually simple to fix once you figure out what’s triggering them. Cleaning and lubricating the machine should do the trick if dirt is causing the issue. Loosening tension slightly may help if it is a tension problem.
Professional servicing might also be useful in keeping your SINGER M1600 sewing machine running optimally. All in all, with some effort, you should be able to get your zigzag stitch working as it should.
How to correctly do zigzag stitching on your SINGER M1600 sewing machine
To correctly do zigzag stitching on your SINGER M1600 sewing machine, first make sure that the needle is in its correct position and that it is properly locked in place. Then, adjust the thread tension to achieve a balanced stitch and use the presser foot to guide the fabric through the machine. Adjust stitch length and width as needed for your project, making sure to keep everything even and consistent. Finally, start stitching!
SINGER M1600 sewing machine problems thread bunching
Why is my SINGER M1600 sewing machine bunching thread? My SINGER M1600 sewing machine is having trouble and is bunching thread. This can happen when the top and bobbin threads are not correctly placed under the presser foot prior to beginning a stitch. Make sure both threads are behind the presser foot and close to the back of the machine before you start stitching.
SINGER M1600 sewing machine problems thread bunching under fabric
The thread may be bunching up underneath the fabric when using a SINGER M1600 sewing machine. To solve this problem, make sure to read and follow the instructions in the SINGER M1600 sewing machine manual regarding how to correctly thread the upper thread – as there are some variations between different sewing machine models. This should help to prevent the issue from continuing.
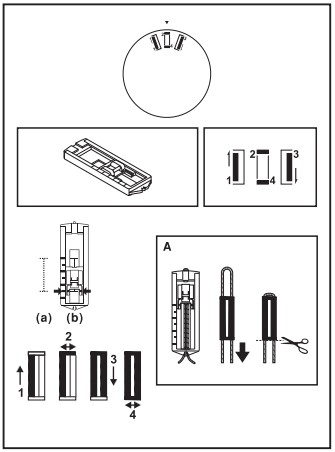
SINGER M1600 sewing machine stitch length problems and solutions
The SINGER M1600 sewing machine often has issues with its stitch length due to the wear and tear of the gear components. The teeth of the gears may be made from rubber, plastic, or silicone and can become detached, making it hard to adjust the stitch length properly.
Poor feed dog function and an inappropriate presser foot can also result in uneven stitch lengths. Additionally, selecting an improper bobbin size or type can lead to tension-related problems that affect stitching. Therefore, all these elements should be taken into consideration when addressing any difficulties related to stitching on your SINGER M1600 sewing machine.
SINGER M1600 sewing machine top stitch problems. SINGER M1600 sewing machine is not sewing any stitches while trying to sew
The SINGER M1600 sewing machine may be experiencing issues with top stitching. It is essential to make sure that the upper thread is correctly threaded, and the needle thread should be positioned behind the needle bar thread guide. If there are any knots or tangles in the thread, then it needs to be cut off and removed from the bobbin area.
Additionally, check if the needle size is suitable for the thickness of thread used; adjust upper tension levels accordingly and replace bent/blunt needles as necessary. Lastly, inspect both presser foot holes and bobbin for any scratches, replacing them when needed.
SINGER M1600 sewing machine problems bottom thread bunching
Why is the thread looping/bunching under my fabric? If your SINGER M1600 sewing machine is having trouble with the thread looping or bunching up underneath the fabric while sewing, it could be due to incorrect or no tension on the top thread. To correct this issue, you should check the upper thread to ensure it is threaded correctly.
To do this, lift the presser foot lever and set the tension at 4. Place the spool on the spool pin and secure it with a cap. With your right hand holding onto the thread, use your left hand to guide it down into the tension channel around the bottom and up to the other side.
When it reaches the top, move from back to front into take-up lever and gently tug on it to make sure it is running freely when the presser foot is lifted. Once you have lowered the presser foot, there should be an increase in tension that indicates your threading was successful. If not, then you will need to rethread it again.
SINGER M1600 sewing machine knotted stitches problems. Why is my SINGER M1600
sewing machine knotting up?
If your SINGER M1600 sewing machine is knotting up, the first step to take is to check that the thread tails are not too short. Check that the SINGER M1600 sewing machine is properly threaded and that the bobbin is inserted correctly. Replace any worn-out needle and adjust the tension for your fabric type.
Clean away any dirt or lint buildup in the bobbin area, making sure you use a suitable size of bobbin. Lower the presser foot before beginning to stitch and raise the feed dogs when leaving off from stitching. Lastly, remember to oil your SINGER M1600 sewing machine regularly for optimal performance.
Following these steps should help ensure that your SINGER M1600 sewing machine no longer knots up!
SINGER M1600 sewing machine buttonhole problems
If the buttonhole on your SINGER M1600 sewing machine is not stitching correctly, first make sure that the buttonhole lever is pulled down completely and then pushed back slightly. Check if both sides of the buttonhole appear even in terms of tightness; if one side is too open or too tight, use the Buttonhole fine adjustment screw to adjust accordingly (turn counterclockwise for too open and clockwise for too tight).
How to sew a buttonhole on the SINGER M1600 sewing machine
To start, exchange the all-purpose foot for the buttonhole foot. Then, measure and record both the diameter and thickness of your button before adding an extra 0.3 cm (1/8″) to account for bar tacks; use this value as your marker on fabric A. Now place fabric B under the foot so that it is in line with starting markings on material A. Lower down the foot until a center line marked on cloth aligns precisely with center point stitching of buttonhole foot B.
Note:
Every fabric has a different density, so it’s important to sew a sample buttonhole on the same material you are working with. Carefully follow each step of the 4-step sequence while adjusting your Pattern Selector Dial accordingly – be sure to raise your needle before altering any settings! Furthermore, avoid sewing too many stitches in steps two and four.
Tips:
To get the best results, try slightly altering your upper thread tension. Additionally, be sure to use a stabilizer for fabrics that are fine or stretchy. For those same types of fabrics like knits and spandex materials, opt for heavy threads or cords when sewing with zigzag stitch patterns – this will help keep everything in place.
SINGER M1600 sewing machine Skipping Stitches problems and solutions
If your Singer M1600 sewing machine is skipping stitches, some possible causes include an incorrect needle size or type, improper threading of needles, too light pressure on fabric, incorrect stitch regulator settings, and/or a needle hole that is too large in the throat plate.
To fix these issues, ensure all components are correctly installed and adjusted according to the instructions. Additionally, use an appropriate-sized needle for the fabric type you are working with. In some cases it may be necessary to have the SINGER M1600 sewing machine serviced professionally for optimal results. With proper maintenance and care, your SINGER M1600 sewing machine should return to normal quickly.
SINGER M1600 sewing machine Poor Stitch Quality problems and solutions
If the stitches you make with your SINGER M1600 sewing machine are not of high quality, it could be due to a number of things. Ensure that you replace your needle frequently and keep up with regular maintenance. Additionally, using an incompatible bobbin can cause stitching problems and lower-grade thread should always be avoided; choose high-quality threads instead.
Furthermore, making sure to clean and oil your SINGER M1600 sewing machine regularly will ensure optimal performance. All these steps must be taken in order to produce professional, neat results on all of your projects.
SINGER M1600 sewing machine Jammed Stitches (Bird nesting) problem and solutions
Why is my SINGER M1600 sewing machine Birdnesting? Jamming stitches, also called “Bird nesting” is a common problem when using the SINGER M1600 sewing machine. It occurs when your threading isn’t done correctly and looks like a tangle of stitches in one spot instead of forming normal stitches.
To correct this issue, be sure to pass the thread through the take-up lever correctly and keep the footer up while threading. If these methods don’t work, it’s best to get help from an expert as attempting to fix it yourself may cause further damage.
SINGER M1600 sewing machine straight stitch problems
Why won’t my SINGER M1600 sewing machine sew straight? The SINGER M1600 sewing machine may produce unsatisfactory straight stitches due to an outdated or unsuitable needle, incorrect settings of stitch length and width, or improper tension adjustment. It is important to ensure the correct needle type is selected for the project and that the appropriate settings are used in order to achieve a satisfactory result.
How to sewing straight stitches on the SINGER M1600 sewing machine
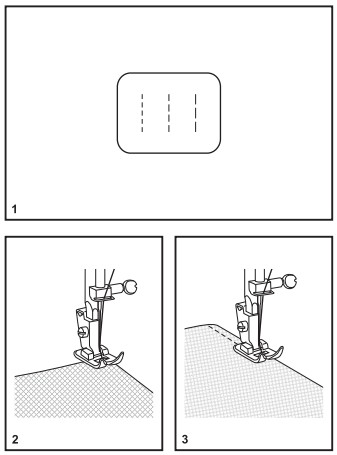
To start, select the straight stitch on your sewing machine. (1) Then position the fabric beneath the presser foot in alignment with your desired seam guide line on the needle plate. (2) Finally, lower down to engage the presser foot lifter and push down on your foot control to begin stitching. (3)
SINGER M1600 sewing machine Stitches Looping problems
If the stitches on a Singer M1600 sewing machine are looping, it is likely due to incorrect tension. If the loops are forming on the top of the fabric, they can be fixed by loosening the upper tension or tightening the lower one. Conversely, if they appear on the bottom side, adjusting the upper tension should help.
SINGER M1600 sewing machine problems when will only sew backward
When using a SINGER M1600 mechanical sewing machine, there can be issues with the reverse stitch feature. To investigate this, check that the buttonhole knob is not stuck in reverse or put back on in the wrong position, nor should it be loose or tangled up.
It is also possible that the settings are incorrectly set to sew backwards, pushing fabric towards you instead of away. If none of these appear to be causing the problem, take the SINGER M1600 sewing machine to a repair shop for assistance.
SINGER M1600 Sewing machine seams problems
The SINGER M1600 sewing machine can produce puckered seams if the tension is too tight, if the presser foot is not suitable for the fabric or if the stitch length does not match the fabric. Additionally, a blunt needle or one that is too big, an incorrect plate with a wide needle hole and mismatched upper thread and bobbin threads in terms of size or type can also be responsible for causing puckering. Finally, uneven pushing or pulling of the fabric while stitching may lead to undesirable results.
Conclusion
In conclusion, the SINGER M1600 sewing machine can produce a variety of stitch patterns. However, often times users face issues such as stitch looping, uneven seams, and reversed stitching when using this machine.
These problems can be rectified by following the tips mentioned in this article: selecting the appropriate needle type for the project, adjusting settings to ensure correct tension and stitch length/width, and consulting with an expert if necessary.
By taking these steps, you can ensure that your SINGER M1600 sewing machine runs efficiently and produces the desired results when used properly.