SINGER M1600 Sewing machine breaking needles
Sewing machines are indispensable for those who want to create beautiful garments or home décor items. However, using the wrong needle on the SINGER M1600 sewing machine can result in breakage, which can lead to a number of problems. In this article, we will discuss how to avoid needle breakage on the SINGER M1600 sewing machine and get the best possible results.
Why break needles on the sewing machine SINGER M1600?
If you keep finding that your SINGER M1600 sewing machine needle is breaking, it’s time to figure out what the root cause may be instead of simply swapping out for a new one. It could be any number of explanations as to why it keeps snapping and luckily there are some repairs you can try before abandoning hope entirely. If there’s even the slightest sign of damage on the needle itself, don’t wait – get a replacement so as not to interfere with further stitching projects.
Common Problems Causing A Needle Break in Sewing Machine SINGER M1600
The SINGER M1600 sewing machine can suffer from five distinct issues that could lead to the breaking of its needle:
- The needle on sewing machine SINGER M1600 is damaged, bent
- The needle on sewing machine SINGER M1600 is Dull
- Incorrect needle size for fabric
- Wrong SINGER M1600 sewing machine thread tension
- The wrong SINGER M1600 sewing machine presser foot is attached
Needle breakage can be caused by several problems with the SINGER M1600 sewing machine, so let’s explore them:
The needle on sewing machine SINGER M1600 is damaged, bent
Prior to operating a SINGER M1600 sewing machine, it is essential to inspect the needle for any visible indications of wear or damage. If necessary, replace the damaged needle with a sharper one as working on thicker material can put strain on an aged or bent needle leading to breakage during stitching. Additionally, slowing down your stitching speed will also help avoid damaging the equipment.
The needle on sewing machine SINGER M1600 is Dull
The SINGER M1600 sewing machine should have its needles changed every 8-10 hours of use to ensure that your projects turn out looking professional and with excellent quality. The damage will be minimized, as well as skipped stitches or uneven lengths; this is why it’s essential for you to pay attention and take care of your needle. If any sign of wear appears on the needle, replace it immediately! Doing so will help make sure that all fabric items you craft look beautiful and last long.
To ensure longevity and consistent quality of your SINGER M1600 sewing machine, inspecting the needle regularly is paramount. To test if it has dulled, you can simply use a pocket knife blade to scratch against it; if there’s friction or resistance present, then consider replacing for optimal performance.
How to check the needle on a SINGER M1600 sewing machine
It’s absolutely imperative to perform a checkup on your SINGER M1600 sewing machine needle prior to use. Place the flat part of the needle onto an even surface, and make sure that both sides are level. If you notice any warping or bending in the needle, do not sew with it! Taking this precaution will ensure your optimal performance from your sewing equipment.
Using a worn-out or faulty tool could result in serious injury to you and anyone near you, that’s why it is critical to only use needles manufactured exclusively for home sewing machines. Doing this will ensure they perform optimally while keeping everyone safe!
(1) Flat side (2) Needle type marking
– Correct needle
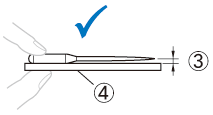
(3) Parallel space (4) Flat surface
– Incorrect needle
If the needle is not even with the flat surface, it is bent. Do not use a bent needle.
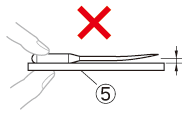
(5) Flat surface
Incorrect needle size for fabric
As you embark on any sewing project, it is essential to take fabric type into consideration when choosing the right needle size. Utilizing a larger-than-necessary needle can cause extra friction and lead to breakage; however, by referencing the Singer M1600 manual according to thread thickness and fabric weight, you can ensure that your needles remain intact and projects maintain their aesthetic appeal!
Needle and thread combinations
Finding the perfect needle for your SINGER M1600 sewing machine requires evaluating factors such as thread and fabric type. Utilize the provided chart to discover suitable pairings of needles, threads, and fabrics that will guarantee flawless results!
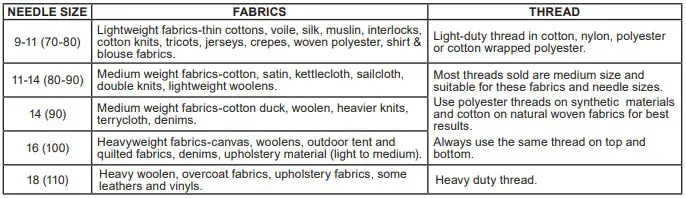
It is indispensable to correlate needle size with the thread size and weight of fabric for successful sewing.
Important to know:
- Forging an improper combination like thick fabric such as denim with a small needle (e.g., 65/9 – 75/11) can be hazardous and cause potential harm, since the needle may break or bend when sewing. Additionally, it could yield irregular stitches that do not look uniform at all.
- Avoid using thread of weight 20 or below at all costs as it can result in an array of undesirable problems.
- For a secure and smooth stitch, choose a ball point needle (golden-hued) when working on stretch fabrics or materials that tend to overlook stitches.
- No matter what your fabric and thread type are, a needle size of 90/14 to 100/16 is the perfect choice when using transparent nylon thread.
- The lesser the thread number, the stronger its structure; and correspondingly, a larger needle number indicates thicker needles.
Wrong SINGER M1600 sewing machine thread tension
Thread tension is a crucial factor when sewing, as it helps avoid needle breakage. It should be adjusted depending on the weight of the fabric and thread being used. Both the upper and lower threads should also have equal weight to ensure that correct tension is applied to prevent needles from bending or snapping. This will help you get better results with your SINGER M1600 sewing machine.
The wrong SINGER M1600 sewing machine presser foot is attached
Using improper or incompatible presser foot with a SINGER M1600 sewing machine can cause needles to become damaged due to repeated strikes against it. To minimize risk, ensure that the right type of presser foot is used for each pattern and double-check that all corresponding settings are correctly adjustedcisely worded. This will protect needles from damage and help maintain good results.
How to set the presser foot on the SINGER M1600 sewing machine
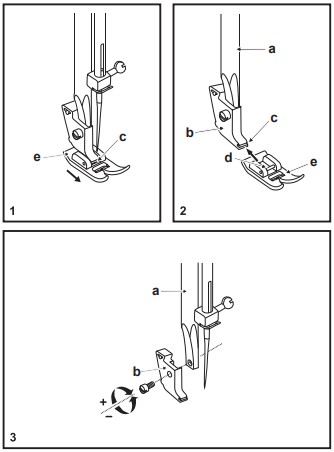
To remove the presser foot, push it (e) away from its slot (c). For attachment, insert the pin of the foot into its holder. To unclip and attach a shank: raise the bar (a), then affix or detach as shown in Figure 2.
IMPORTANT: Don’t forget to switch off (“O”) your device when completing any of these tasks!
Conclusion
To prevent needle breakage on a SINGER M1600 sewing machine, select a suitable needle size based on the fabric and thread type being used, adjust the thread tension as necessary, and make sure that the correct type of presser foot is attached. By following these tips, you can guarantee optimum performance from your SINGER M1600 sewing machine and flawless results in all your sewing projects! With proper care and maintenance, a SINGER M1600 sewing machine can provide years of reliable use.