
SINGER M1600 Sewing machine upper thread breaking
Are you having trouble with thread breakage on your SINGER M1600 sewing machine? Thread-breaking can be a common issue when using the SINGER M1600 sewing machine. To avoid thread-breaking issues while using the SINGER M1600 sewing machine, be sure to adjust your tension settings and use quality thread. Additionally, select the right type of needle size for each project you work on – replace it regularly to stay sharp and effective!
This article will provide tips and tricks to help you identify potential causes of your thread-breaking woes, and ensure successful stitching sessions moving forward. Let’s get started!
Causes of SINGER M1600 Sewing machine Upper Thread Breaking
Experiencing thread breakage on your SINGER M1600 sewing machine? Don’t worry – there are many potential causes that can be fixed quickly. Improper needle positioning or threading, tight tension, and a blunted or bent needle point could all lead to broken threads.
Additionally, the size of the thread may not match the corresponding machine’s needle size; burrs on presser feet might snag fabric; needles that are too long for this model machine specification cause issues; worn out take-up springs as well as excessively used tension discs containing grooves contribute to these problems.
It’s essential to address the imbalanced speeds of stitching, or else you run the risk of thread breaking on your SINGER M1600 sewing machine. To ensure a successful seamstress experience, all these factors must be considered beforehand.
Here are 9 the most common causes of upper thread breaking on a SINGER M1600 sewing machine and how you can fix them:
Your SINGER M1600 Sewing machine Is Not Threaded Correctly
For flawless performance and maximum efficiency of your SINGER M1600 sewing machine, it is essential to thread the upper yarn properly. With this simple measure in place, you can ensure that the upper thread won’t break and safeguard against any future complications!
How to Correctly Thread a SINGER M1600 Sewing Machine?
Although this is a straightforward task, it’s essential to get it right – otherwise, you may end up with some serious sewing issues.
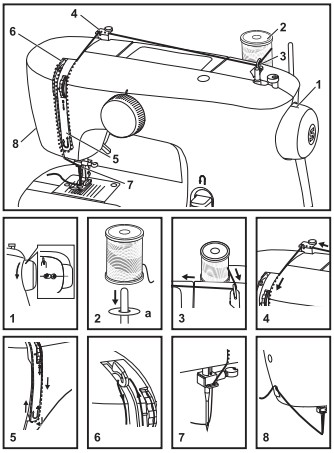
Threading the Upper Thread:
- Rotate the handwheel counterclockwise until the mark on it is facing upwards. This will elevate your needle to its peak position. Once finished, lift up the presser foot in order to undo any tension that may be set by the discs.(1)
- Securely affix the thread and spool pin felt (a) onto the spool pin for optimal results.(2)
Note: For safety reasons, make sure to turn off the power before threading – it is strongly recommended!
- Carefully draw the thread from the spool and guide it through the upper thread guide. (3)
- Carefully maneuver the thread around the thread guide as shown in the illustration. (4)
- To tension your thread, draw the thread down right channel and up to the left-hand channel. (5) For best results, hold onto the thread between its spool and guide as you do this.
- At the top of this movement pass thread from right to left through the slotted eye of the take-up lever and then downwards again. (6)
- Guide the thread behind the slender wire needle clamp guide (7) and then underneath it to the needle which should be threaded from front to back.
- Gently tug about 6-8 inches of thread away from the needle eye, then neatly cut it to length with the built-in thread cutter. (8)
Your SINGER M1600 Sewing machine Thread Tension Is Too Tight. Adjusting Thread Tension on SINGER M1600 Machine for Even Stitches
To achieve even thread tension with the SINGER M1600 sewing machine, adjust according to fabric and thread weight. If you pull too hard on your threads, they may snap – turn the dial counterclockwise for lighter pressure. If you are having difficulty fine-tuning bobbin tension or anything else feels amiss, reach out to an experienced technician right away!
Your SINGER M1600 Sewing machine Thread Is Poor Quality
As a SINGER M1600 sewing machine user, it is essential that you use the best quality thread for your projects. It’s not worth taking risks with thin and weak threads that can quickly break when pulled or too thick ones which might jam in the needle/tension discs. To ensure optimal results without any breakdowns during use, make sure to buy superior-grade threads specifically designed for SINGER M1600 machines!
Your SINGER M1600 Sewing machine Needle Is Damaged, Bent, or Dull
Over time, the SINGER M1600 sewing machine needle may become bent or broken due to extensive use of thick materials. There is also a chance that manufacturing flaws are present on the needle itself.
If you suspect deformation of needle, it’s definitely worth replacing the existing one for optimal performance! For best results we recommend switching out your needle after each project; however, if you find yourself dealing with more thread breakage than usual while sewing then its time to get a new needle.
You Are Not Using the Correct Needle in SINGER M1600 Sewing machine
To ensure your SINGER M1600 runs smoothly and avoid any jams or thread breakage, it’s essential to swap out the needle prior to each project. This is especially important if you’re working on thicker fabrics like leather, corduroy or denim – they require specialty needles that can handle increased thickness. By selecting the appropriate needle for each job, you’ll greatly reduce the chances of snapped threads and hassle-free sewing!
Your SINGER M1600 Sewing machine Needle Is Not Inserted Correctly
For the best stitching performance, correctly insert your SINGER M1600 sewing machine needle – with one flat side placed towards the back of your machine. When inserting the needle, be aware of the flat side that should face towards the back of your SINGER M1600 sewing machine–this is located atop its shank. With this knowledge in mind, you’ll reap reliable and consistent results each time.
To avoid a possible catastrophic event, double check that your needle is inserted all the way up and fastened securely. If you notice the screw has become loose or if it gets bumped, take extra precaution to make sure the needle isn’t hitting any part of your SINGER M1600 sewing machine such as the bobbin case or throat plate. It’s also important to ensure you’re not inserting it backward – this can lead to breaking of needles too.
Your SINGER M1600 Sewing machine Take-Up Lever Spring Is Broken
If you’re having difficulty starting to sew or your thread breaks right away, the SINGER M1600 sewing machine may have a broken or bent take-up lever spring that needs to be replaced. To ensure accuracy and safety, it’s best for this issue to be addressed by an experienced professional repair technician.
Your SINGER M1600 Sewing machine Bobbin Case Is Full of Lint
To prevent frequent thread breakage, it is imperative to maintain your SINGER M1600 sewing machine free of lint accumulations in the bobbin case. This will ensure smooth and snag-free stitching without interfering with hook timing. Keep it clean for luxurious results every time!
You Are Sewing Too Fast
When you stitch too hastily, the tension may become uneven and cause your thread to break. Therefore, it is vital that when sewing with a SINGER M1600 machine, or on any other project for that matter, you take your time – especially if you’re dealing with multiple layers of fabric. This will give the machine enough space for properly making its locking stitch without resulting in broken threads.
Conclusion
If you are experiencing thread-breaking issues on your SINGER M1600 sewing machine, it is likely due to an incorrect needle insertion, the wrong needle size for the fabric being used, improper thread tension, or a broken/bent lever spring. For high-quality results and minimal interruptions in future projects, regular maintenance and troubleshooting of your SINGER M1600 sewing machine are critical steps that should not be overlooked.