Singer Sewing machine breaking needles
The causes of sewing machine needle breakage can include using the wrong size needle, attaching the presser foot or attachment incorrectly, pulling fabric while sewing, using a needle that is too long or too short, not fastening the needle securely in the needle bar, and sewing over pins at an angle.
All of these factors can cause needles to bend and break, which can lead to poor stitch quality and machine damage. Taking the time to ensure that needles are the right size, securely fastened, and free from obstructions can help reduce needle breakage and keep sewing projects running smoothly.
List of the 6 main causes of breaking needles problems for the Singer Sewing Machine
Here are the main causes of needle breakage on Singer sewing machines:
- Using a damaged or bent needle
- Using a dull needle
- Using the incorrect needle size for the fabric being sewn
- Using the wrong needle and thread combination
- Incorrect thread tension
- Using the wrong presser foot for the fabric being sewn
Why break needles on the sewing machine Singer?
If your Singer sewing machine needle keeps breaking, you may need to investigate what is causing the issue instead of simply replacing it. There are various possible explanations for why a needle can break and a few fixes that you can attempt to resolve the problem. If any damage, no matter how small, is noticed on the needle then it should be changed in order to prevent disruption to your sewing.
Common Problems Causing A Needle Break in Sewing Machine Singer
There are 5 main problems that can cause a needle to break in a Singer sewing machine:
- The needle on sewing machine Singer is damaged, bent
- The needle on sewing machine Singer is Dull
- Incorrect needle size for fabric
- Wrong Singer sewing machine thread tension
- The wrong Singer sewing machine presser foot is attached
Let’s look at some common problems with the Singer sewing machine that can lead to needle breakage:Lets have a look at some of the common Singer sewing machine problems that can cause a needle to break:
The needle on sewing machine Singer is damaged, bent
The needle of a sewing machine can become worn or bent over time, especially if it is used on heavy fabrics. This can cause the needle to hit parts of the machine and break. To avoid unnecessary damage, sewers should use sharper needles and slow their stitching speed.
It is also possible that a needle may be faulty before being inserted into the machine – it is always a good idea to have replacement needles when sewing. If the needle is damaged, such as having breaks in it, and continues to be used, this can cause strain on the needle which will lead to breakage while sewing.
To prevent any interruptions, it is best to check the needle for signs of damage before beginning and replace it if necessary.
The needle on sewing machine Singer is Dull
If the needle is dull, it won’t be able to penetrate fabric and thread properly. This can cause skipped stitches, uneven stitch lengths, and poor quality seams.
To check if your needle is dull, you can use a pocket knife blade and try to scratch the needle with it. If your knife slides off easily, then your needle is still sharp. However, if there is resistance, it’s time to replace your needle with a new one.
It’s also important to change your needle regularly. Sewing machine needles should be replaced after 8-10 hours of use as they can get dull faster than you think. Replacing the needle will prevent any problems and ensure that you maintain good quality stitches.
It’s important to take care of your sewing machine needle, as it plays an essential role in creating a beautiful and professional-looking finish. Always check for any signs of damage or dullness before starting any project, and replace the needle if needed. By doing this, you can help ensure that your projects look great and will last for a long time.
If the needle is dull, bent, or otherwise damaged, replace it.
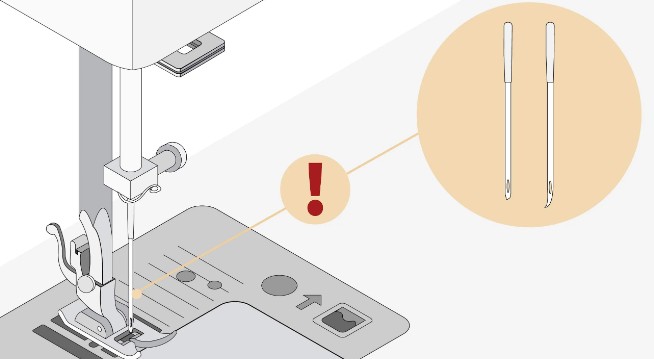
How to check the needle on a sewing machine
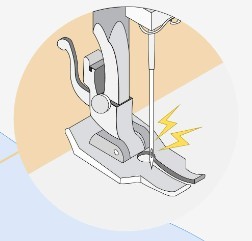
Before using a sewing machine needle, it is important to make sure that it is not bent. Place the flat side of the needle on a flat surface and ensure that the distance between the needle and the flat surface is even. Sewing with a bent needle can be hazardous since it could easily break while in use, resulting in injury. Therefore, it is best to only use needles that are specifically designed for home sewing machine use. Doing so will ensure that it won’t bend or break while in operation.

(1) Flat side (2) Needle type marking
– Correct needle
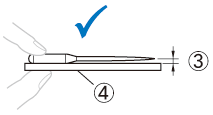
(3) Parallel space (4) Flat surface
– Incorrect needle
If the needle is not even with the flat surface, it is bent. Do not use a bent needle.
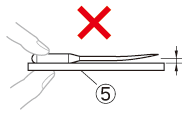
(5) Flat surface
Incorrect needle size for fabric
The type of fabric being sewed through can affect the size of needle necessary. When working with different materials, it’s important to switch needles to one that is best suited for that particular material. Excessive friction caused by a needle too big for the weave could result in needle breaking. Always select the best size needle for the fabric.
The sewing machine needle that should be used depends on the fabric and thread thickness.
Refer to the following table when choosing the thread and needle appropriate for the fabric that you wish to sew.
Needle and thread combinations
When selecting a needle for your Singer sewing machine, it is important to match the thread and fabric correctly. Refer to the provided chart that outlines the best combinations of needle, thread and fabric types.
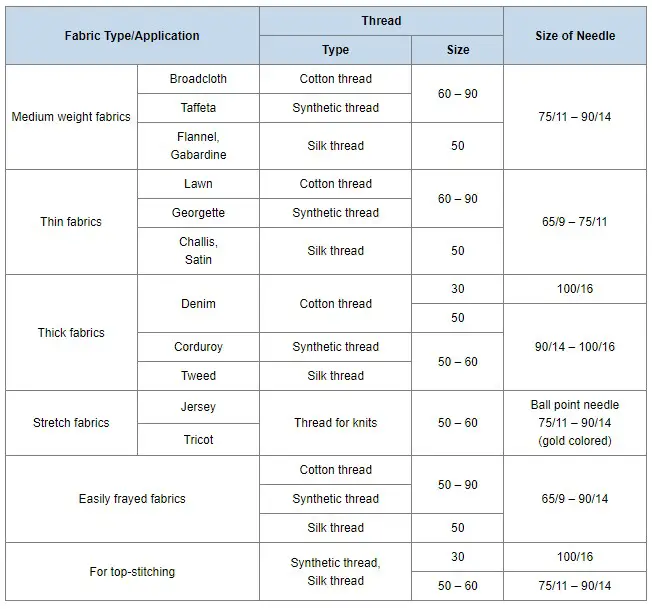
Important to know:
- Using a wrong combination such as a thicker fabric like denim with a small needle (e.g., 65/9 – 75/11) may lead to the needle breaking or bending, causing an injury. Additionally, it could result in uneven stitching.
- Never use a thread of weight 20 or lower. It may cause malfunctions.
- If sewing on stretch fabrics or materials prone to skipped stitches, opt for a ball point needle (gold colored) instead.
- When using transparent nylon thread, use a needle size of 90/14 to 100/16 regardless of the fabric and thread type.
- The smaller the thread number, the thicker the thread; and the larger the needle number, the thicker the needle.
Wrong Singer sewing machine thread tension
Thread tension is a key factor when sewing and preventing needle breakage. If the upper thread tension is too loose, it can cause the needle to bend or snap while moving through the material. You should adjust your machine’s thread tension depending on the weight of fabric and thread being used.
Make sure that both the bobbin and upper threads are of equal weighttension is an important element to consider when sewing and ensuring that your needle doesn’t break.
The wrong Singer sewing machine presser foot is attached
If the wrong type of presser foot is attached to the Singer Sewing Machine, it can cause the needle to repeatedly strike against it and eventually break. This can occur if the pattern being sewn requires a particular type of presser foot that is not compatible with the machine’s design or settings.
To prevent this from happening, be sure to use the correct type of presser foot for the pattern being sewn, as this will ensure that uniform stitches are formed and that the needle does not suffer any damage from striking against a wrong or incompatible presser foot.
Failing to do so can cause needles to break prematurely, incurring additional cost and time as replacements will need to be purchased. Additionally, it is also important to check the machine’s settings to ensure that they are properly configured for the type of presser foot being used. Doing this will not only help protect your machine’s needle but can also improve its overall performance.
10 Common Problems with Singer Sewing Machines
In addition to the common problems listed above, Singer sewing machines can also experience the following issues:
- Stitch Problems
- Sewing Machine Parts Problems
- Upper thread breaking
- Bobbin winding problems
- Bobbin thread problems
- Bobbin holder problems
- Bobbin tension problems
- Sewing Machine Keep Jamming
- Tension problems
- Sewing machine not feeding fabric
FAQ
How often should I change my sewing machine needle?
It is recommended to change your sewing machine needle after every 8-10 hours of sewing or after completing a project.
How do I know which needle to use for my fabric?
The size and type of needle you use will depend on the weight and type of fabric you are working with. Refer to your Singer sewing machine manual for guidance on selecting the right needle.
How do I adjust the thread tension on my Singer sewing machine?
Consult your Singer sewing machine manual for instructions on how to adjust the thread tension. You may need to adjust the tension manually or use the automatic tension setting.
How do I know if my presser foot is compatible with my fabric?
Your Singer sewing machine manual should provide guidance on which presser foot to use for different types of fabric. You can also refer to online resources for guidance.
Can using a low-quality thread cause needle breakage on my Singer sewing machine?
Yes, using low-quality thread can cause tension issues, which may lead to needle breakage. It is recommended to use high-quality thread that is appropriate for your fabric.
Conclusion. Singer Sewing machine breaking needles
In conclusion, needle breakage on a Singer sewing machine can be caused by several key factors such as incorrect needle size, wrong thread tension, and the wrong presser foot being attached.
To prevent this from happening, it is important to select the right type of needle for your fabric, adjust the thread tension correctly according to the material, and ensure that the correct type of presser foot is being used for each pattern. By following these steps, you can help protect your Singer sewing machine needle from unnecessary breakage.
By understanding the factors which lead to needle breakage and following the correct precautions, you can maximize the lifespan of your needles thus ensuring that your Singer 1304 sewing machine performs optimally. This will reduce the need for costly replacements and keep your sewing projects running smoothly.