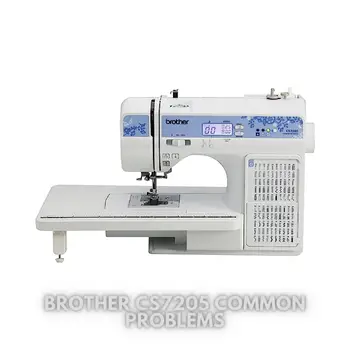
Brother CS7205 Common Problems and Troubleshooting
The Brother CS7205 is a feature-rich sewing machine designed to make your creative projects a reality. Let’s delve into its overview and understand its key specifications and features before we address the common problems.
Brother CS7205 Overview
Make your sewing and quilting dreams a reality with the CS7205 computerized sewing machine from Brother! This machine allows you to view all the built-in stitches at a glance with the convenient flip chart.
Choose from 150 decorative, quilting, and utility stitches, plus a sewing lettering font with 55 alphanumeric stitches for basic monogramming. Also featured are a large back-lit LCD display for easy viewing, even in low light, variable speed control, brightly lit workspace, drop feed dogs, automatic needle threader, and much more!
Packed with included accessories, this machine is a great value with 11 included sewing/quilting feet and a wide table.
Product Details and Features
| Brand | Brother |
| Color | White |
| Material | Plastic |
| Product Dimensions | 12.52″D x 16.26″W x 7.01″H |
| Item Weight | 1 Kilograms |
| Power Source | Corded Electric |
| Is Electric | Yes |
| Volume | 5 Cubic Centimeters |
| Warranty Description | 25 Year Limited |
Key Features
- 150 UNIQUE BUILT-IN STITCHES: The Brother CS7205 sewing and quilting machine includes 150 built-in stitches including utility, decorative, heirloom, 1 alphanumeric font, and 8 1-step auto-size buttonholes
- AUTOMATIC NEEDLE THREADER: This sewing and quilting machine includes an automatic needle threader that perfectly pushes thread through the needle
- QUICK-SET DROP-IN BOBBIN: Features a convenient, jam-resistant 1-step bobbin replacement and fast, automatic bobbin winding
- INCLUDED ACCESSORIES: The CS7205 includes a wide table, 11 sewing feet plus a quilt guide, a bilingual English/Spanish user manual, and more
- LCD SCREEN: View your stitch selections on the easy view, LCD display
Causes of Common Problems with the Brother CS7205
Before we delve into the specific troubleshooting solutions, let’s explore some common problems that users may encounter with the Brother CS7205 sewing machine. The following subsections will address these possible problems and provide effective solutions to resolve them.
Common Problems with the Brother CS7205
1. Stitch Irregularities – Skipped Stitches
Description of the problem: While sewing, you notice that the stitches are irregular, and the machine seems to skip stitches occasionally.
Cause of the problem:
- Dull or bent needle
- Incorrect needle size for the fabric
- Improper threading
Troubleshooting:
- Replace the needle with a new one that is suitable for your fabric type.
- Ensure you are using the correct needle size recommended for the fabric.
- Double-check the threading process and make sure the thread is correctly seated in the tension discs and through the needle’s eye.
2. Bobbin Winding Difficulties
Description of the problem: You encounter issues while winding the bobbin, or the bobbin does not wind properly.
Cause of the problem:
- Loose or unevenly wound thread on the bobbin
- Incorrectly placed bobbin
- Bobbin winding mechanism obstruction
Troubleshooting:
- Ensure that the bobbin is placed securely on the winding spindle and that the thread is wound evenly and tightly.
- Double-check that the bobbin winding function is engaged correctly.
- Inspect the bobbin winding mechanism for any obstructions or tangled threads, and clean if necessary.
3. Thread Tension Issues
Description of the problem: You notice uneven or loopy stitches on the fabric, indicating problems with the thread tension.
Cause of the problem:
- Incorrect thread tension settings
- Lint or debris in the tension discs
- Thread caught in the tension mechanism
Troubleshooting:
- Recheck and adjust the thread tension according to the fabric and stitch type you are using.
- Clean the tension discs using a soft brush to remove any accumulated lint or debris.
- Inspect the tension area for any entangled threads and remove them carefully.
4. Jammed Bobbin Case
Description of the problem: The bobbin case gets jammed or stuck while sewing, causing disruptions in your stitching.
Cause of the problem:
- Improper installation of the bobbin case
- Dirt or lint buildup in the bobbin area
- Worn-out bobbin case
Troubleshooting:
- Remove and reinsert the bobbin case carefully, ensuring it is properly seated and latched in place.
- Thoroughly clean the bobbin area to eliminate any dirt or lint that may be causing the jamming.
- If the bobbin case is damaged or worn, consider replacing it with a new one.
5. LCD Display Issues
Description of the problem: The LCD display on the sewing machine becomes unresponsive or displays incorrect information.
Cause of the problem:
- Loose or damaged LCD connections
- Software glitch or malfunction
- Electrical issues
Troubleshooting:
- Check and secure all connections related to the LCD display.
- If possible, update or reinstall the machine’s software according to the manufacturer’s instructions.
- If the issue persists, consult a professional technician to diagnose and fix any electrical problems.
6. Thread Breakage
Cause of the problem:
- Incorrect thread type or weight for the chosen needle and fabric
- Thread tension too tight
- Bobbin tension issues
Troubleshooting:
- Ensure you are using the right thread type and weight suitable for the fabric and needle being used.
- Adjust the thread tension to a suitable setting according to the fabric and stitch type.
- Inspect the bobbin for any irregularities in the winding or adjust the bobbin tension as needed.
7. Uneven Feed Dogs
Description of the problem: The fabric feeding mechanism (feed dogs) does not move the fabric evenly, resulting in uneven stitches and fabric bunching.
Cause of the problem:
- Dirty or obstructed feed dogs
- Incorrect feed dog height setting
- Worn-out or damaged feed dogs
Troubleshooting:
- Clean the feed dogs area and remove any lint or debris that may be hindering their movement.
- Adjust the feed dog height to the appropriate level as specified in the user manual.
- If the feed dogs are worn or damaged, consider replacing them with new ones.
8. Needle Breaking
Description of the problem: The needle frequently breaks while sewing, causing interruptions and potential fabric damage.
Cause of the problem:
- Using the wrong needle size for the chosen fabric
- Incorrect needle insertion
- Machine timing issues
Troubleshooting:
- Ensure you are using the correct needle size and type recommended for the fabric you are sewing.
- Double-check that the needle is inserted correctly, with the flat side facing the back of the machine.
- If the problem persists, there might be an issue with the machine’s timing, and professional repair may be required.
9. Jammed Reverse Lever
Description of the problem: The reverse lever becomes stuck or difficult to operate when trying to backstitch.
Cause of the problem:
- Accumulated lint or debris around the reverse lever
- Loose or damaged reverse lever mechanism
- Mechanical obstruction
Troubleshooting:
- Clean around the reverse lever area to remove any lint or debris that might be affecting its movement.
- Tighten or repair the reverse lever mechanism if it is loose or damaged.
- Inspect the machine for any mechanical obstructions that may be hindering the reverse lever’s functionality.
10. Bobbin Thread Showing on Top
Description of the problem: The bobbin thread appears on the top side of the fabric, creating unsightly loops.
Cause of the problem:
- Incorrect threading of the bobbin
- Thread tension imbalance
- Worn-out or damaged needle
Troubleshooting:
- Re-thread the bobbin following the machine’s threading diagram carefully.
- Check and adjust the thread tension to achieve a balanced stitch formation.
- Replace the needle with a new one, ensuring it is the correct size and properly inserted.
11. Uneven Stitch Length
Cause of the problem:
- Incorrect stitch length setting
- Dirty or damaged feed dogs
- Improper pressure on the presser foot
Troubleshooting:
- Adjust the stitch length setting to your desired length, following the machine’s guidelines.
- Clean the feed dogs thoroughly and check for any damage that might affect their performance.
- Ensure the presser foot is applying adequate pressure on the fabric for consistent stitching.
12. Loud or Unusual Noises
Description of the problem: The sewing machine produces loud or strange noises during operation.
Cause of the problem:
- Lack of lubrication in moving parts
- Loose or damaged components
- Foreign objects stuck inside the machine
Troubleshooting:
- Apply lubrication to the recommended areas as per the manufacturer’s instructions.
- Tighten or repair any loose or damaged components that may be causing the noise.
- Inspect the machine thoroughly to remove any foreign objects that might be causing the noise.
13. Thread Clogging in Bobbin Area
Description of the problem: Threads accumulate and get jammed in the bobbin area, affecting sewing performance.
Cause of the problem:
- Lint or debris buildup in the bobbin area
- Incorrect threading of the upper thread
- Bobbin case not installed properly
Troubleshooting:
- Clean the bobbin area thoroughly to remove lint and debris.
- Re-thread the upper thread carefully, following the machine’s threading diagram.
- Ensure the bobbin case is correctly installed and latched into place.
14. Needle Jamming with Fabric
Description of the problem: The needle gets stuck or caught in the fabric while sewing.
Cause of the problem:
- Using the wrong needle for the fabric type
- Insufficient presser foot pressure
- Feed dogs not moving the fabric smoothly
Troubleshooting:
- Select the appropriate needle type and size for the specific fabric you are using.
- Adjust the presser foot pressure to ensure smooth fabric feeding during sewing.
- Inspect and clean the feed dogs, and make sure they are functioning properly.
15. Error Messages on LCD Display
Description of the problem: The LCD display shows error messages or codes that you don’t understand.
Cause of the problem:
- Software glitch or corruption
- Malfunctioning machine sensors
- Incompatibility with selected settings
Troubleshooting:
- Turn off the machine, wait a few seconds, and then turn it back on to see if the error clears.
- If the error persists, consult the user manual or manufacturer’s website for information on the specific error message.
- Reset the machine to its default settings and try different combinations to identify any incompatibilities.
16. Thread Jamming in the Bobbin Case
Cause of the problem:
- Incorrect threading of the bobbin case
- Lint or debris trapped in the bobbin case
- Bobbin case tension issues
Troubleshooting:
- Re-thread the bobbin case, ensuring it follows the correct path as per the machine’s guidelines.
- Clean the bobbin case area thoroughly to remove any lint or debris.
- Adjust the bobbin case tension to achieve optimal thread tension.
17. Uneven Fabric Feeding
Description of the problem: The fabric is fed unevenly, causing an uneven stitch appearance and difficulties in sewing straight lines.
Cause of the problem:
- Uneven fabric thickness
- Worn-out feed dogs or presser foot
- Incorrect presser foot pressure
Troubleshooting:
- Use a fabric stabilizer or layer the fabric to even out the thickness while sewing.
- If feed dogs or presser foot are worn, consider replacing them with new ones.
- Adjust the presser foot pressure to ensure even fabric feeding.
18. Bobbin Running Out Quickly
Description of the problem: The bobbin thread seems to run out too fast, requiring frequent replacements.
Cause of the problem:
- Incorrect bobbin thread tension
- Bobbin winding issues
- High-speed sewing
Troubleshooting:
- Adjust the bobbin thread tension to ensure it’s not too loose or too tight.
- Recheck the bobbin winding process to ensure it’s correctly wound.
- Try reducing the sewing speed to avoid excessive bobbin thread usage.
19. Fabric Puckering
Description of the problem: The fabric gathers or puckers while sewing, affecting the overall stitch quality.
Cause of the problem:
- Incorrect thread tension
- Using the wrong needle or thread for the fabric
- Insufficient presser foot pressure
Troubleshooting:
- Adjust the thread tension to achieve a balanced stitch formation.
- Use the appropriate needle type and size, as well as suitable thread for the fabric you are sewing.
- Increase the presser foot pressure to prevent fabric puckering.
20. Bobbin Thread Not Catching
Description of the problem: The top thread stitches correctly, but the bobbin thread does not interlock properly, resulting in loose stitches.
Cause of the problem:
- Improper bobbin insertion
- Bobbin case misalignment
- Worn-out or incorrect bobbin
Troubleshooting:
- Ensure the bobbin is inserted correctly, with the thread feeding in the correct direction.
- Check that the bobbin case is properly aligned and securely latched into place.
- Consider replacing the bobbin with a new one that matches the machine’s specifications.
21. Needle Threader Malfunction
Cause of the problem:
- Threader hook misalignment
- Threader mechanism obstruction
- Worn-out threader components
Troubleshooting:
- Check and realign the threader hook to ensure it accurately catches the needle eye.
- Inspect the threader mechanism for any tangled threads or debris, and clean if necessary.
- If the issue persists, consider replacing worn-out threader components or seek professional repair.
22. Needle Overheating
Description of the problem: The needle becomes hot during extended sewing sessions.
Cause of the problem:
- High sewing speed
- Insufficient lubrication
- Needle friction against fabric
Troubleshooting:
- Try reducing the sewing speed to lower the needle’s heat generation.
- Apply lubrication to the recommended parts to reduce friction and heat buildup.
- Check if the needle is correctly inserted and not rubbing against the fabric excessively.
23. Uneven Thread Tension on Different Fabrics
Description of the problem: The thread tension varies when sewing different types of fabrics.
Cause of the problem:
- Different fabric thickness or texture
- Thread incompatibility with fabric
- Incorrect thread tension settings
Troubleshooting:
- Adjust the thread tension according to each fabric’s specific requirements and thickness.
- Use a thread type that is suitable for the fabric being sewn.
- Experiment with different thread tension settings to achieve balanced stitches on various fabrics.
24. Skipped Stitches in Thick Fabrics
Description of the problem: The machine skips stitches or struggles to sew through thick or multiple layers of fabric.
Cause of the problem:
- Insufficient needle size for thick fabrics
- Inadequate presser foot pressure
- Worn-out or incorrect needle
Troubleshooting:
- Use a larger needle size that is appropriate for sewing through thick fabrics.
- Increase the presser foot pressure to provide better fabric feed and stability.
- Replace the needle with a new one, ensuring it matches the fabric and sewing requirements.
25. Machine Not Powering On
Description of the problem: The sewing machine does not turn on, even when connected to a power source.
Cause of the problem:
- Power cord or plug issues
- Faulty power switch
- Internal electrical problems
Troubleshooting:
- Check the power cord and plug for any damage or loose connections. Consider trying a different power outlet.
- Test the power switch functionality and ensure it’s operating correctly.
- If the machine still doesn’t power on, there might be internal electrical issues requiring professional repair.
Brother CS7205 Sewing Machine User Reviews
Positive Reviews from Brother CS7205 Sewing Machine Users
- Many users were satisfied with the variety of built-in stitches offered by the Brother CS7205 sewing machine, allowing them to explore various creative projects.
- Users appreciated the clear and well-explained user manual provided with the machine, making it easy for beginners to understand its features and functionalities.
- Several customers praised the reasonable price of the sewing machine and the option to pay for it in convenient monthly installments.
- Customers who received the product highlighted the excellent packaging, ensuring the machine arrived safely without any damages.
- Some users found the Brother CS7205 sewing machine to be versatile, enabling them to create high-quality garments and undertake professional-level sewing projects.
- Customers admired the ease of use of the sewing machine, making their sewing tasks more efficient and enjoyable.
Negative User Reviews of the Brother CS7205 Sewing Machine
- Some users faced difficulties with the automatic needle threader, finding it hard to use and requiring manual threading instead.
- A few customers mentioned that the sewing machine did not have an alert system for when the thread ran out, leading to wasted time while sewing without sufficient thread.
- Several users found the trouble-shooting guide provided with the machine to be insufficient in addressing certain issues they encountered.
- Some customers experienced challenges with threading the machine, making it difficult for them to start using the sewing machine effectively.
- A few users encountered difficulties with the sewing machine’s reverse feature, finding it unnecessary and not adding value to their sewing experience.
All the information about user reviews is taken from the site Walmart.
Based on the reviews, it is evident that the majority of users are satisfied with the Brother CS7205 sewing machine, as it received a rating of 5.0 out of 5 stars. Users praised the sewing machine for its variety of stitches, clear user manual, versatility, and ease of use.
However, there were some concerns regarding the automatic needle threader, lack of thread alert, and difficulties in threading, which impacted a few users’ experiences. Overall, the positive feedback outweighs the negative, making the Brother CS7205 sewing machine a popular choice among customers.
Brother CS7205 Common Problems
Janome HD1000 Heavy-Duty Common Problems
Janome HD5000 Common Problems
Brother CS7205 Sewing Machine Manual
The operating instructions for the Brother CS7205 sewing machine can be found on the manufacturer’s website. You can access the official Brother website and navigate to the support or product page for the CS7205 model.
From there, you will find the user manual available for download or online viewing. The manual provides comprehensive guidance on setting up, operating, and maintaining the sewing machine, making it an essential resource for users to ensure proper usage and troubleshooting.
Brother CS7205 Frequently Asked Questions
1. How can I troubleshoot the issue of skipped stitches on my Brother CS7205?
If you are experiencing skipped stitches, try the following troubleshooting steps:
- Ensure you are using the correct needle size and type for the fabric you are sewing.
- Check the needle for any signs of wear or damage and replace it if necessary.
- Verify that the thread is properly threaded through the machine, including the needle and bobbin.
- Clean the machine’s bobbin area and feed dogs to remove any lint or debris that could be affecting the stitching.
- Adjust the thread tension as needed to achieve balanced stitches.
2. How do I resolve thread jamming in the bobbin case?
To address thread jamming in the bobbin case, follow these steps:
- Remove the bobbin case and clean it thoroughly, removing any tangled threads or debris.
- Check that the bobbin is wound correctly and inserted properly into the bobbin case.
- Re-thread the bobbin and needle, ensuring proper threading paths.
- Adjust the bobbin case tension if necessary, following the user manual’s instructions.
3. My Brother CS7205 sewing machine is not powering on. What should I do?
If the sewing machine is not turning on, try the following steps:
- Double-check the power cord connection to ensure it is securely plugged into a working power outlet.
- Test the power outlet with another device to verify if it’s functioning correctly.
- Inspect the power switch for any damages or faults and try turning it on and off several times.
- If the machine still doesn’t power on, consult the user manual for troubleshooting tips or contact customer service or a service center for assistance.
4. How can I prevent fabric puckering while sewing with the Brother CS7205?
To avoid fabric puckering, follow these steps:
- Choose the appropriate needle size and type for the fabric you are using.
- Ensure the thread tension is adjusted correctly to achieve balanced stitches.
- Use the appropriate presser foot pressure setting for the fabric being sewn.
- Consider using a fabric stabilizer or double-layering thin or lightweight fabrics.
Conclusion
When encountering any issues or problems with your Brother CS7205 sewing machine, it’s essential to refer to the user manual for proper troubleshooting and solutions.
If the problem persists or you need further assistance, don’t hesitate to contact Brother’s customer service or visit an authorized service center. Proper maintenance and understanding the machine’s features will help you get the most out of your sewing experience with the Brother CS7205.